Patrick McConnell
About Archive Also on Micro.blog
  • SwiftData Migrations and the Real World

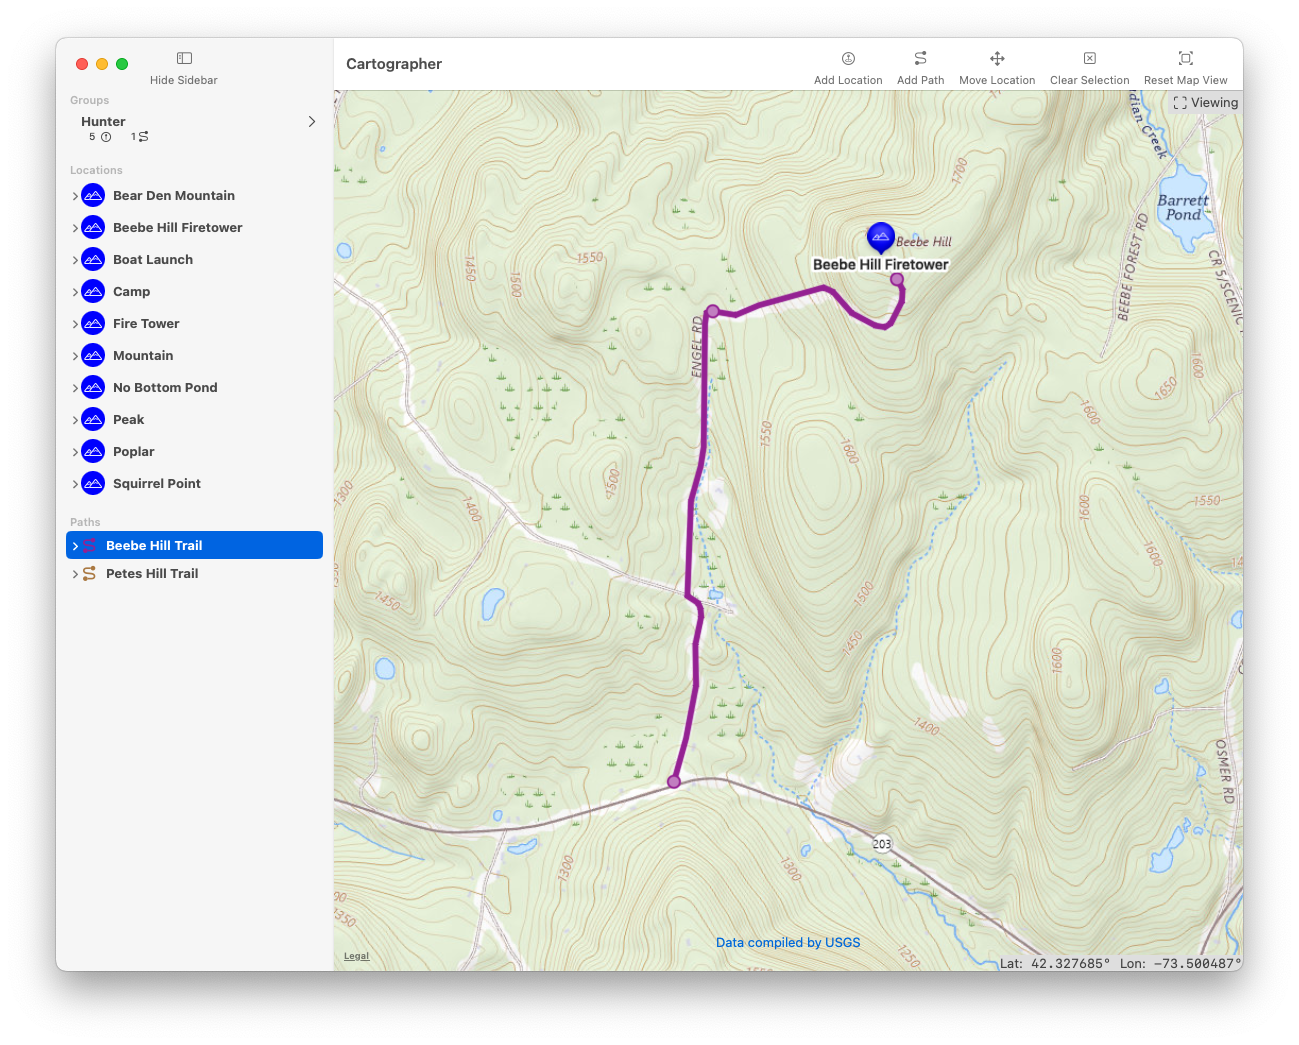
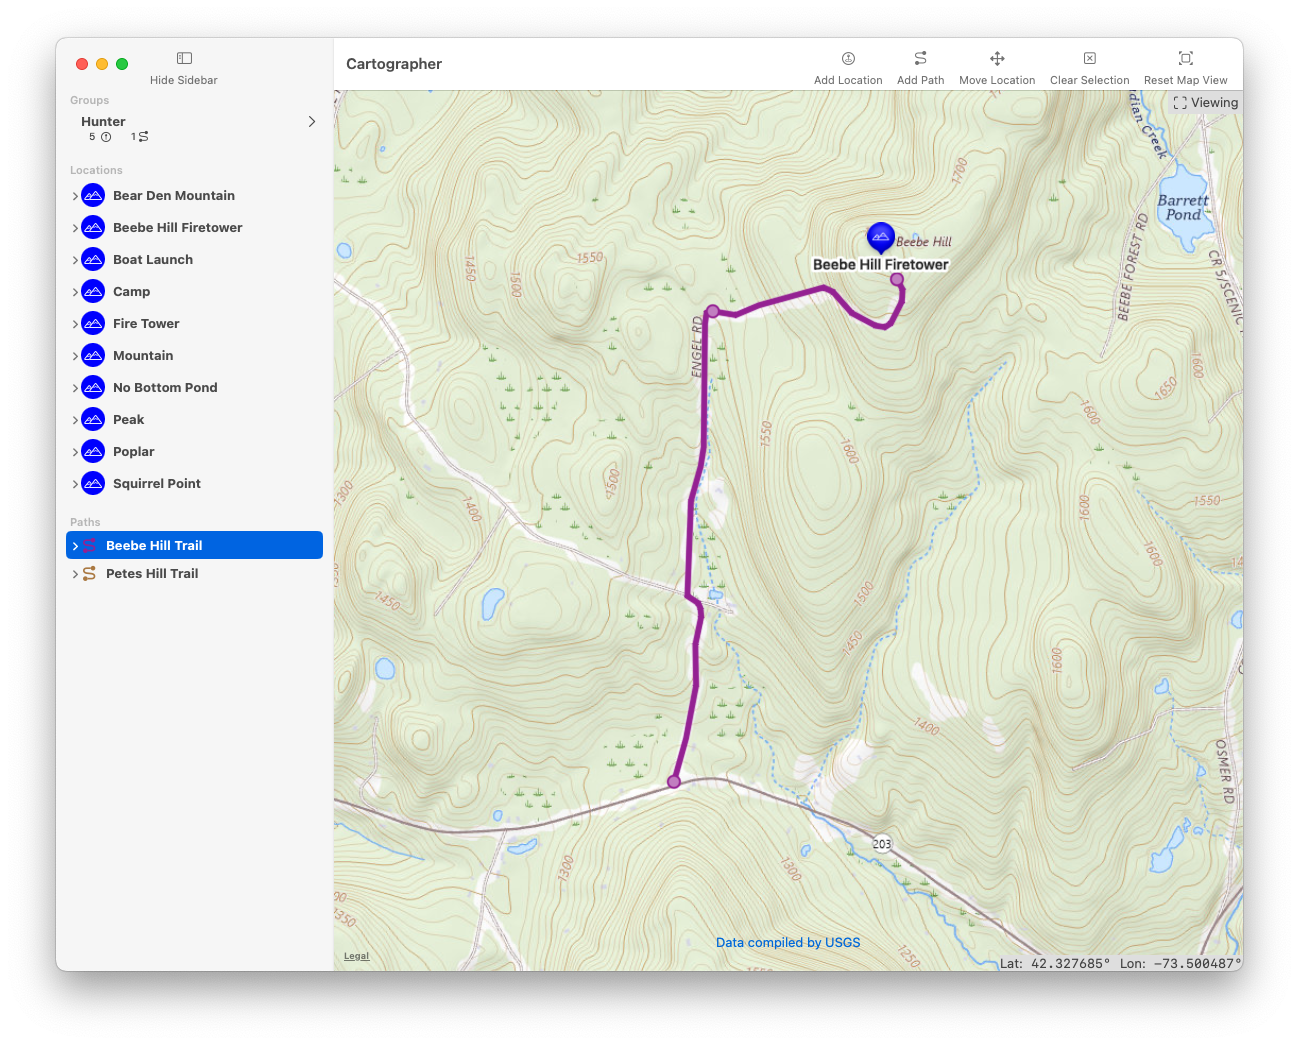
    My ongoing app project, Cartographer, uses SwiftData for its backing store. Before shipping I knew I needed to get a better grasp on how migrations are handled with SwiftData. I have a long roadmap of features I want to be able to add over time and I needed to be sure I have a handle on how my data models could evolve over time.Cartographer Screenshot.

    Cartographer is a native MacOS application using SwiftUI. It allows viewing and editing GPS data. You can plan future trips or review past adventures. I created the app to help generate data for some of my other map based app projects and to reduce my reliability on third party, mostly web based, tools. I’m also focusing on you owning your own data and privacy but that’s for another post.

    The two main data models for Cartographer are Locations and Paths. Each also has a relationship to a Waypoint that holds the information necessary to locate the item on the map such as latitude and longitude. A Location will have a single Waypoint while a Path will store a series of Waypoints to trace a route.

    Since the earliest iterations of the app, I’ve provided a Group as a way to organize collections of Locations and Paths. Say you are planning a multi-day trip and you want to break it up into several Paths, one for each day, and specific Locations along your route. You can place all these Paths and Locations into a Group to quickly display on the map all the data associated with the Trip you are planning.

    In SwiftData terms the Locations and Paths have a Relationship to a Group. A Location (or Path) can belong to one Group and Group can have many Locations. I elected to call my Group objects AnnotationGroup so as to not be confused with a SwiftUI Group. The Location Model looked something like this:

    (side note: I had to add Hashable conformance for the Model to stop Xcode from complaining about the Model not conforming to Hashable. Prior to this addition I would have to compile twice in order to get this error to go away so I added this declaration and the problem stopped. Go figure)
    This is not the entire model definition and a similar setup was used for Paths. This was fine and worked as expected. Later on in the development process I realized that a one Group per Location/Path relationship was not ideal. What if I want to use a Location in many Groups? I knew I needed to update my models in order to reflect this change.
    Since I was using SwiftData, the backing store (where the data lived) was on my Mac and changes to the Model definitions in my code (the Schema) would  cause errors upon launching the app. The app did not know what to do with the old data that didn’t match the new Schema. Up until this point if I changed a model I just deleted the data files and started over.  The default SwiftData app template will create a ModelContainer for you that stores it’s data at a path something like this:

    /Users/<your_user_name>/Library/Containers/<your_apps_bundle_id>/Data/Library/Application Support

    Within that directory you will find three files named:

    default.store

    default.store-shm

    default.store-wal

    These three files contain your apps data and the configuration needed to work with that data. If you are just beginning your project and frequently updating the models it’s fine to just delete these three files and start fresh any time you make a breaking change.

    The default app template using SwiftData will provide you with a typical ModelContainer setup and a Model to use. As you develop your app you will add more Models and in turn add them to the ModelContainer schema. This works fine during development or if the app you are building is not likely to have Schema changes once you are done. 

    In the real world for more than a tutorial app or a quick throwaway project, you are likely to need to continue to revise your Schema updating the Model definitions and migrating old data into a new Schema. If you’ve done work with a database backend before you know the drill.

    Your users will not want to delete their old data and start over each time you update your app. You are going to need to migrate older data into your newer formats.

    There are Apple Developer videos that explain working with SwiftData. They allude to Migration strategies but for the most part the content provided is not very deep. These are valuable learning tools to get started with SwiftData and you should certainly review these videos.

    Meet SwiftData

    Model Your Schema with SwiftData

    Dive Deeper Into SwiftData

    These videos and associated sample code will get you started working with SwiftData and handling simple data migrations across schemas. There are other tutorials and blog posts out there that more or less repeat the information in these Apple videos. There is nothing wrong with any of these resources except they leave out some details.

    In most non-trivial applications it’s up to you as the developer to take the frameworks, documentation and sample code in and come up with your own ways to use them in solving your problems.

    Unfortunately when it comes to SwiftData Migrations the documentation is all but non-existent.

    There are pages in the Apple Developer Docs that correspond to the required Structs needed to handle Migration but no relevant information is provided beyond the Struct or Method signatures. You will need to review the Videos, etc I’ve mentioned and do your own trial and error to get up to speed. Further, most samples and tutorials are trivial examples and solving real world problems will require trial and error.

    I’ve done some trials and made some errors and here is what I’ve learned. I don’t claim any of this is the correct way to do things but it worked for me and may be helpful to others.

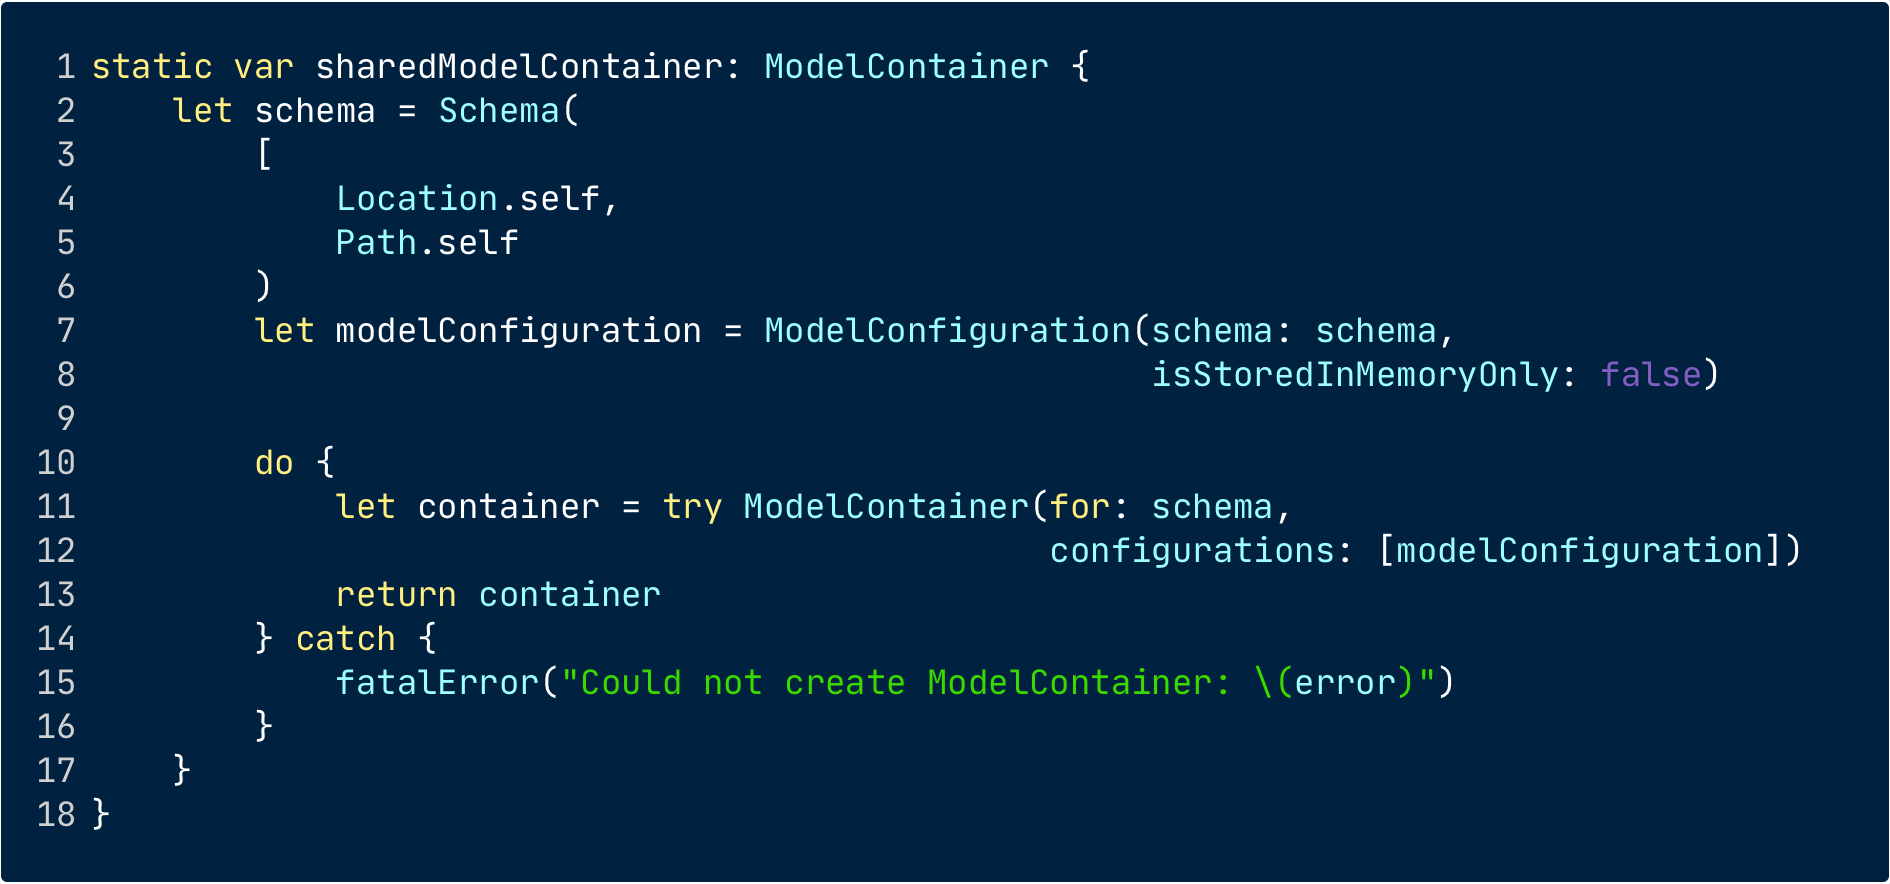
    In the standard template Xcode uses for apps using SwiftData, a ModelContainer is configured and created for you. This configuration can be tailored a bit to make some changes such as how and where to store the data but you generally are unlikely to need to do much more than add your models to the schema. A typical ModelContainer might be defined as follows:

    You can include all your Models in the schema but SwiftData is clever enough to add any related Models automatically. So in my case I can omit specifying Waypoint and AnnotationGroup Models as they are inferred by the Relationships defined in the Location and Path Models. Feel free to include them if you like but it’s not needed. I tend to include all my Models so I don’t need to think about it but I’ve left them out here for brevity.

    The default ModelContainer setup defines the Schema including what models are to be stored, how to configure the store and then returns the container. You can create more than one container to store different Models or different configurations for different use cases but this is the default setup the Xcode template provides.

    You might create a ModelContainer that is only used in Previews, for example, and you may change the `isStoredInMemoryOnly` setting to true as the Preview data is ephemeral and not required to be persisted.

    You then create Classes for each data type or Model you need. Using the @Model macro is enough to tell SwiftData that the Class is a data model. You can then use other SwiftData macros to specify things like Uniqueness and Relationships among the Model data.  

    You can do all this and have a working SwiftData application without any concern for Migrations. Then one day you realize you need to make a breaking change that will require migrating data from an old format to a shiny new format.

    In order to define how your data is transitioned from one schema to another you create versioned Schemas and a Migration Plan. I’ve used the term Schema throughout this article thus far but for the most part it’s just a specification of how your Models are defined from one version to another. 

    In my app, as I’ve explained earlier, I wanted to change the Relationship between a Location or Path so that each could belong to one or more Groups. This is called a Many to Many relationship. A Location may belong to many Groups and a Group may contain many Locations. It’s easy to define these relationships in your models. Just specify that the relationship is an Array of the desired type. In my case the updated Model looked something like this:

    The only change here is that the earlier version defined a Group (singular) Relationship and here the Relationship is to Groups (plural) and those are defined as an Array of Annotation Group.

    This would work just fine if I had no existing data.  I already created a bunch of Locations and Paths in the old format and I don’t want to recreate all that data to work with this new Schema.  If I was to run my app after making this change the app would crash with errors mentioning it didn’t know what to do with a Group, etc. The solution appears simple, I just need to take the old data and for each group a location belonged to insert that group into the new groups and carry on. Simple.

    So I will need a new versioned Schema with this updated Model definition. Again, simple.

    But wait I don’t even really have a versioned Schema for the original definition. I just used the default Model Container and defined a few models. How do I get from that to this new world of versioned Schemas?

    That part isn’t difficult either but like a lot of development work it’s a bunch of cutting and pasting and typing. It goes with the job.

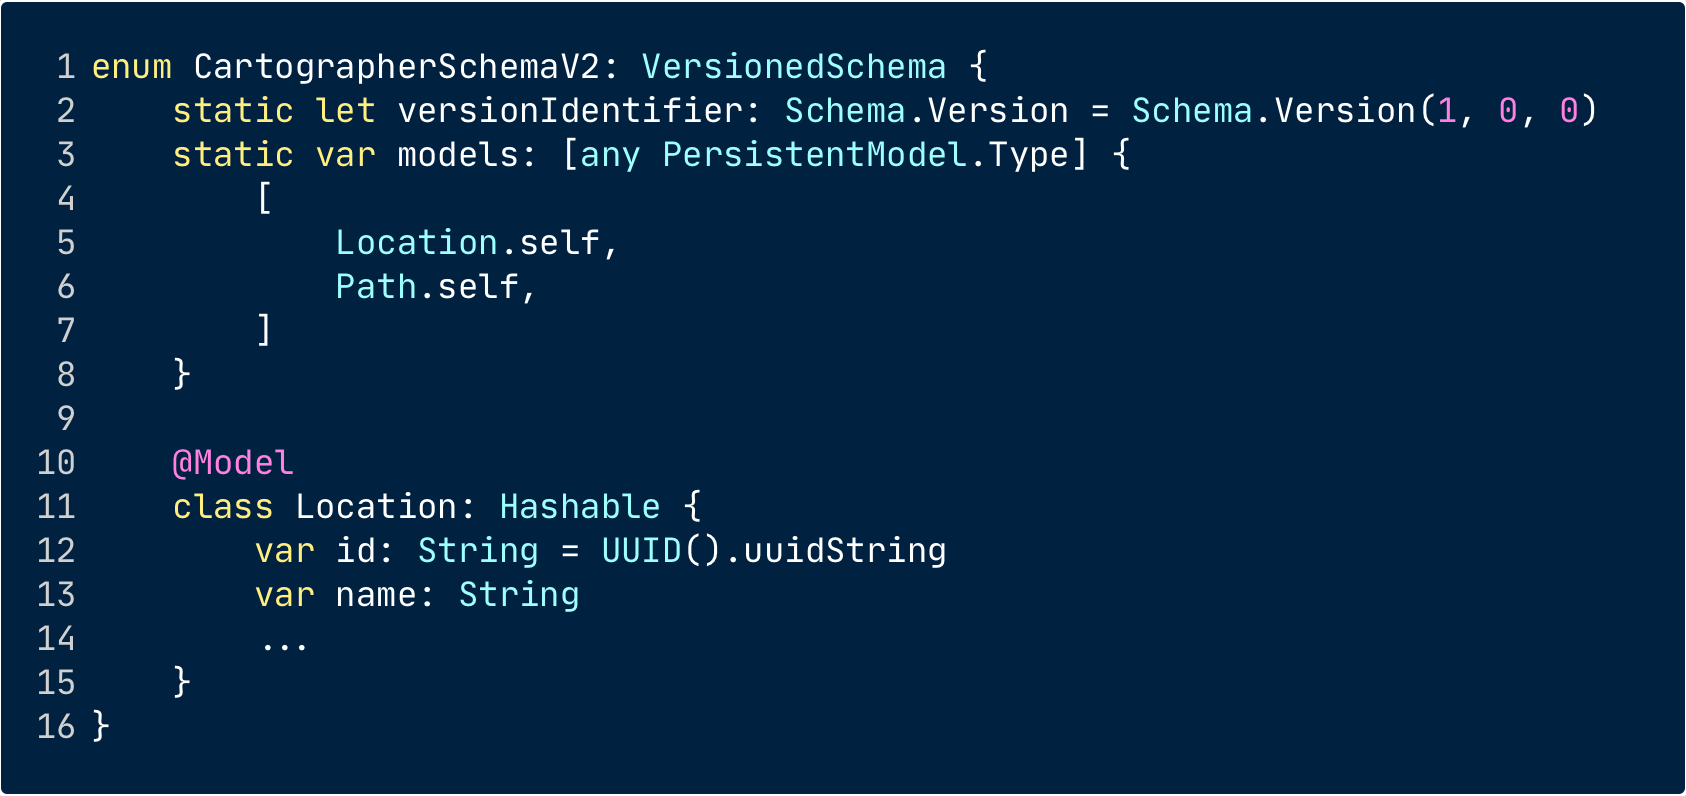
    To create a Versioned Schema you define an enum for the schema. In this enum you include the version, what models are covered and the Model definitions themselves.

    Wait I have to move my Models into this new enum? Yes. I don’t like i either. My Models contain a bunch more code not shown here and most of it doesn’t directly relate to SwiftData and what it needs.

    If you are not terribly concerned with how your code is organized in your project or on disk feel free to skip this next bit. It’s a me problem but perhaps it’s a you problem too?

    For example I have many @Transient properties to help with data presentation in the app. If you are not familiar with the @Transient macro, it essentially tells SwiftData you don’t need to be concerned with persisting this (i.e. dynamic properties.) Do I need to copy all that into this new versioned Schema?

    It turns out you don’t. You can if you wish but you don’t need to include the entire Model definition within the versioned Schema. You do need to include the base Model definition along with any stored properties and at least one init definition. You can then create an extension of the Model that may include other helpful code. Of course if any of that helpful code will need to be versioned it will need to be in this versioned Schema. I dislike the idea of of all my models being in this single enum so I’ve left a bunch of it defined as extensions of the Model stored in its own file within the project. You may not be as offended by this huge enum definition and if you are not, feel free to copy and paste your entire Model(s) into the enum. If you are in doubt just copy the entire Model into the new VersionedSchema.

    A typical VersionedSchema will define the version using a semantic numbering system (line 2) but the driving definition for use of the Schema is actually the enum type itself as we’ll see. You then specify what Models are included in the Schema and define the Models. Yes you have to include a minimum of a complete SwiftData Model definition for each model. If you have 10 Models you will have 10 classes defined within this enum.  And yes, you will need to repeat these Model definitions for each version of your Schema. None of this is difficult but it is a code maintenance issue and for those of us who try not to repeat the same code over and over it can be a bit painful. The reasons should be obvious but we don’t have to like it.

    In SwiftData Migration terms, I want to Migrate from SchemaV1 to SchemaV2. I will need to define each schema version in a VersionedSchema as shown above. 

    Once you have the Schemas defined you need to define the Migration Plan.

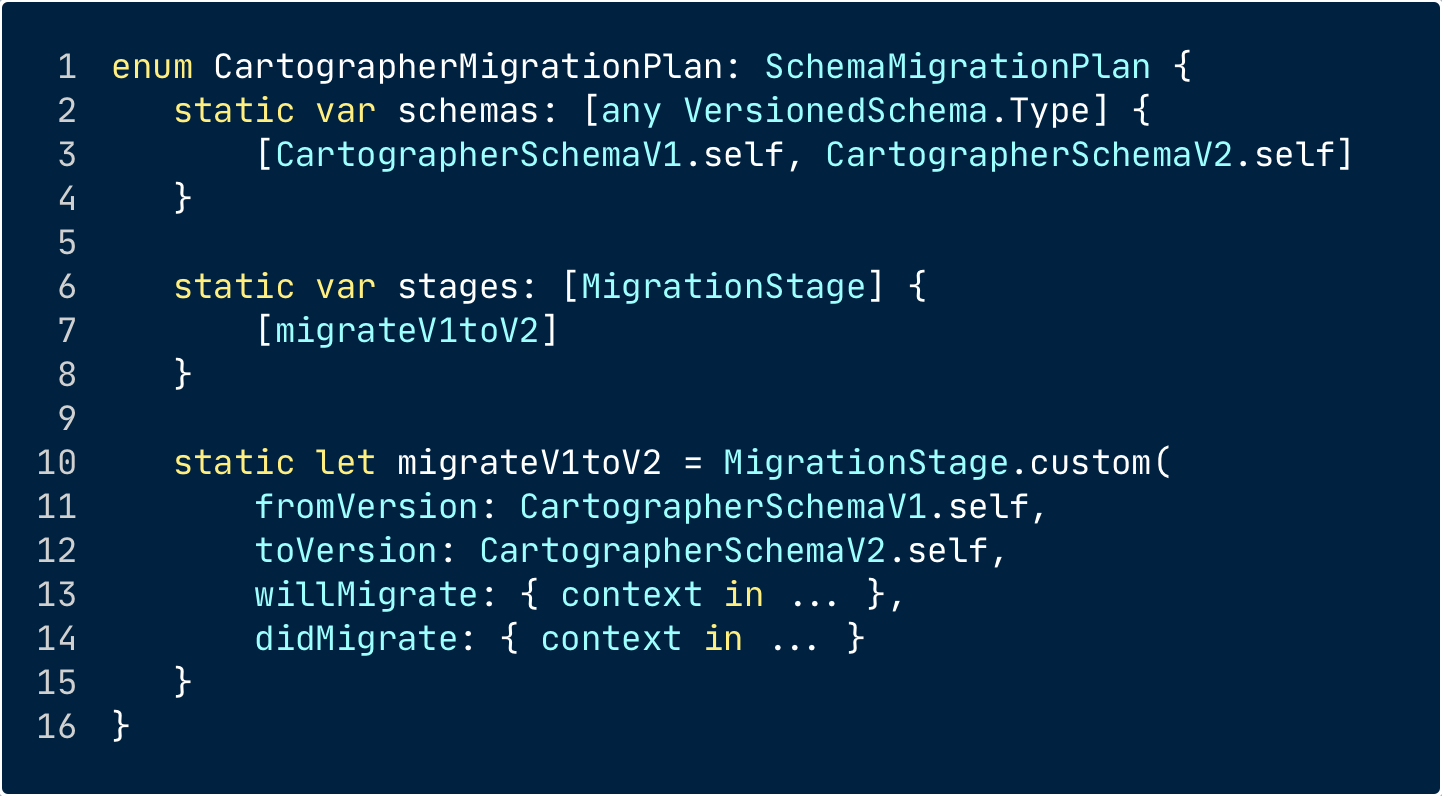
    A SchemaMigrationPlan is just what it sounds like, a plan on how the data is to be migrated from one Schema to another (or more.) A base SchemaMigrationPlan looks something like this:

    Again it’s defined as an enum and again the enum type will be important later. You specify which Schemas this Migration Plan is using and what stages to include.

    What is a Stage? A stage is a two step process that will be executed when the Migration is run. In the example above, I define migrateV1toV2 as a MigrationStage. You can have more than one stage but this is already confusing enough. Actually, you may think of reasons to have multiple stages. I didn’t use that ability.

    In defining a MigrationStage you indicate the starting Schema (fromVersion) and the end Schema (toVersion). Then two different closures will be called when your Stage is executed: willMigrate and didMigrate. Each closure will be provided a modelContext so you can manipulate your models and data as needed. Sounds good.

    What does that mean?

    WillMigrate is called first and will be provided with the ModelContext for the first schema. This may seem obvious and clearly it is self evident as the documentation for this method is completely empty in Apple’s Documentation. Sigh. You are given your old data in a Model Context. You can then make changes to that data if it makes sense or otherwise get a hold of the old data for use in the new context later. WilMigrate is called, as its name implies, before any migration has occurred.

    For example a few of the tutorials make note of adding uniqueness to a property that was not originally unique. Let’s say you have a name field and it’s a String. It’s possible prior to adding the Unique macro that users created non-unique names. When you are provided the context in the willMigrate closure you can then update any names that collide and write new values. If the new Schema still includes the name property this updated data will migrate across just fine with the new values.

    Refer to Apple's Developer Videos for a more detailed explanation of this type of migration.

    You don’t need to make any changes to any Models or properties that don’t change. My initial thinking was I needed to rewrite each old model into the new model format. You don’t need to do anything of the sort. In an increasingly rare instance these days of “it just works”, it just works. You only need to change things that won’t survive the migration. 

    What sort of things won’t survive or work with an automatic migration? Well in my example a change in a Relationship from a single to a many type won’t just work. If you recall from way earlier (and kudos for still reading this. Thanks!) I can “just” copy the old Group value and insert that into the new Groups property. Done. Not so fast. I only have the single context provided here and that context is the old Schema context that knows nothing about the fancy new Schema and it’s Groups (many to many) relationship. I can’t just do something like:

    newLocation.groups.insert(oldLocation.group)

    Though I sure wish I could.

    Here is where I will discuss what I did along with another concept that should achieve the same result in a different manner.

    As mentioned the willMigrate and didMigrate each receive a different context to work with. Basically they do as they are labeled. Prior to SwiftData performing the initial migration (willMigrate) of all the things it can do automatically you are given access to the old data and can manipulate it or as I said perhaps hold on to portions of it to be reused with the new context in didMigrate.

    So I’ll just declare some var to hold on to this data and read those values later. Here is another thing that feels a bit like a code smell. You can’t define any vars in your MigrationPlan or VersionedSchemas so you need to make them global. Not ideal. However, I feel that for the limited lifetime of a migration this is not the worst thing and all “rules” are made to be broken if not bent a little.

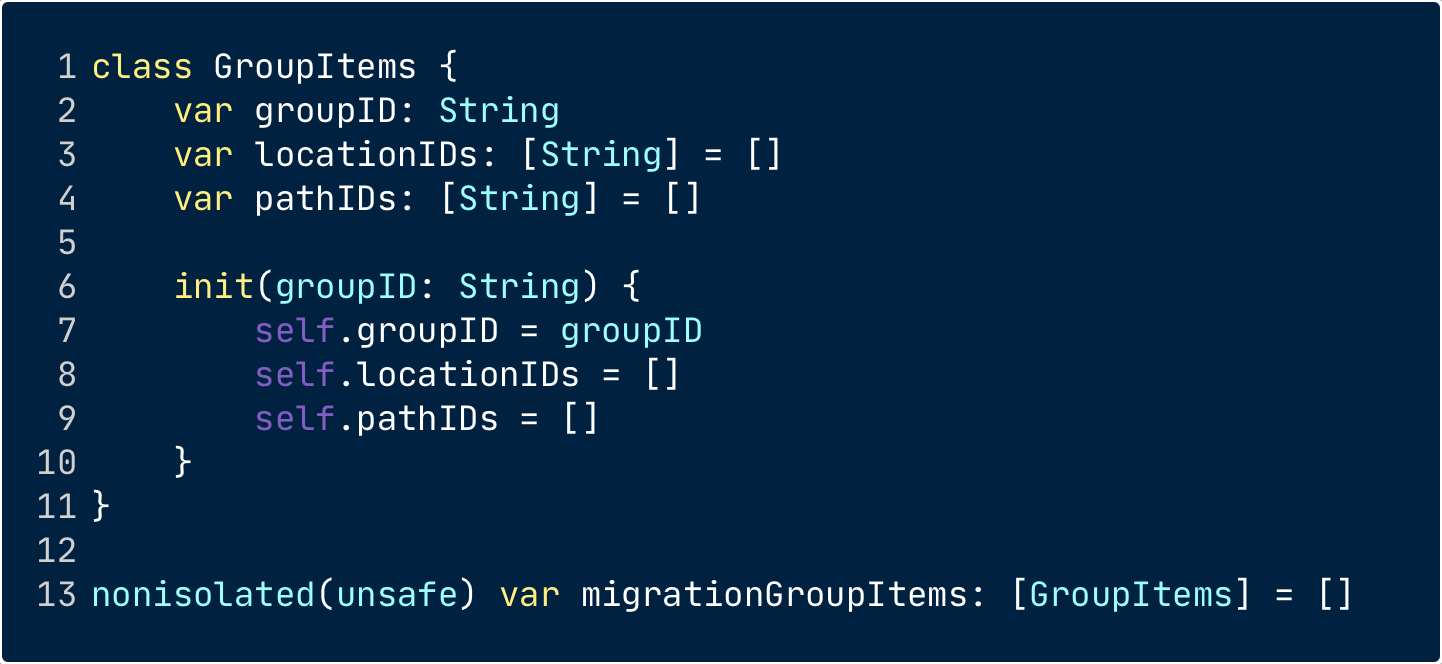
    I ended up defining a Class to hold the old data and an array of that Class to write from willMigrate and be read from didMigrate.

    This simple Class holds all the Locations and Paths that correspond to a Group with a specified ID. Seeing it in use may help explain. (Line 13 begins with a tribute to Modern Swift Concurrency to appease the compiler, praise Jobs.)

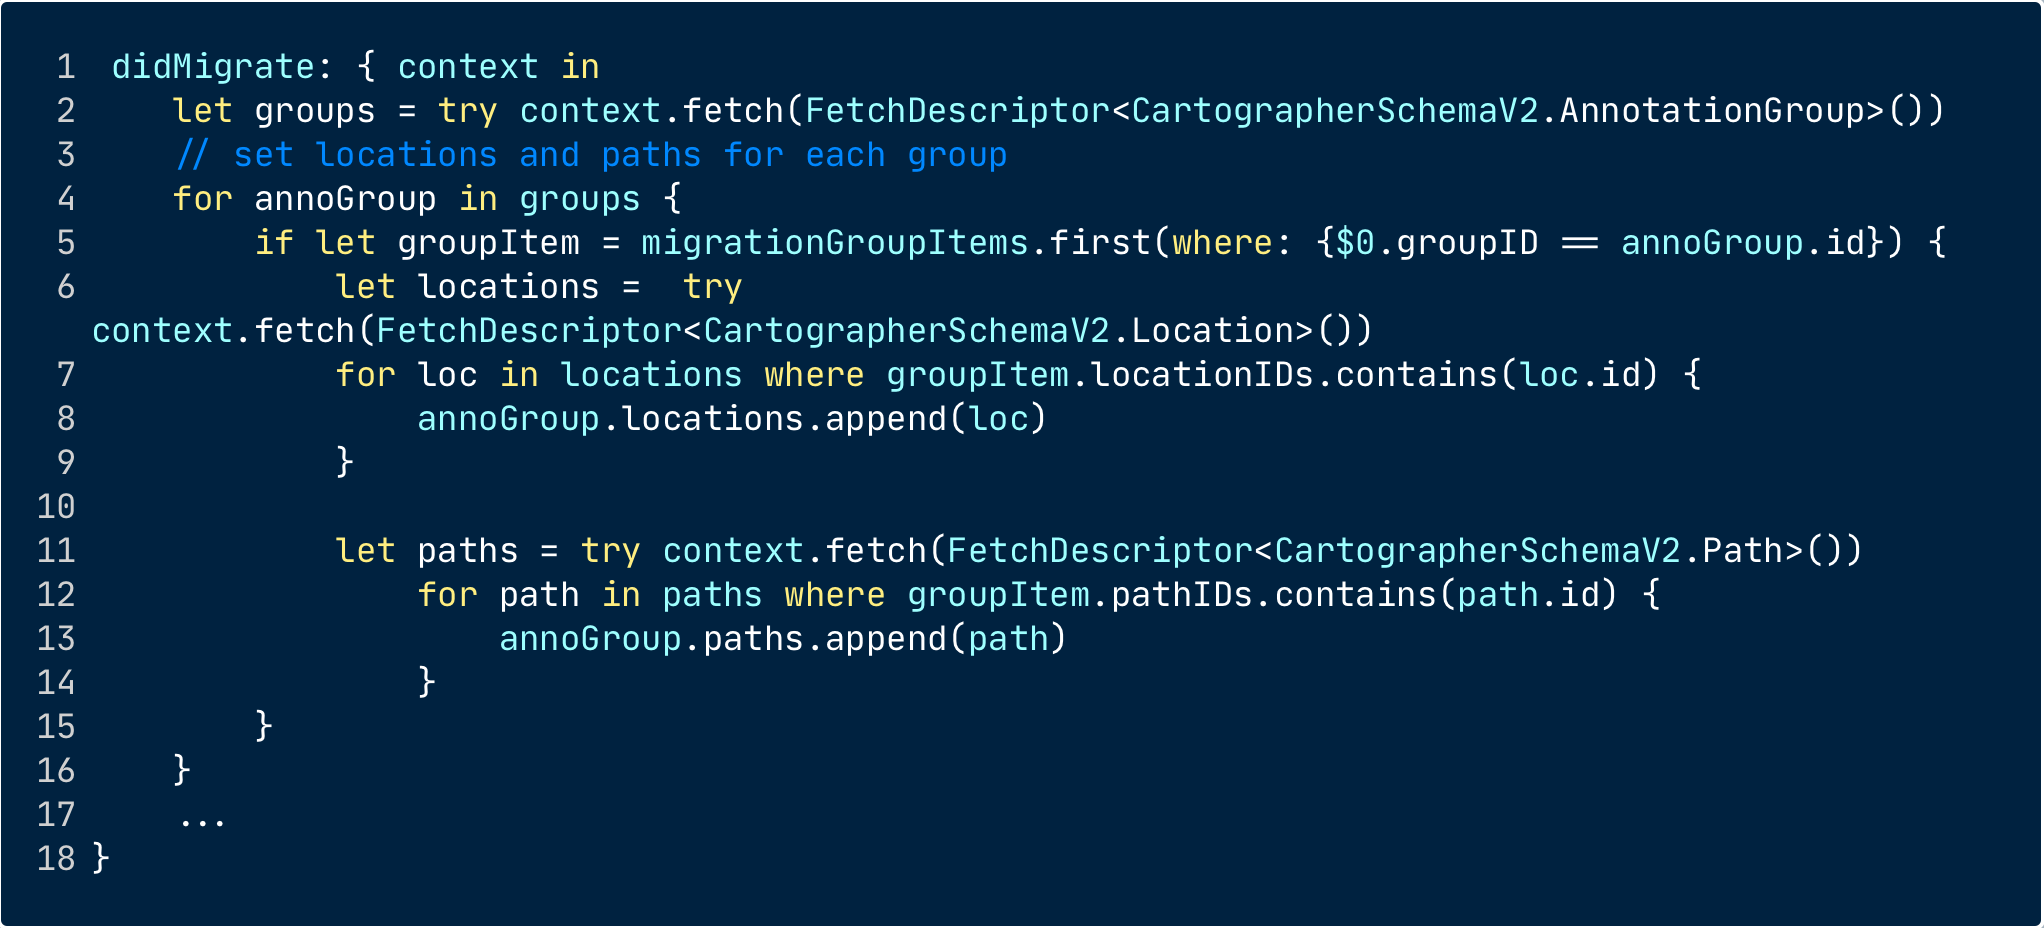
    Here is a portion of the willMigrate closure that creates a GroupItem for each group. When we iterate over each Location and Path later in the willMigrate closure we insert the Location or Path into the appropriate GroupItem. This happens in willMigrate where we have the original ModelContext (i.e. the old data)

    If you’ve followed thus far you can see where this is going. In didMigrate (with the new ModelContext) we then write all the data needed to setup the relationships for Locations and Paths to their associated Groups.

    The missing piece to put this all together is telling SwiftData to use this Migration Plan. This is done in your ModelContainer initialization. If you specify a migationPlan it will be executed prior to the container being created (line 2 below.) So all that magic (and tedious data manipulation) we outlined above will happen and your old data will be safe and sound in its new Schema home.

    As you add migrations you can continue to extend your migrationPlan. Keep in mind a user may have data from version 1.0 of your app and you have created several new schemas. The Migration Plan will need to assume always beginning with the first version.

    This all works as expected. My old data has been migrated and the new data is correct. Each Group still have the correct Locations and Paths and now Locations and Paths can be added to multiple groups.

    I was content with this solution. There is too many repetitive definitions of Models and a lot of boilerplate code but in the end the actual working parts are not too bad.

    A few hours after I had all this working it dawned on me that this could be done another way. 

    An alternate Migration Plan could use 3 Schemas. SchemaV1 is the original with only the single relationship Group. SchemaV2 would include BOTH Group and Groups. SchemaV3 would remove the original Group relationship. In SchemaV3 when you were given the ModelContext in willMigrate both properties would exist and you could read from Group and insert into Groups. Then when the migration was completed the original Group field would be dropped leaving only the new Groups.

    I believe this would work and perhaps this is what Apple intended and I’m sure they will document some best practices around this any day now.

    Is the alternate a better solution? I’m not sure.

    Keep in mind all the repetitive code you need to write for each VersionedSchema. Is that better than use of a global var to hold some temporary data? It wasn’t enough for me to redo my migration so it lives on as the version outlined here. Perhaps in another migration I will try the alternate way but I’m really allergic to that much repeated code. We’ll see.

    Some additional thoughts:

    Don’t start with VersionedSchemas when you’re just beginning your app development. It’s fine to tweak your models, delete the old data and carry on.

    It’s a good idea to create Git Branches with the original schema and any newer versions as you work through your migration journey. You are unlikely to get things correct the first few times and being able to load back up the old schema may prove handy.

    Backup the data stores (those default.store files) before you start making changes. Then you can always restore them rather than creating test data for your migration. 

    You will find that your Models now have type names such as SchemaV1.MyModel and in my case I put all these types into a Persistence Struct so I had to reference Persistence.CartographerSchemaV1.Location rather than just Location. The solution is to use a typealias such as:

    typealias Location = Persistence.CartographerSchemaV2.Location

    Keep in mind that while you are working thru your migrations this may confuse you a bit depending on the context you're working in. The point is once the migrations are all working your code can go back to referring to Location rather than the fully qualified type name. Remember to update your typealias as you add new Schemas.

    You can create reverse migrations, to go from V2 to V1 for example, if you have that need. I just kept deleting my data an importing some old format data when I needed to revert during the process.

    I’m hardly an expert here. I had to solve a problem and found the existing documentation lacking. Nothing I read was wrong but as is often the case it didn’t provide the full picture. I tried things until I found what worked. I’m not claiming I sat down and wrote the code you see here. It took iteration. It’s complex stuff but when broken down into its parts it’s not too bad.

    I’ve joked along the way about Apple and their documentation and those jabs are warranted. The documentation is all but non-existent. Still SwiftData and these Migrations are a good system. Perhaps it can be improved but it does work and gives you tools to do complex things.

    If you’ve read this entire brain dump I applaud your efforts. I don’t expect this explanation of SwiftData Migrations to be directly applicable to your apps data models but hopefully it provides more insight into how Migrations work and provides new ways of thinking when it’s time for you to deal with Migrations. 

    As always if you have questions or comments reach out on Mastodon

    Even better, If you are looking for help with your Apple Development Projects then get in touch. I’m available to hire on a remote freelance basis. If you have a full-time gig doing interesting things for the greater good and don’t make people run through a code puzzle gauntlet in your hiring process I would entertain that as well.

    → 3:03 PM, Apr 15
  • Creating an Image from an MKMapView

    Apple's MapKit provides some great tools to add maps to your Mac or iOS apps. Unfortunately, it may not provide all the features you need.  SwiftUI has its own implementation of MapKit but it’s missing a lot that is still available in UIKit/AppKit. Something both implementations share is the inability to export or print an image of your map showing any markers or tile overlays. 

    For my current MacOS app project I’m making use of a lot of overlays and annotations so I’ve elected to use MKMapView via NSViewRepresentable. If you’re not familiar with NSViewRepresentable, it allows using AppKit views in your SwiftUI projects. If you need the (mostly) full features of MapKit you will need to revert to the older AppKit/UIKit implementations.

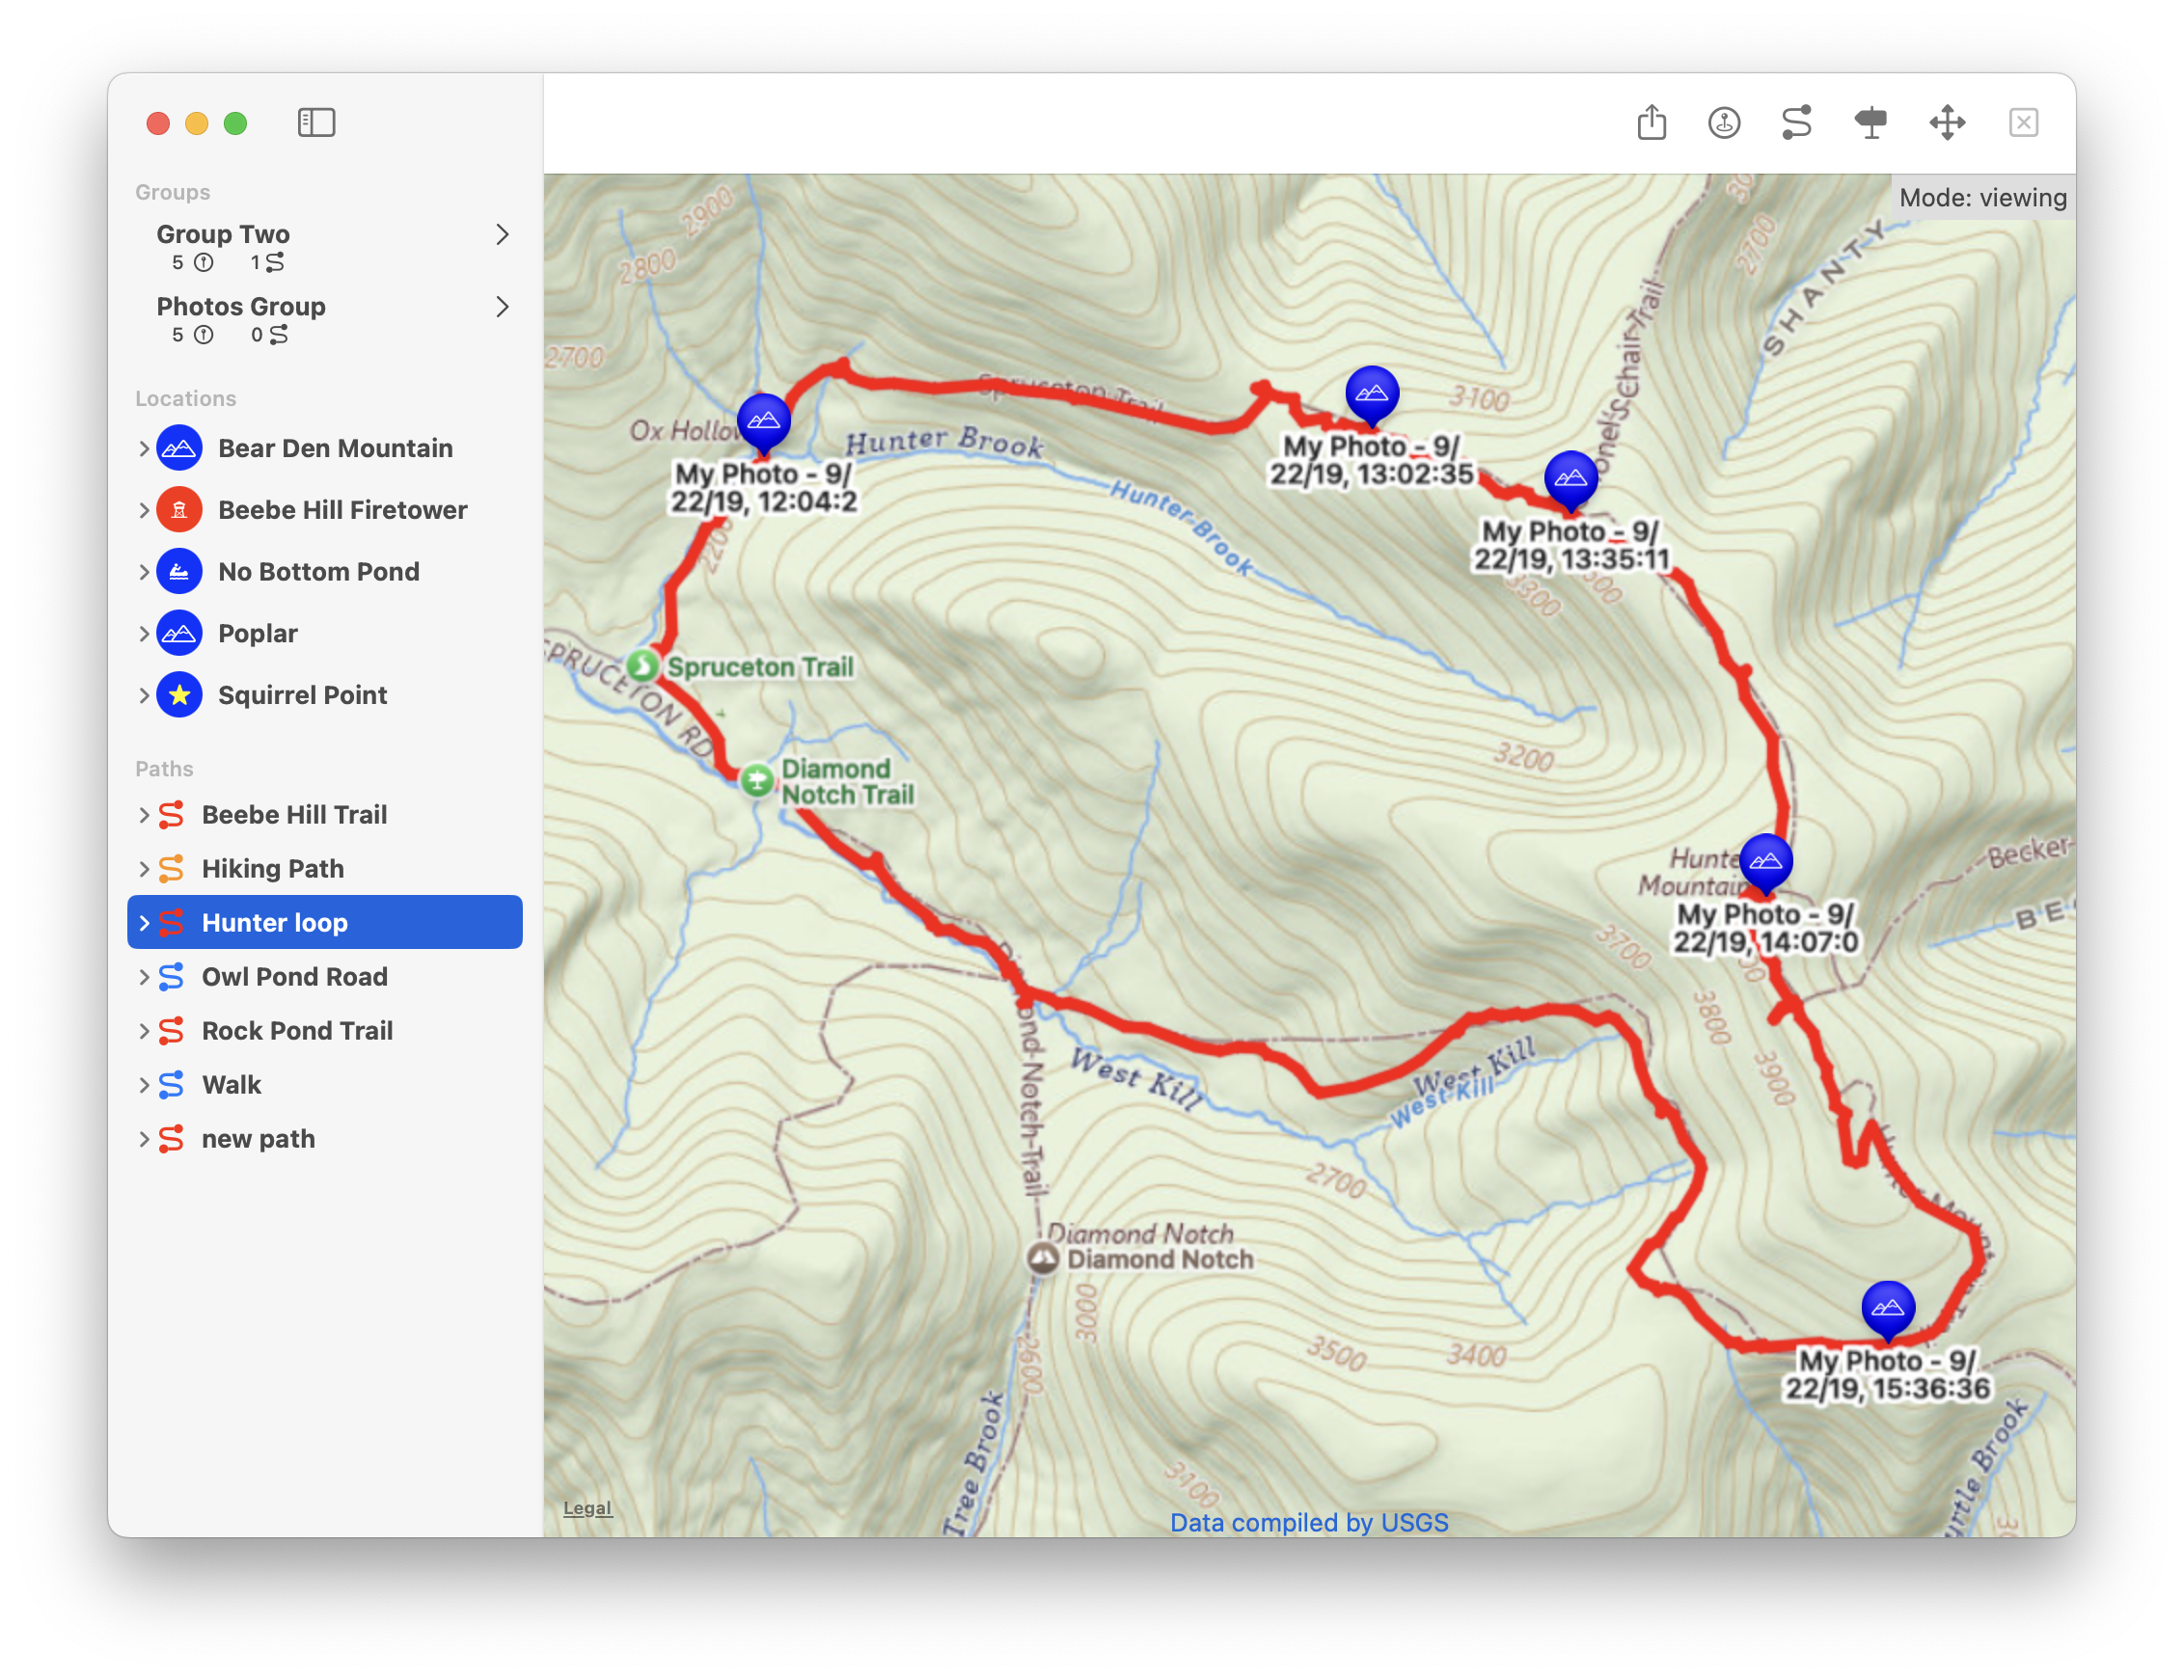
    Cartographer Screenshot.

    My app, Cartographer, is a GPS data viewer/editor. It allows you to create maps with paths and locations. You can import or export data from GPX files, a standard GPS exchange format.

    Many people just import GPX data into their favorite map device such as an iPhone or Garmin. The paths and waypoints are displayed on a map on the device and you can use the information for navigation.

    But what if you want to share your map as an image or even print it for some real old school navigation?  Not to mention paper maps don’t need cell service or batteries. This is one of the areas where MapKit falls short. 

    SwiftUI offers imageRenderer to generate an image from a SwiftUI View. if you’re working with SwiftU’s MapKit implementation, you may think you can just call that and you're all set. Unfortunately imageRenderer won’t work with complex views such as Webviews and MapViews.

    If you’re working with older MapKit implementations, as I am, you might try to use some code to just convert your view to an image and export or print that. That will work. Sorta. Depending on how you try to convert your mapView to an image you will get different results all of which fall short. 

    If your map uses tile overlays to display custom map types, such as topographic maps, you may or may not get an image that includes those overlays. If you are displaying any kind of map Annotations they will not be included in your image.

    While this is frustrating the reasoning makes some sense. You will notice that if you zoom in/out on your map that the map and any overlays (tile or others like polylines) will scale to your maps zoom level. Markers will always remain the same size and be anchored to the map locations they are associated with. This is good and the expected behavior.

    However the way the MapKit framework achieves this is by storing the Annotations in a separate subview. That subview will not be rendered if you try to convert the mapView to an image.

    I want to export the map view as it appears in app. Users expect that and anything less is not worth shipping.

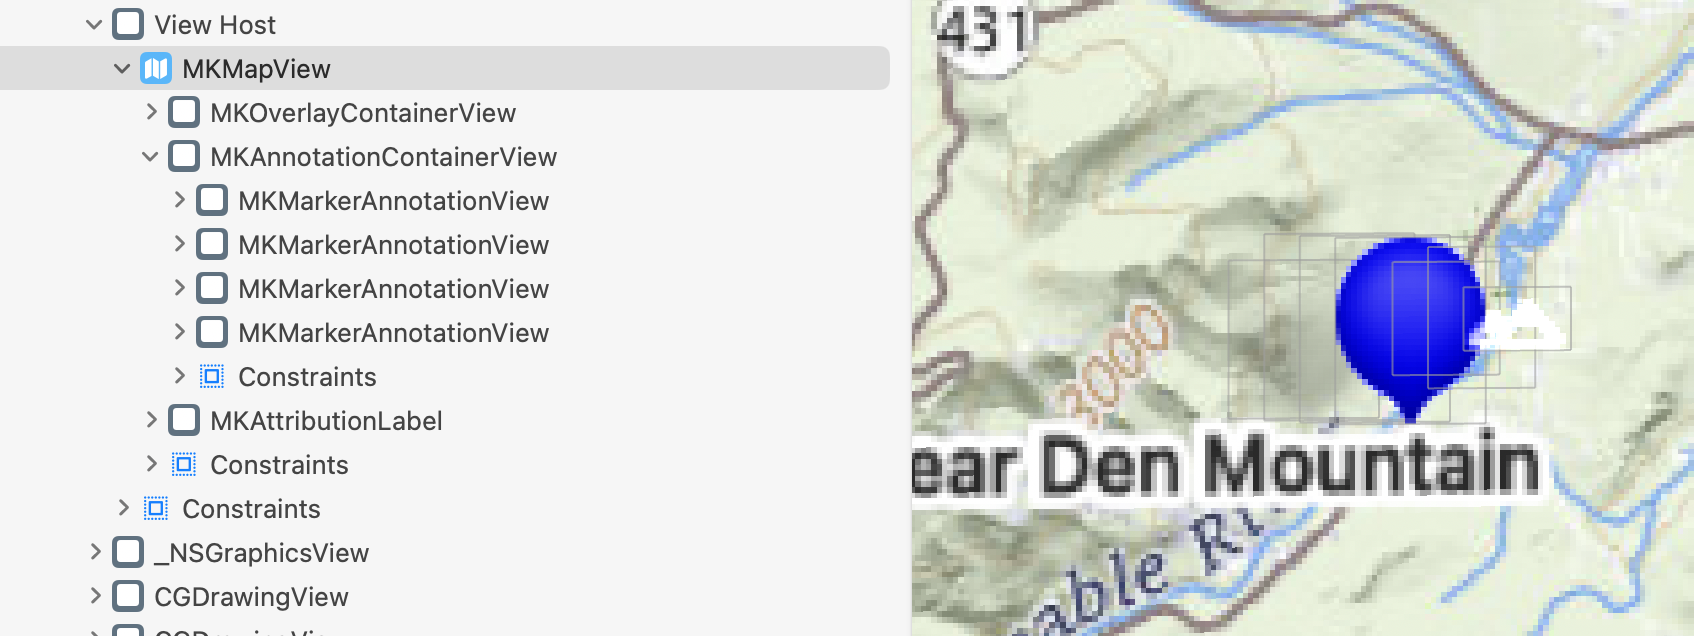
    With some digging in Xcode’s debugger I was able to determine the view hierarchy for a MapView. 

    View hierarchy.

    Using Xcodes View Debugger you can see that a MKMapView has a few container subviews. For reasons unclear to me the method I’m using to generate a map image will include the map overlays but not the markers. I assume this is due to the previously mentioned scaling of the map content.

    We can see that there is an MKAnnotationContainerView. This seems like a likely candidate to hold the annotations displayed on our map. 

    From there we can see the handful of views that build up the marker. At first I thought I would have to manually draw or composite the marker bubble and the associated glyph for each marker onto the map image I was generating. Then I thought if I can just create an image from the entire MKAnnotationContainerView I could composite that over the map image and be done. Turns out, that works.

    This is how I accomplished the generation of an image from a map view. It’s a bit of a hack and could break as it relies on grabbing subviews of the map view based on their index. Apple could change or break this at any time but the MapKit framework is pretty mature and I feel somewhat safe shipping this.  Most importantly this solution doesn’t make use of any private framework items so it should be fine to ship.

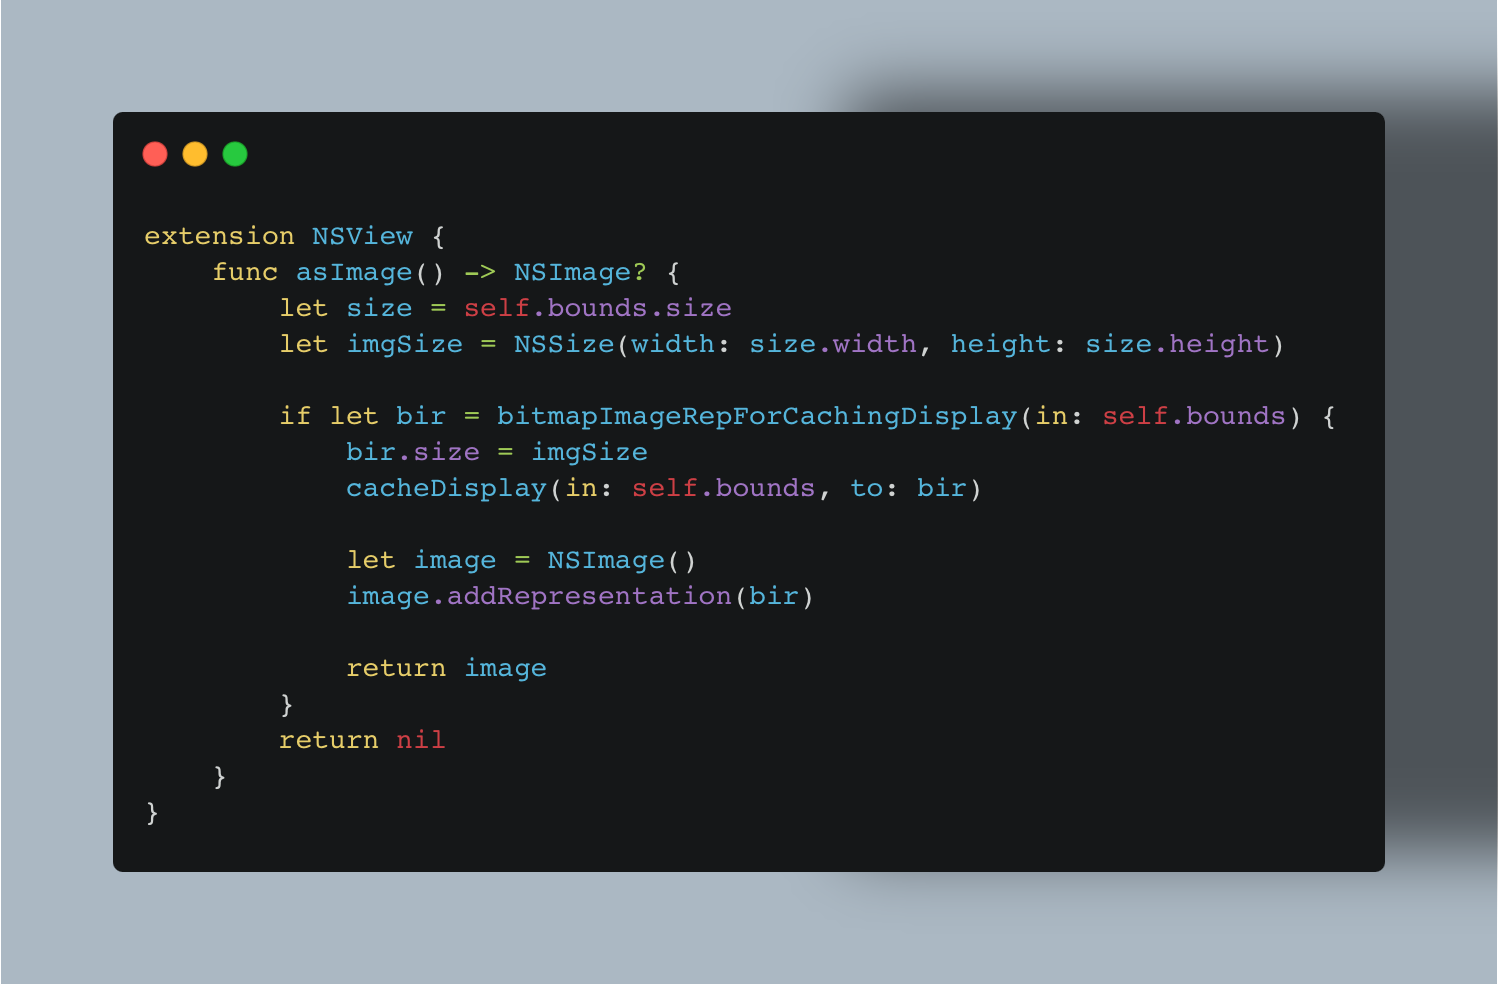
    The first piece of the puzzle I’ve been alluding to is creating an image from a view. There are several ways to accomplish this but this is the one I’ve used in my app.

    asImage method

    This creates an extension on NSView (you can use these same methods for iOS, just swap in the UIView equivalents) I created the extension on NSView and not MKMapView as the container view for the annotations is a different type and it’s not publicly exposed so Swift will balk if you try to extend that.

    This code takes any NSView or subclass and generates a NSImage from it. Passing a MapView will result in an image of the map as it appears in your app but it will be missing any Annotations. As I said earlier, this method will create any overlays including tile overlays. So in my usage, this creates an image with the custom tile overlays and any paths currently in view.

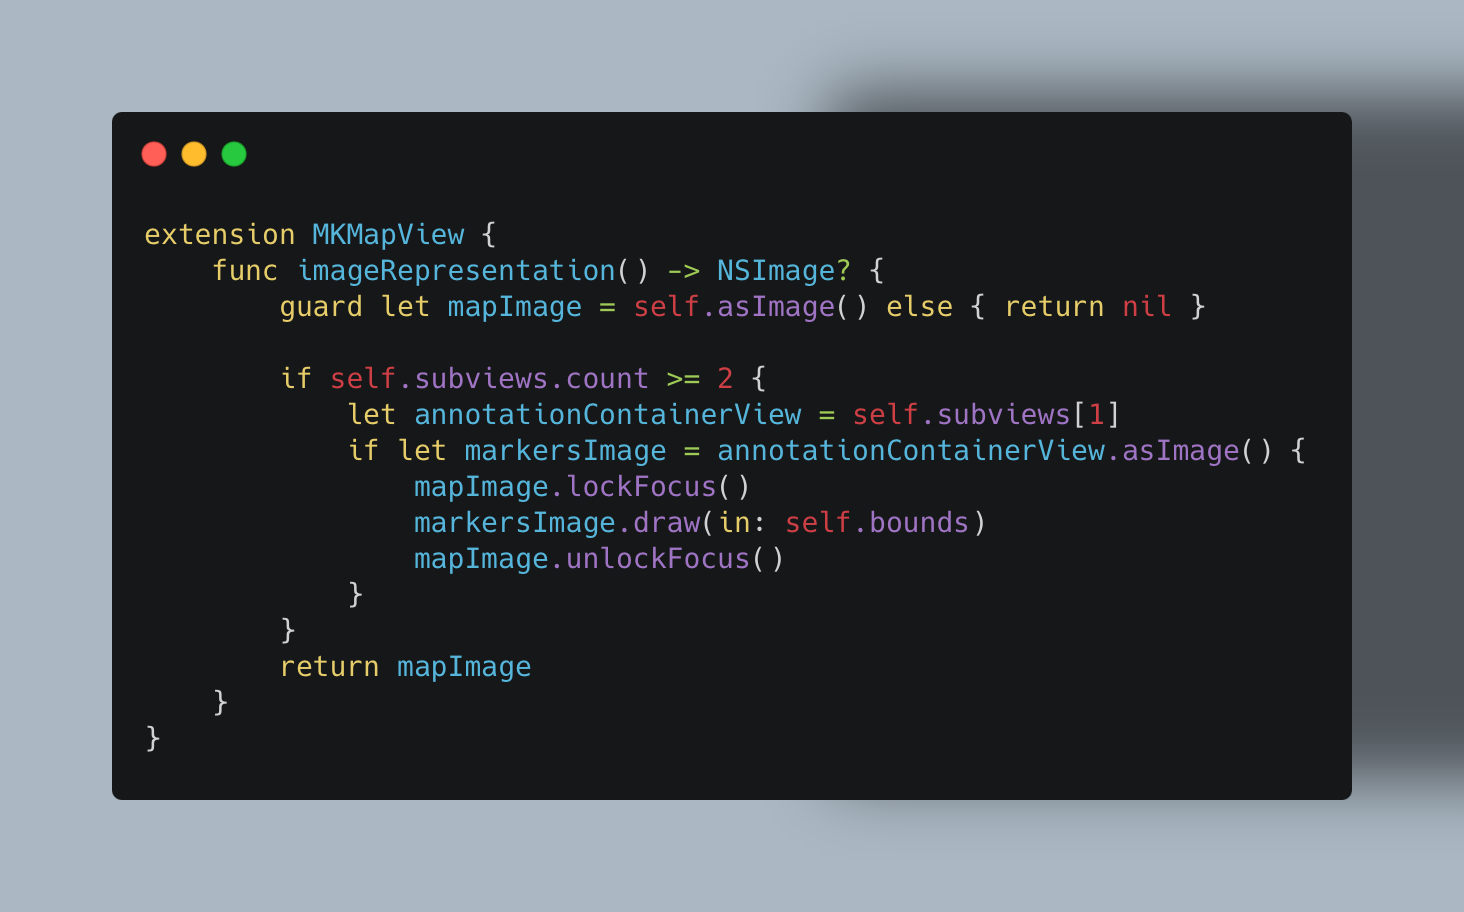
    That’s a good start but what about the markers? Since the MKAnnotationContainerView is a subclass of NSView we can just use the same method to generate a second image that contains only the annotations. Luckily for us, the MKAnnotationContainerView is the same size as the underlying mapView so it makes it trivial to composite the marker image over the map image.

    imageRep Method

    This extension on MKMapView will return an image that is an accurate depiction of the current map including all annotations and overlays. It does make assumptions that mapView.subview[1] is the annotation container but that appears to work.

    so now a call to

    mapView.imageRepresentation()

    will return an image that you can then print or export.

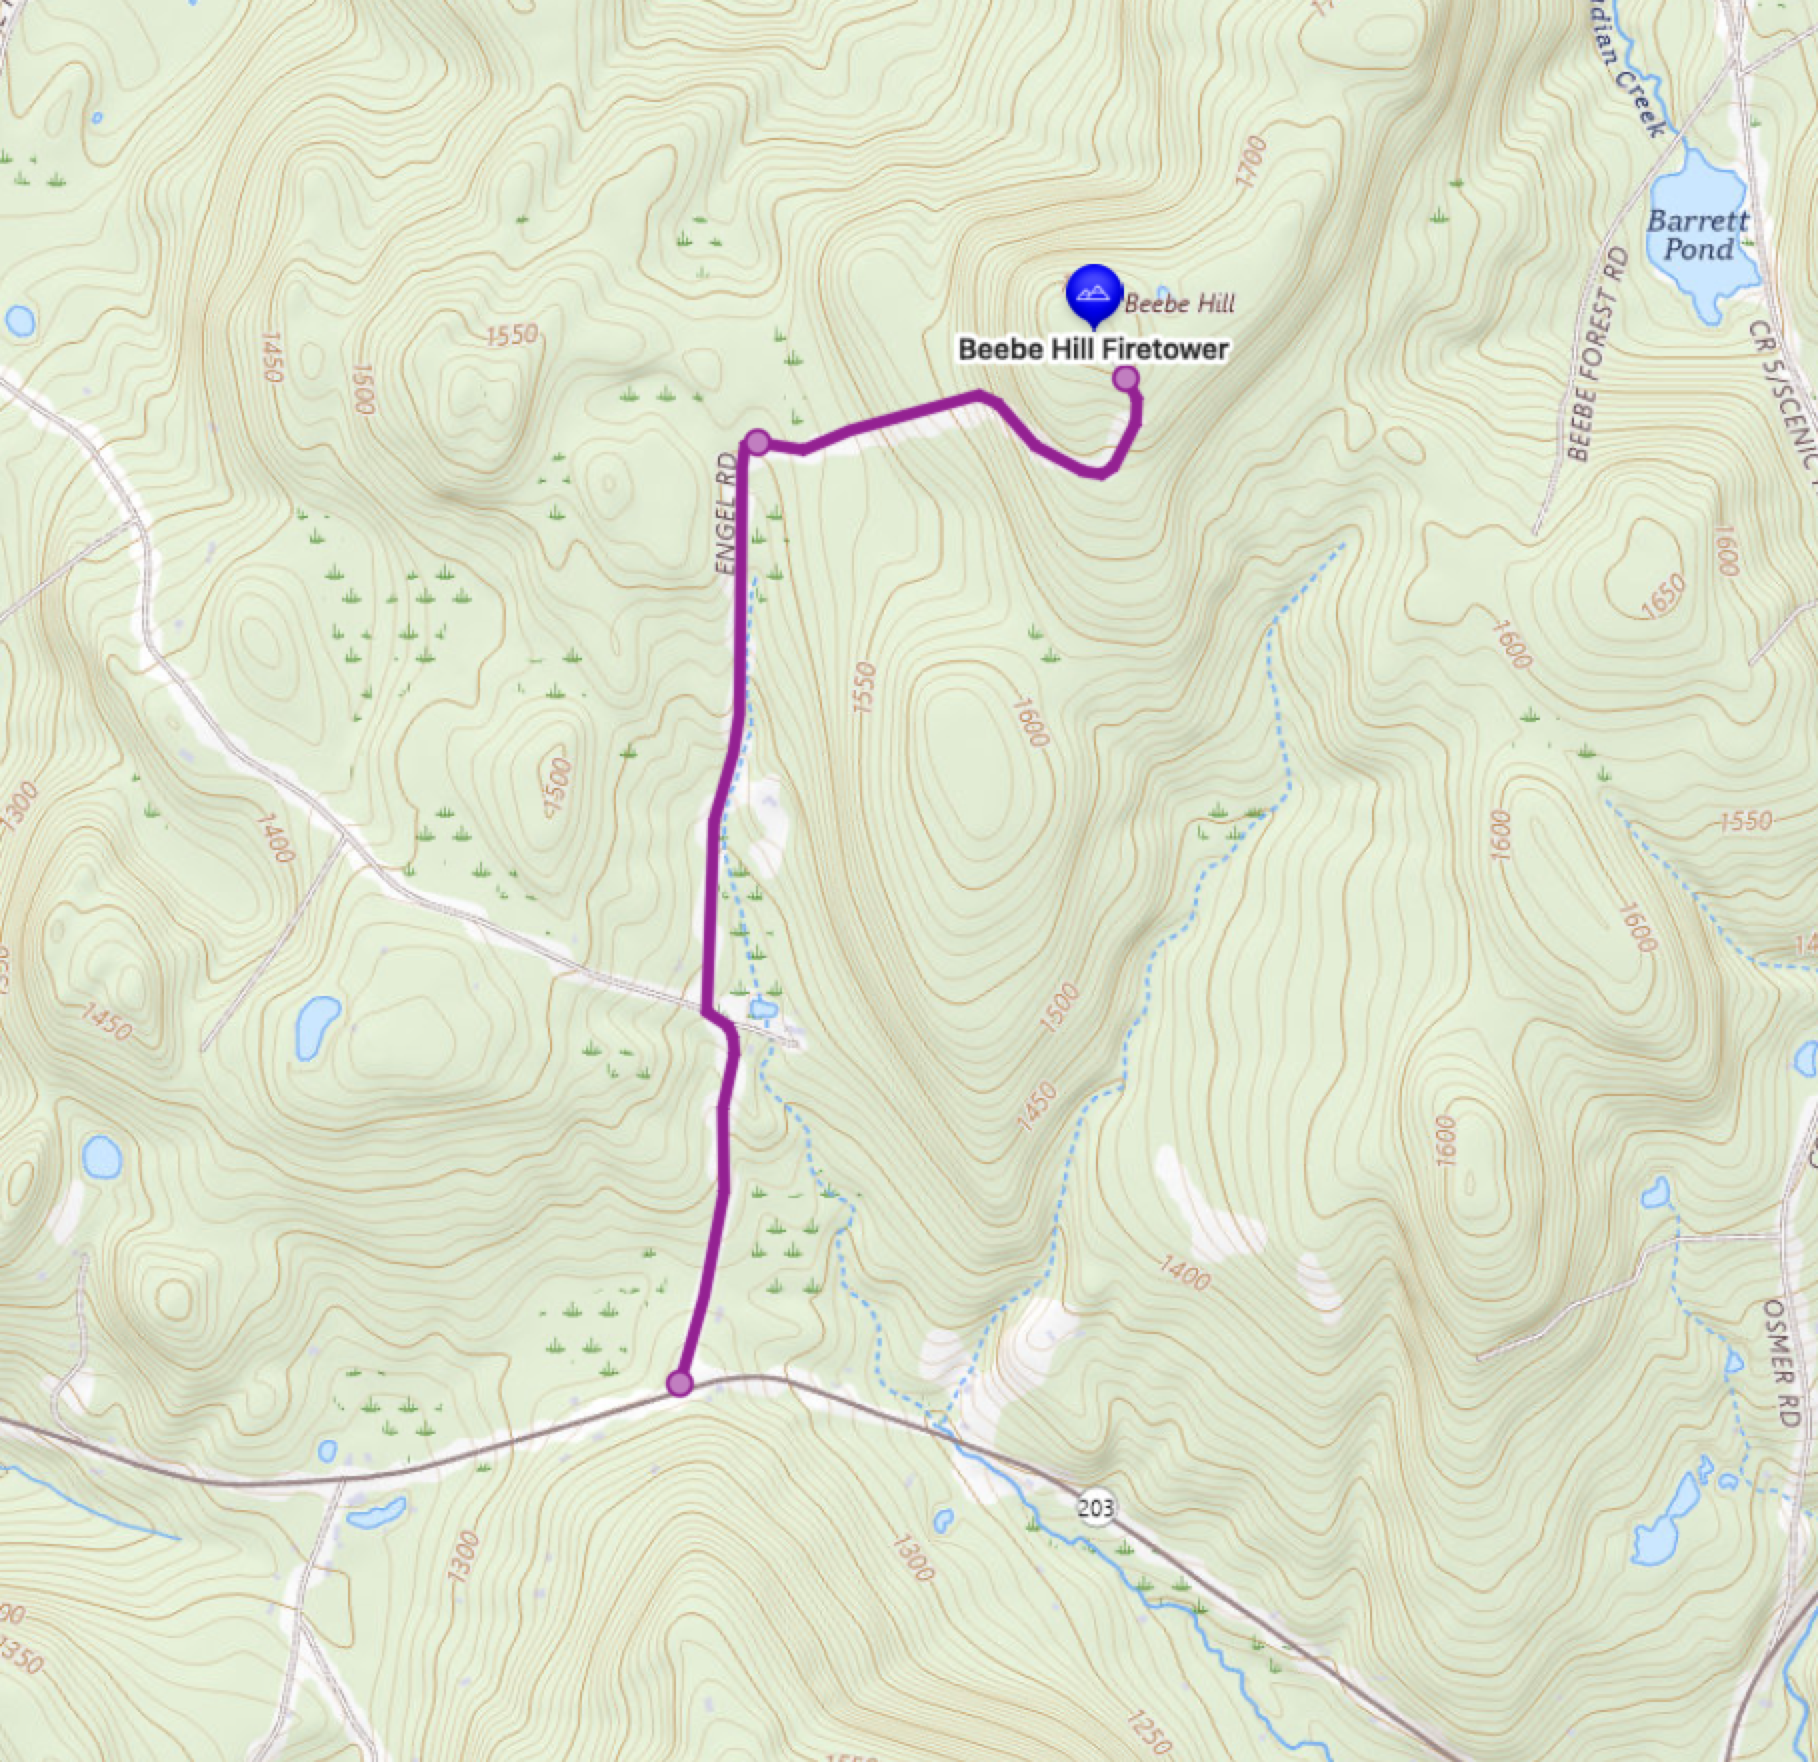
    map image

    No that's not a screenshot, thats an image generated from the map. Nice.

    Hope this is helpful to others. Any comments/suggestions for better ways are welcome. Hit me up on Mastodon. 

    → 12:03 PM, Mar 31
  • Refactoring SwiftUI Views, Generics and Is This Really Better?

    I’m currently building a mapping app for MacOS using SwiftUI, codenamed Cartographer for now. There have been some struggles but currently it’s going well. I’m enjoying really digging into my tasks and taking the time to make things right.Cartographer Screen Shot.

    One of the things I’ve been doing is refactoring any views down to manageable chunks. Not only does this avoid the compiler errors where Xcode complains it’s taking too long but more importantly it helps me reason with my own code.

    My app allows users to create locations and paths on the map. The locations are MapKit custom markers and the paths are Polyline overlays. A user can also arrange these annotations into groups to create some order if they desire.

    A recent task was creating a view to display all the annotations in the map and allow the user to select any or all of them to be exported to a GPX file.

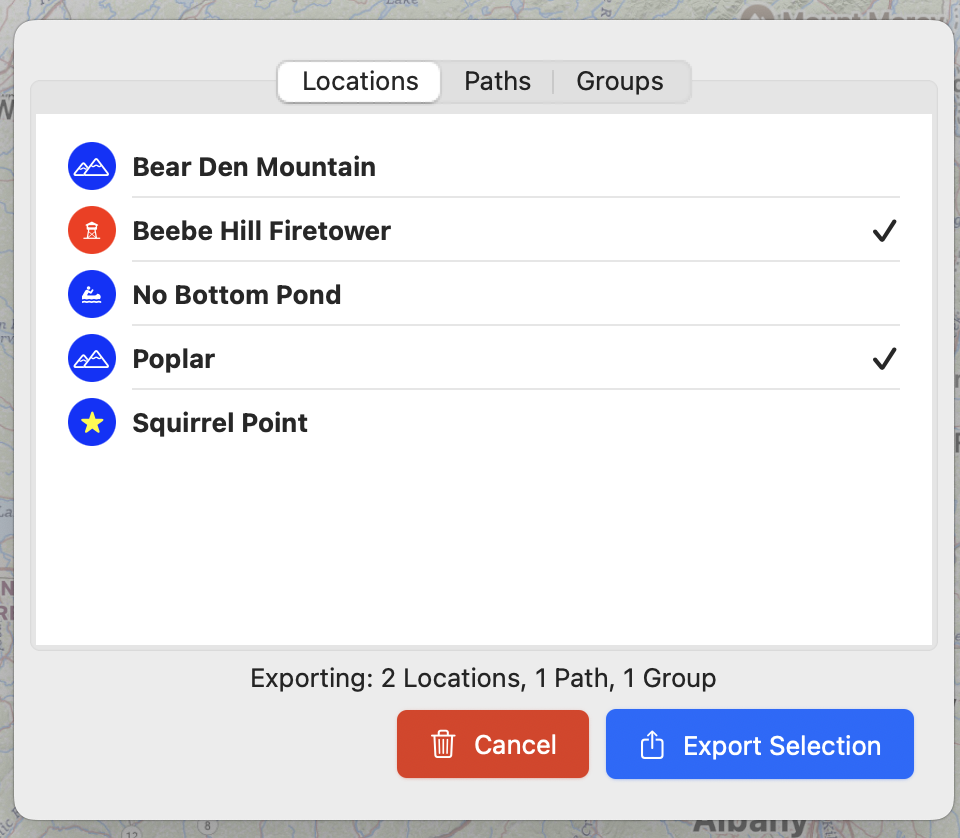
    I wanted a view to show all the exportable items and allow the user to pick the items to be exported. I settled on a TabView with each annotation type being a distinct tab. It looks like this right now:

    Export select dialog

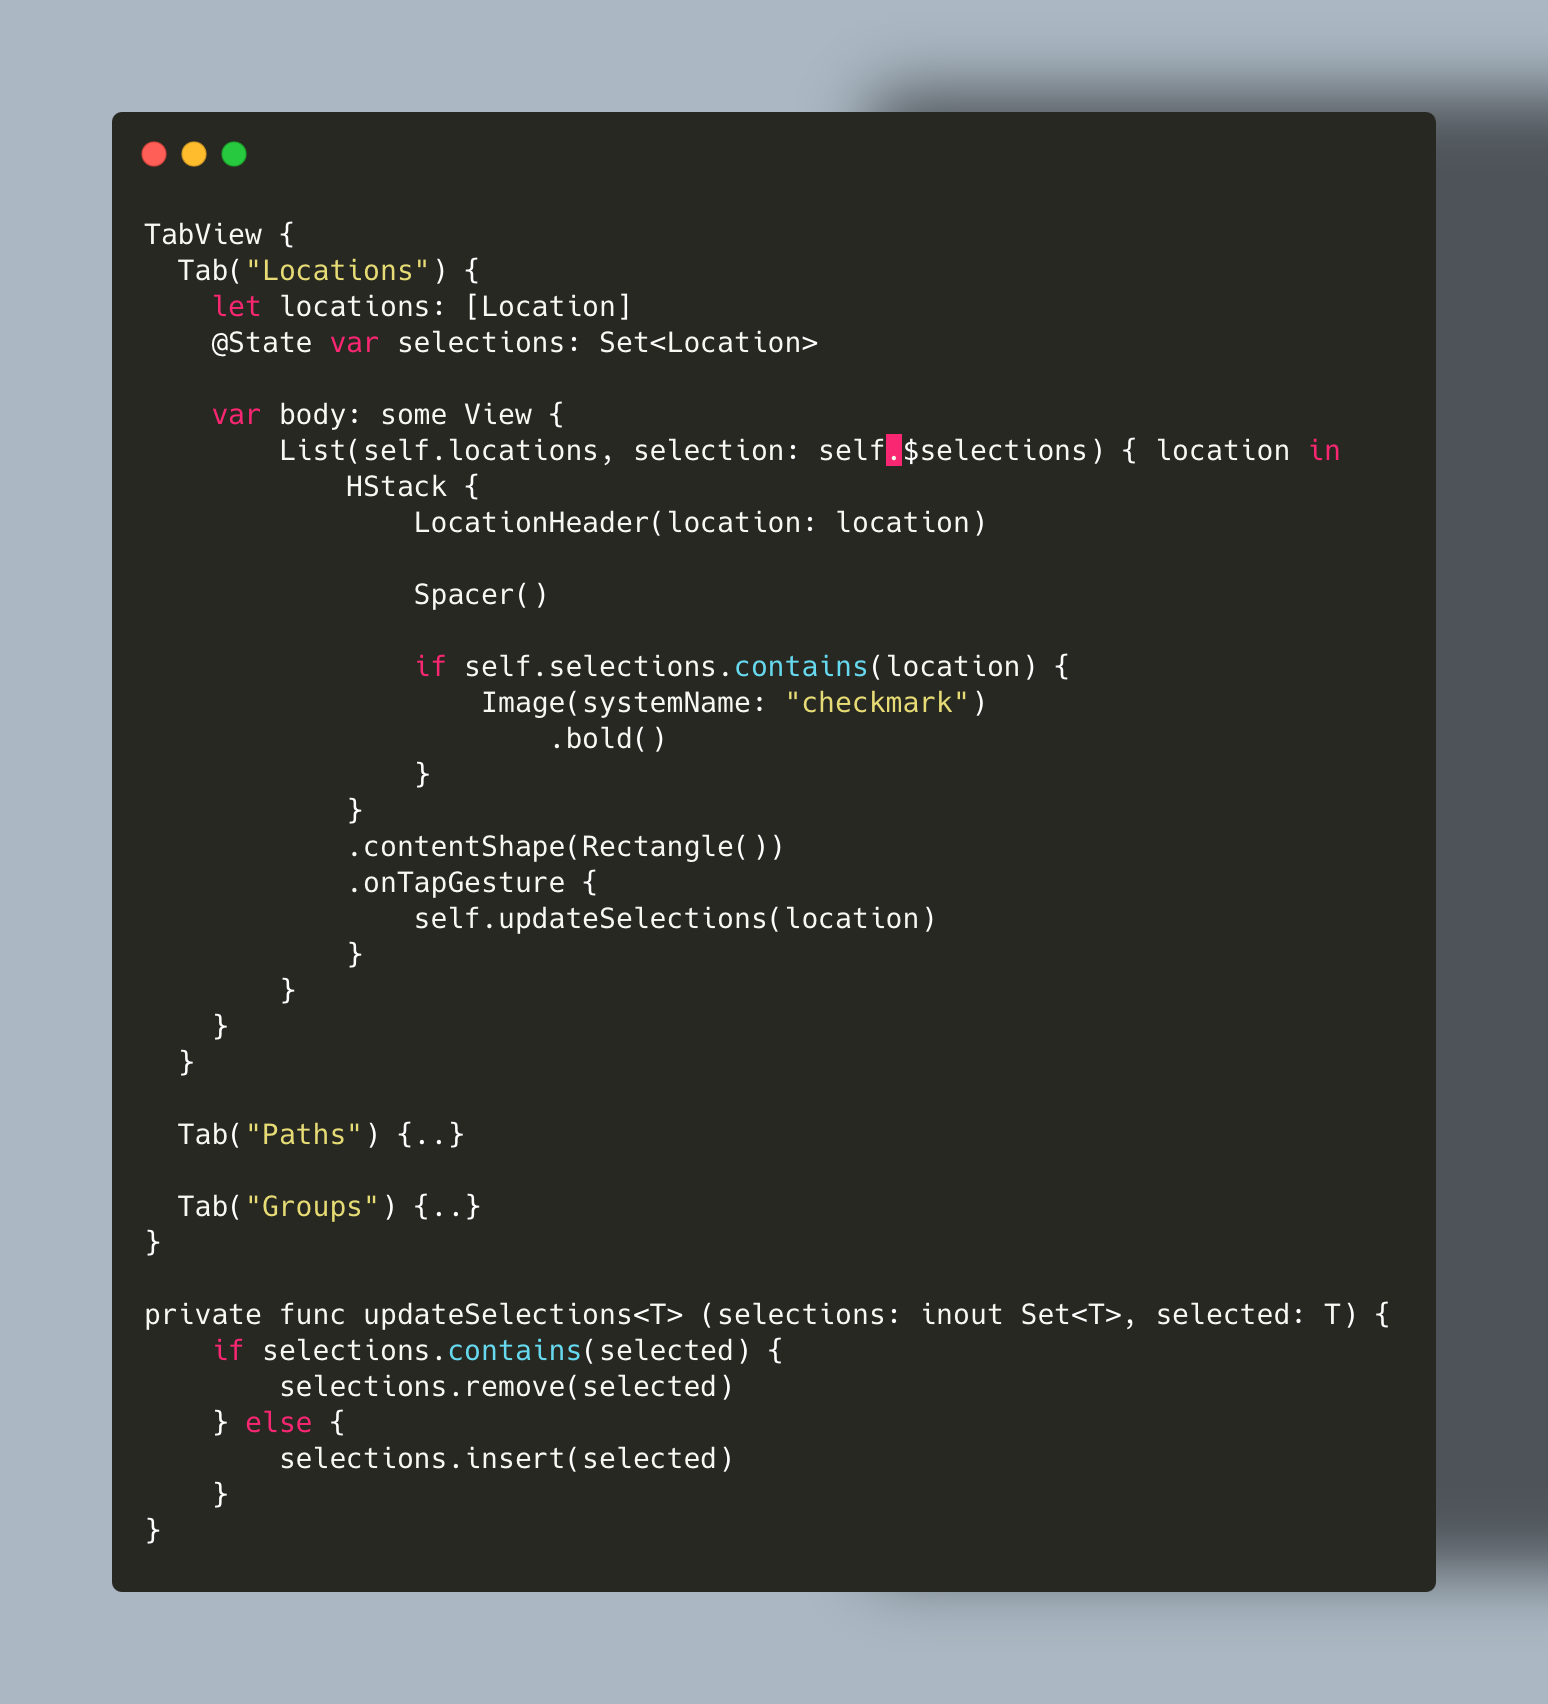
    Each tab has a list for its content where the list displays all the exportable locations, paths or groups. A user can click on any item to select it for export. List selection is handled with a Set<some exportable> to allow for multiple selection. It looks something like this:

    Exportable TabView

    The key thing here in starting to reduce the code repetition was the updateSelections method. This generic method takes some sort of element and a Set of the same element types and adds or removes the item as needed. By making this method generic I’m able to use it whether the Tab is selecting Locations, Paths, Groups or Widgets. It doesn’t matter. 

    Eventually this dialog grew to be many lines of code and I wanted to refactor each tab out to its own view. I started cutting and pasting and things were great but my first attempt had me recreating the generic method to updateSelections to a more specific version for each annotation type. So each tab had its own version of the updateSelections method. This felt wrong-ish.

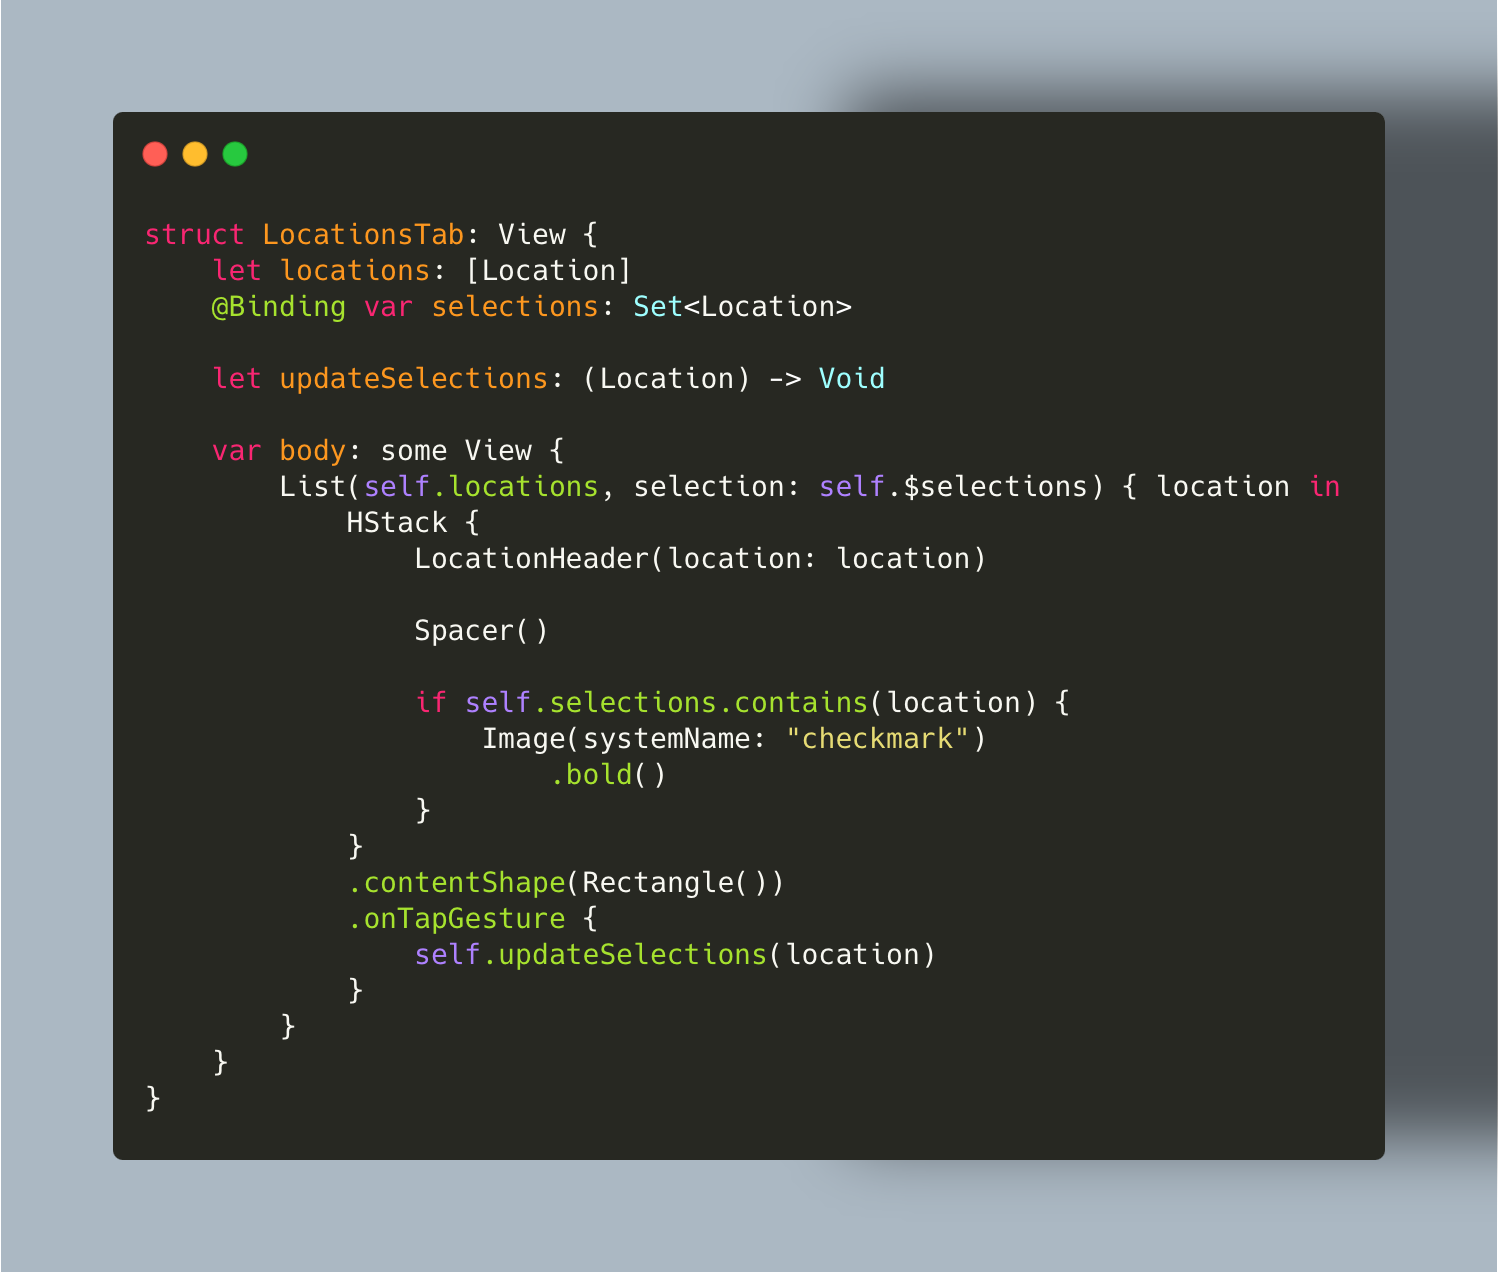
    I made a few attempts to get the code working so that one of my custom TabViews could accept the generic closure as a parameter and I could continue to use this generic version of the updateSelections method. My first few attempts were wrong but I did get this working and it looks something like this:

    Notice the LocationsTab takes a closure parameter defined (Location) -> Void. This seems counterintuitive but this is correct and will accept the generic updateSelections method when passed in. Where is the <T>? It’s not necessary. The method being passed in is still a generic but it meets the criteria for this closure.

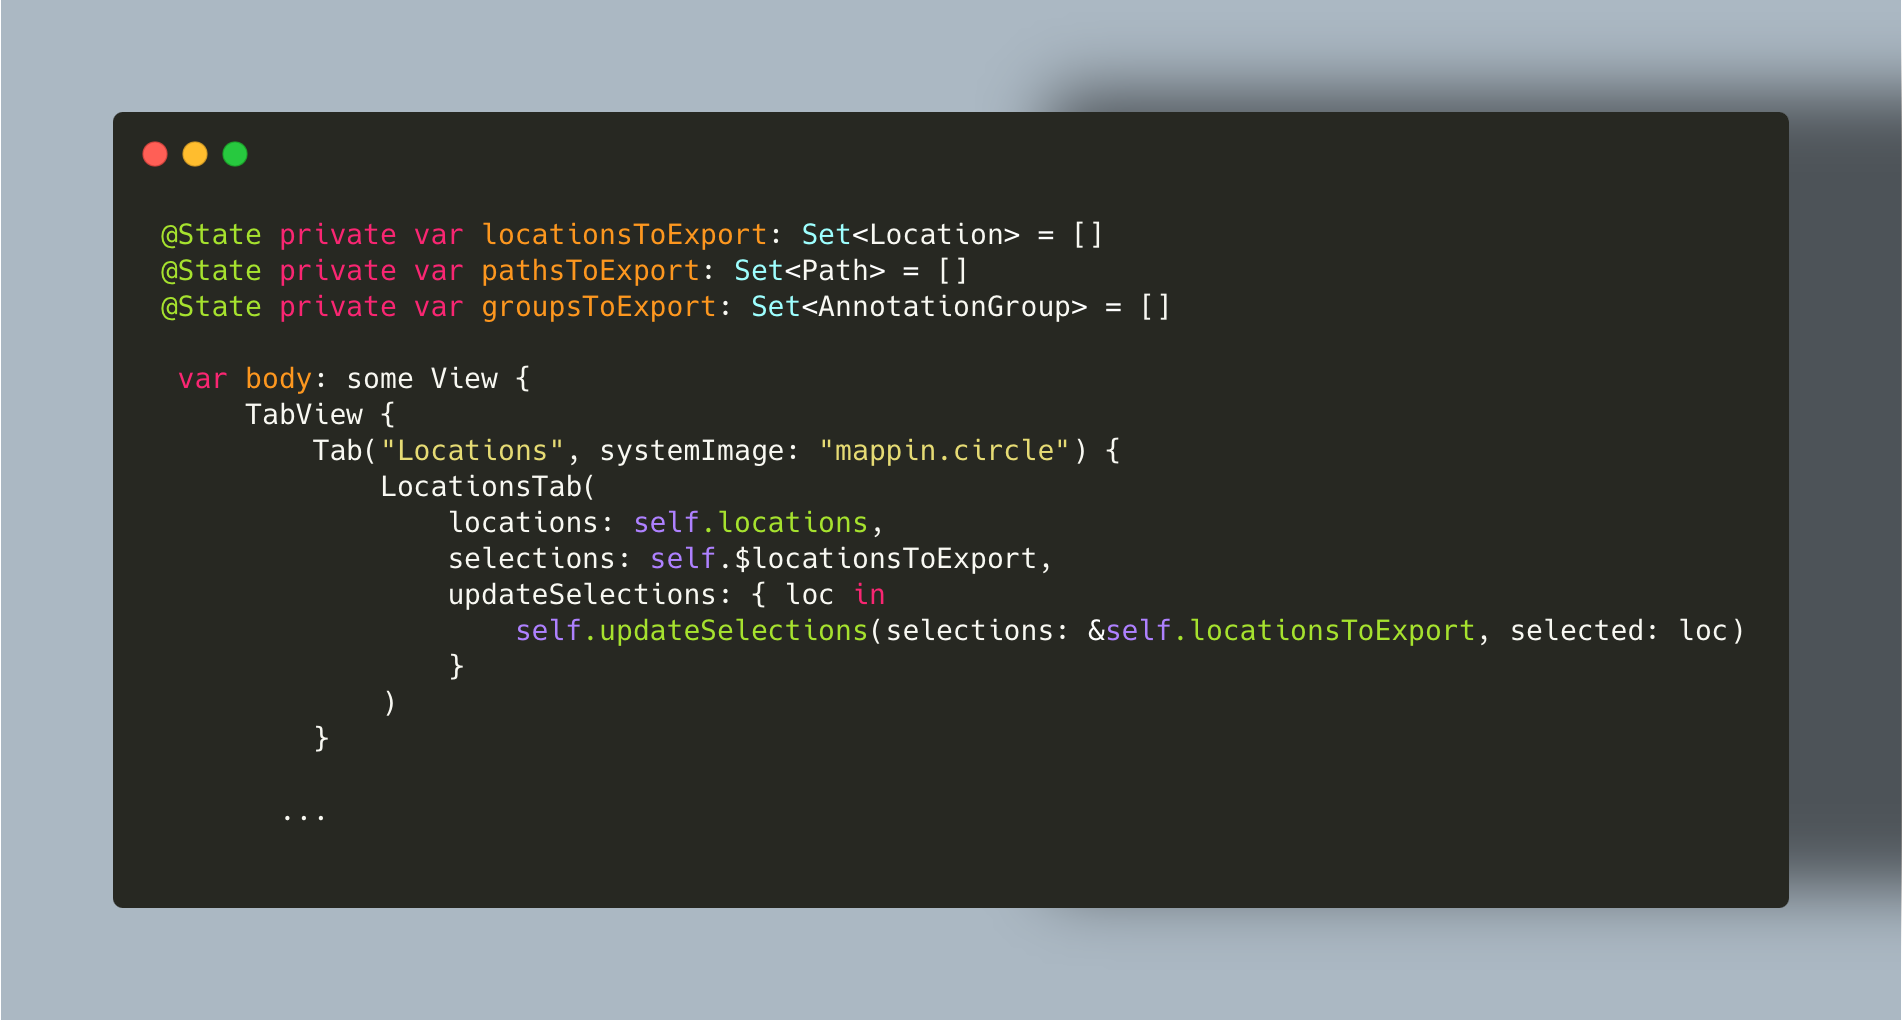
    LocationsTab Usage.

    This partial code listing shows the Sets that track the selected items and how the LocationsTab is called in the TabView. This still calls the original generic updateSelection() method. Note that the location selections set has to be passed as &self.locationsToExport due to the way mutable properties are handle in the generic method.

    Is this actually better than just having different methods in each custom TabView? I’m not sure. I think it’s legible enough and easy enough to reason with or I would just write the three separate methods.

    I have looked at making each custom TabView more generic so you could pass in all the parameters for the different annotation types but I think that may just be too much. Some times the code gets too general purpose and it’s difficult to reason with what it’s actually doing. Sure it would be clear it’s displaying a list of things to select but I think in this case it’s worth having all the context that comes from being a little less than a general view type. Maybe I’m wrong but I think there is a point of over optimization where you can’t read/reason with your code and I’d like to avoid that.

    I thought this was interesting enough to share. This is all a work in progress and likely to change many more times but as of today this is where I am. If you have any thoughts or suggestions feel free to hit me up on Mastodon at the link below.

    → 5:10 PM, Feb 6
  • Swift Subscripts

    Recently, I’ve added Swift Subscripts to my vocabulary. In many cases they feel like a reasonable amount of syntactic sugar, making my code more concise and I hope more legible. I can see where they could be overused so I’m going slow.

    If you are not aware Swift allows you to declare your own subscripts to access collection members. You can always use filter, first, etc on your collection but with subscript your code may read better. 

    Let’s say you have a Observable DataService with a property of Locations containing an array of places to display on a map.

    @Observable class DataService {
        var locations: [Location] = []

    Without subscripts you might add a method to get a specific location by searching for it’s ID:

    func location(forID id: String) -> Location? {}

    Then elsewhere in your code you can call that method and work with the location.

    let loc = service.location(forID: id)

    Subscripts provide the same function but you may prefer the simple format when using them:

    let loc = service.locations[id]

    It’s virtually the same thing as calling your method but I think it reads well and makes the code easier to reason with.

    Assuming you want to call the subscript on the location array, the subscript for that usage might look something like this:

    extension Array where Element == Location {
      subscript(id: String) -> Location? {
          self.first(where: {$0.id == id})
      }
    }

    Notice we placed the subscript in an extension on an array. If you define the subscript right in your DataService you would need to call it as service[id] and that may not be as clear as service.locations[id].

    I try to go slowly if and when I adopt new Swift features. The curmedgeon in me thinks that so much of it just adds unnecessary complexity and often I find myself looking at recent Swift code “improvements" and thinking “thats just looks confusing” Simple, legible code is the easiest to reason with. It’s not a cleverness competition. I think judicious use of subscripts can be a “just right” amount of improved code syntax.

    #iOSDev #Swift


    → 11:31 AM, Oct 30
  • SwiftUI Map Marker Clustering

    So as not to be one of those recipe web sites where all you want is the recipe, the code for this sample project is here.

    I have a few app projects that make use of maps to convey location information. I prefer to work in SwiftUI when possible and this sometimes requires setting lower expectations of what you can achieve. While MapKit was recently improved for SwiftUI use, it still lacks features that are present in UIKit/AppKit. One of those missing features is support for “clustering” markers on the map. Clustering is when a group of map markers are joined into one where their display would otherwise overlap.

    In older, pre-SwiftUI, frameworks Apple provides robust support for clustering markers with just a few lines of code. Alas with SwiftUI, we don’t have that luxury and with the yearly release cycles we are unlikely to have this ability show up any time soon.

    I wanted to see if it was possible to do this myself so I did some research into how clustering is typically done. I came across many articles describing various methods and algorithms used to implement clustering and calculating the distance between map coordinates on the screen. You need both of these pieces to implement any solution. It’s not enough to say this two locations are 100 meters apart so their markers should be clustered. 100 meters means different things at different map scales. You would also like this clustering to happen any time the map is redrawn so it needs to be fast.

    There seems to be consensus around using the DBSCAN algorithm to create clusters of locations on a map. I try to avoid math in order to avoid headaches but the basic concepts of the article linked above make sense and are worth browsing.  An implementation of the DBSCAN algorithm will take a group of items with coordinates, a distance to check for separation and a function to be used to determine the actual distance between any of those items.

    There are a few DBSCAN implementations available for Swift and I picked one and added it to my projects. A version is included in the repo for this sample project. I don’t recall where I found this implementation but I am certain it was free to use/distribute. If you are or know the author let me know and I’ll give credit.

    Give the DBSCAN algorithm we only need our location items and that distance function to determine how far apart any markers would be rendered on the map view.  More research reveals that it’s nice to be able to use your GPU to quickly process a bulk of point data to determine these distances. As luck would have it Apple has created a Single Instruction, Multiple Data (SIMD) library that contains methods to do this distance calculation very quickly. If you want to read more about SIMD head on over to Wikipedia. All that you need to know to make use of Apples code is to import simd into your project and call it accordingly.

    Now we get to the actual recipe of how to make use of all this math.

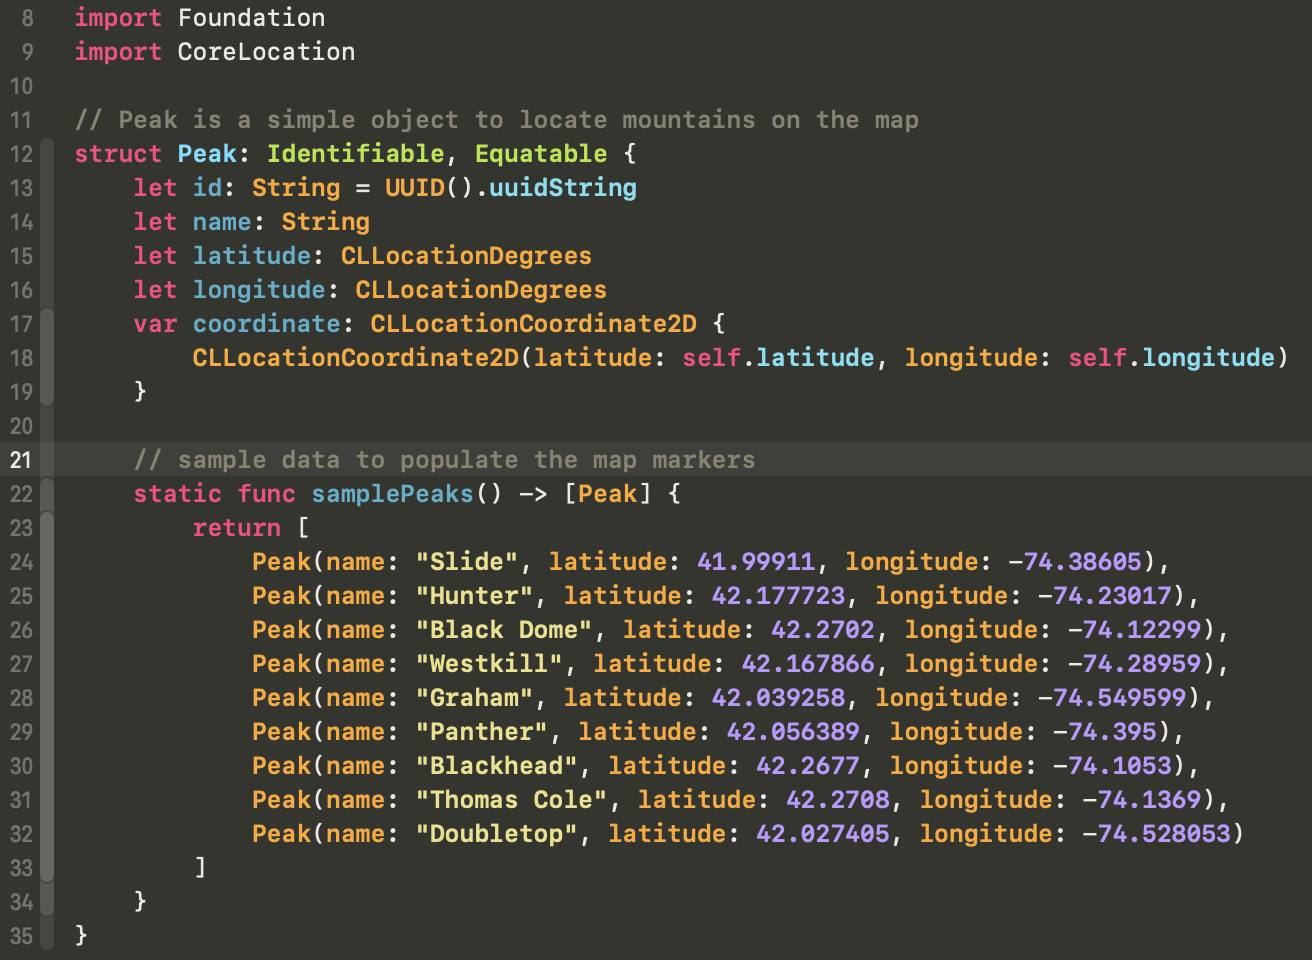
    For this sample project we will render a few peaks in the Catskill mountains. We also provide a static function to give us a few peaks.


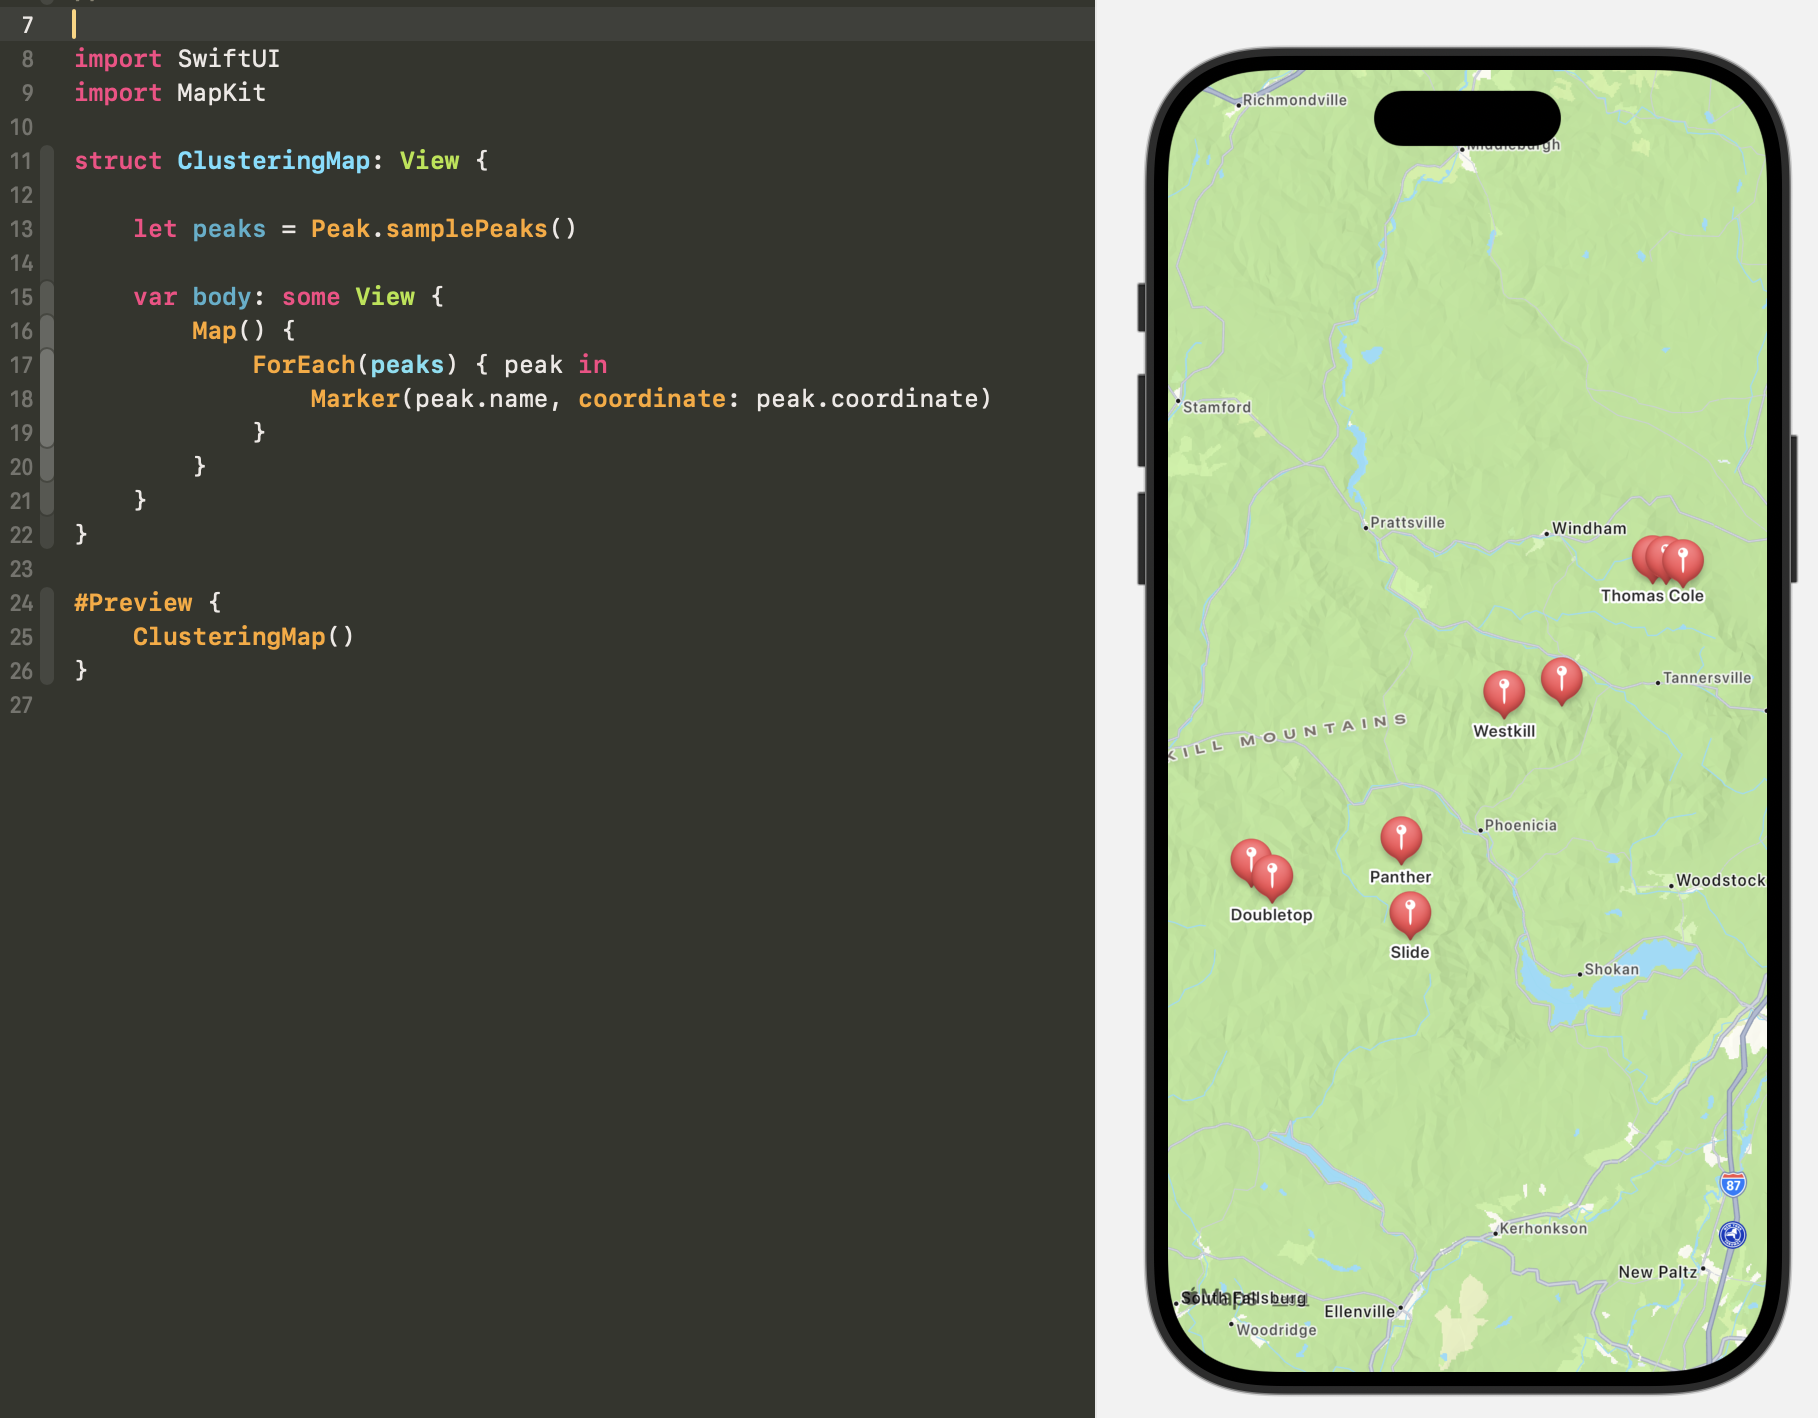
    You can easily render those sample peaks on a map in SwiftUI by iterating over the samplePeaks array and creating a Marker for each one. Doing so would show the overlapping problem we hope to clear up by implementing clustering. Notice in the upper right and lower left of the map a few peaks overlap.


    So we need to render something other than these individual peaks.  What we will render is a marker for an array of peaks. That array may contain only one peak when there is no overlap but in instances where peak markers would overlap the array will contain more than one peak rendered as a single marker. Here is a simple implementation of a PeakCluster item that can be used to create these arrays.

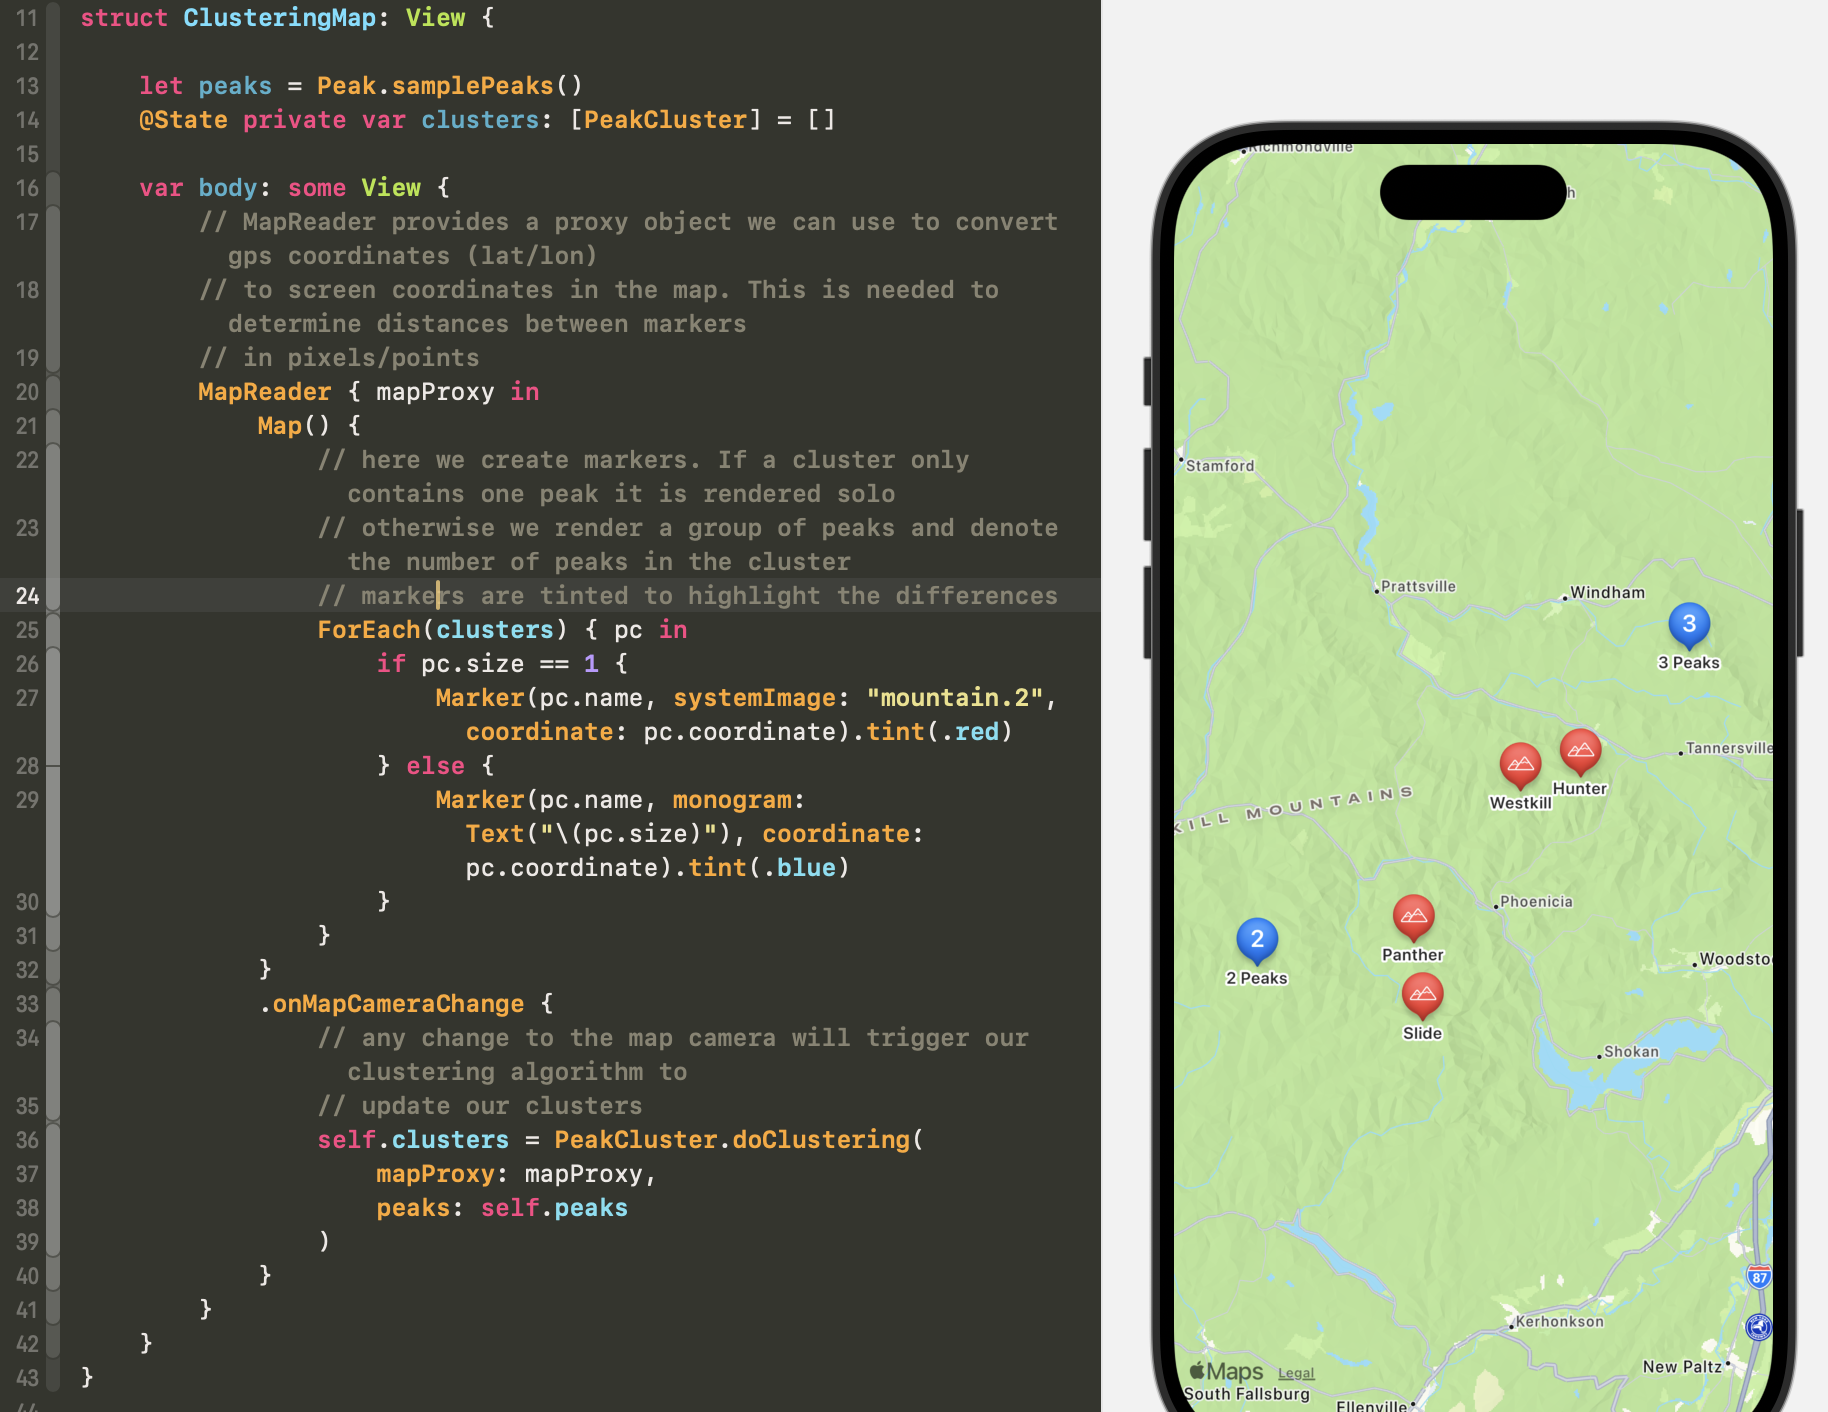
    Should make sense so far but how do we determine which peak markers would overlap. As I mentioned in the intro above, it’s not just a matter of how far apart the peaks are in real world distances. Real world distances are rendered differently depending on how far in or out we are zoomed in the map. We will need a way to convert real world distances to map unit distances. This is where a MapReader and its provided proxy will come to our rescue. Next we will need a way to calculate these clusters as the user zooms in and out of the map. Thankfully SwiftUI makes this easy. There is a modifier on Map called .onMapCameraChange. This modifier will be invoked any time the camera changes (i.e. the user pans or zooms the map.) All we need to do is call our clustering algorithm to update our clusters each time.

    The implementation of this will look like this:

    Notice the formerly overlapping peaks are now joined into one cluster. Clustered markers are rendered with the number of peaks in the cluster and color is used in this example to highlight the clusters.

    Simple, right? That “doClustering” method is doing some heavy lifting so let’s see how that magic happens.

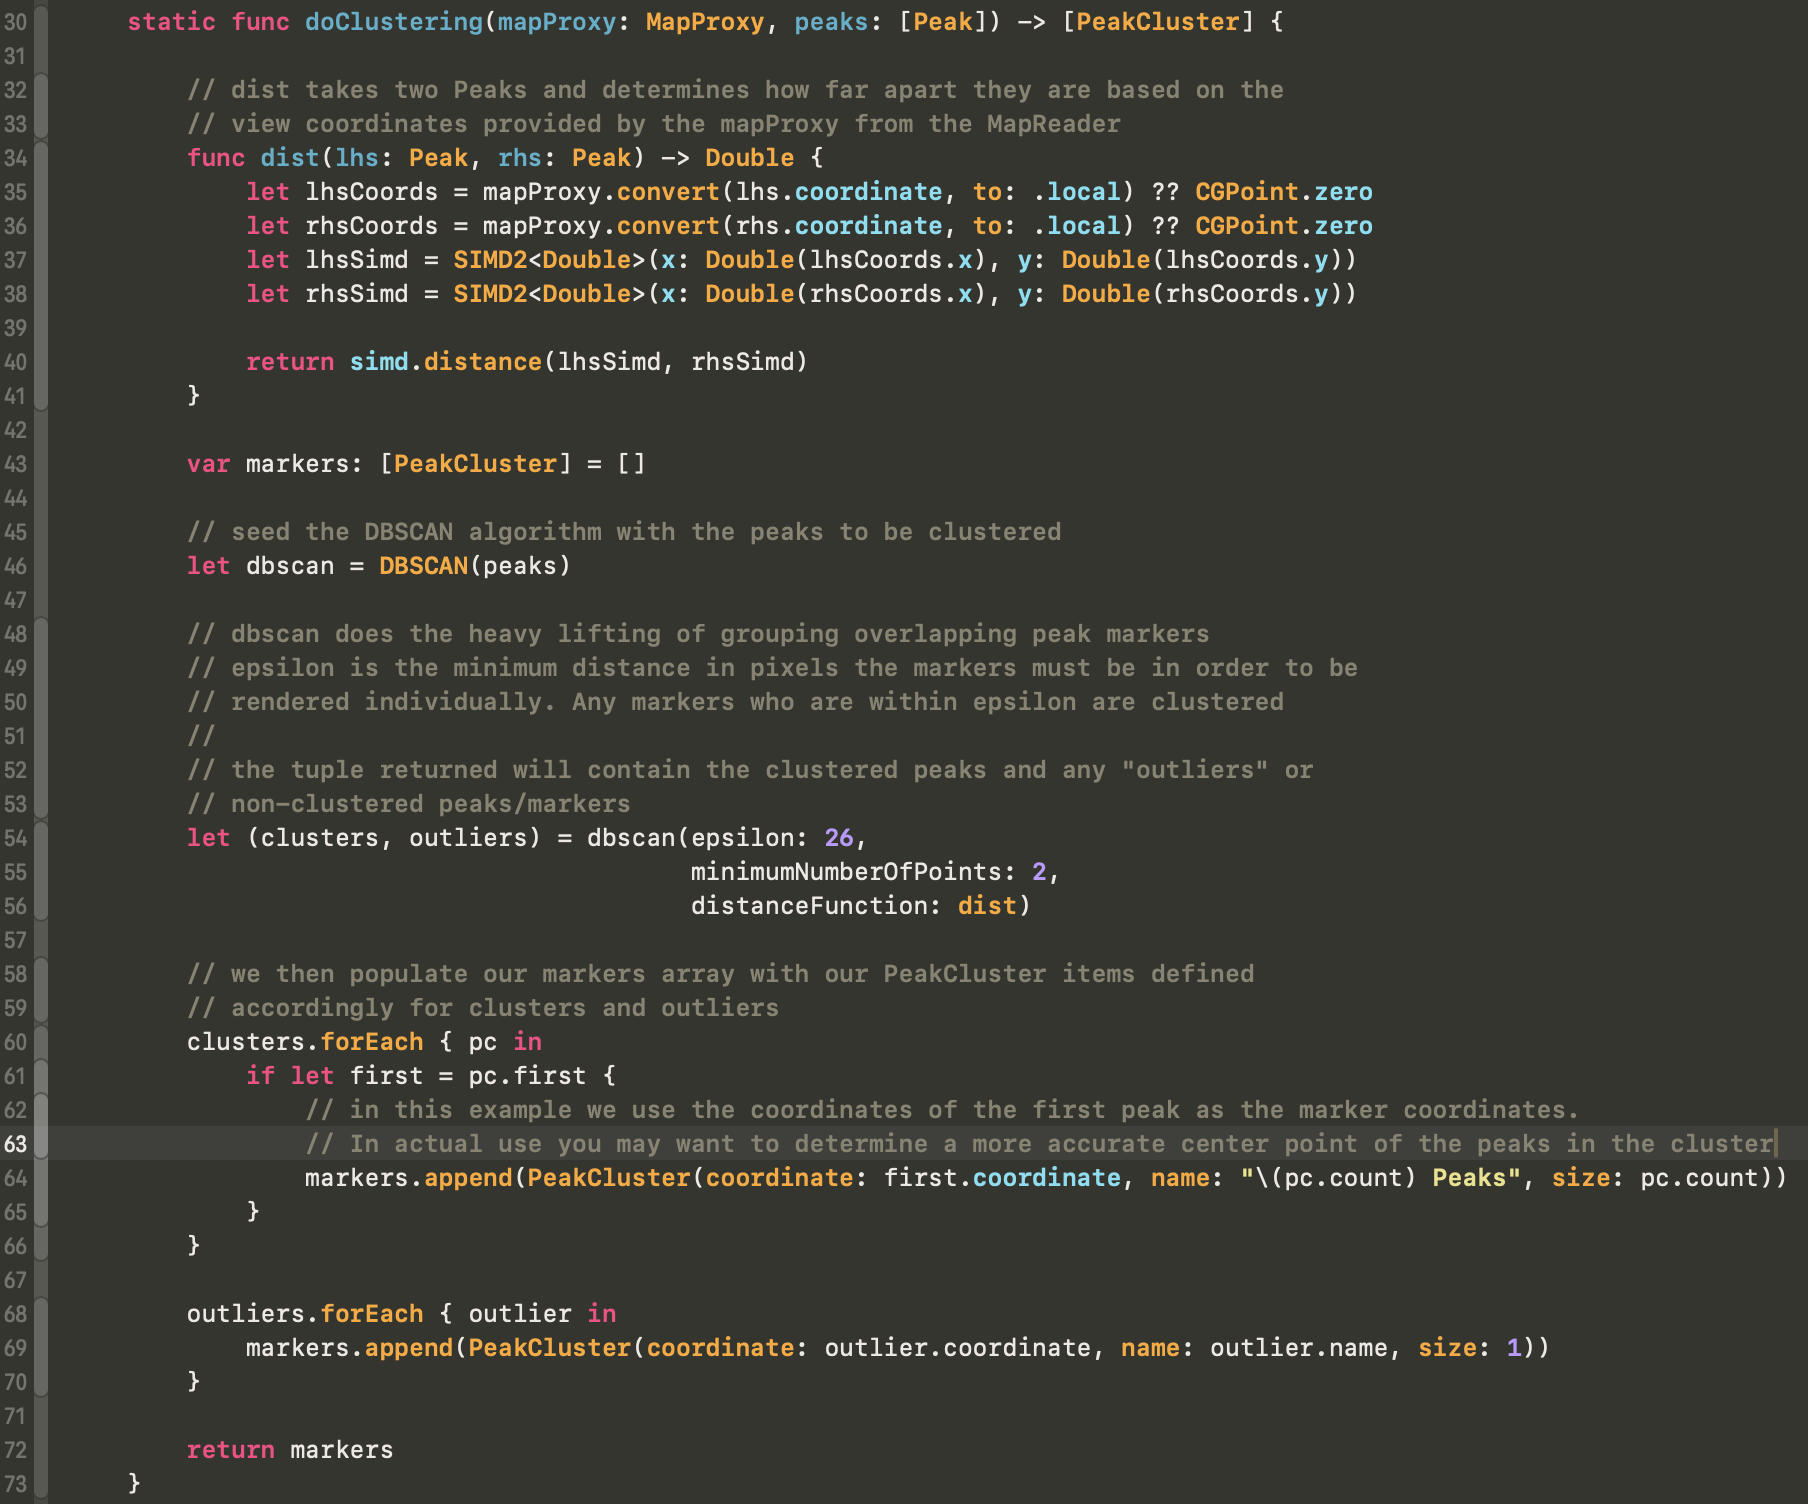
    doClustering requires two things to do it’s job. The first is the mapProxy so we can convert the peak latitude/longitude to map view units and the second thing is the actual peak items.

    First we define the method to be used to determine the distance between our items. In our case the items are Peaks and they have coordinate information. Here we call into SIMD2 (for 2d point calculations, other implemetations exist for 3d, etc) This dist function will be provided to our DBSCAN function to do the clustering.

    We instantiate a dbscan object with our peaks to be clustered then call its method to output the clusters and outliers. Clusters are groups of overlapping peaks and outliers are peaks that are to be rendered individually. I won’t cover how the dbscan implementation works here. Feel free to browse the code.

    Then we iterate over both the clusters and the outliers creating PeakClusters for each item. In this example we just use the coordinate of the fist peak in a closter as the coordinate for the cluster. You may want to use a different method, perhaps the center of the region containing all the peaks in the cluster. For this example this simplification will work. Clusters are given a name denoting how may peaks are contained therein. The size is set to the number of peaks in the cluster. This allows us to quickly determine the marker to render back on our map.

    Outliers are processed similarly. The coordinate for the outlier cluster is correctly set to the peaks coordinate as is the name and the size of one.

    We then return our markers (PeakClusters) to the calling method. 

    This is only a very simple example to show the clustering. For an actual map app you probably need to do a bunch more. Several of the structs defined here are just barebones implementations and you might flesh out your Peak or PeakCluster objects to provide more needed data.

    This implementation feels ok. It’s not perfect. It doesn’t animate the changes from cluster to unclustered markers, for example. I would love to have that but I’m not sure it’s achievable here.

    One caveat is that while this code works well for iOS 18 projects, my original implementation was for iOS 17. Under iOS 17 I noticed that onMapCameraChange was called more than I would expect and in some cases the rendering of the markers before the map completed drawing would cause an infinite loop of redrawing the map. I was able to work around that with some hacks to check if I really wanted to be redrawing the map at those times. It was not an ideal solution and with iOS 18 things seem improved to the point that outside the math/algorithms to do the clustering the View code is pretty concise.

    → 12:00 PM, Oct 24
  • Existential WWDC 2024 Dread

    The original version of this post was almost 1,000 words. It just felt like a lot of ranting with no end so I will sum up my feelings regarding the near future of the Apple platforms/frameworks as follows:

    If you were building a new house and patiently waiting for the builder to finish the roof so the house didn’t leak, how excited would you be when he tells you he spent the past six months working on the addition for the sauna?

    → 2:41 PM, Apr 9
  • Creating Sample HealthKit Data

    A current app project I am working on uses HealthKit workout data as its data source. This makes life easier in that I don’t have to create my own models and manage the data, the frameworks will do this for me and all I need to do is access the users data. This is all well and good until you need to work in the simulator or Xcode previews where no HealthKit data is present.

    I’ve come up with an admittedly imperfect solution. It works well enough that I thought I would share. I welcome any thoughts on improvements. This solution is for iOS 17+ projects. 

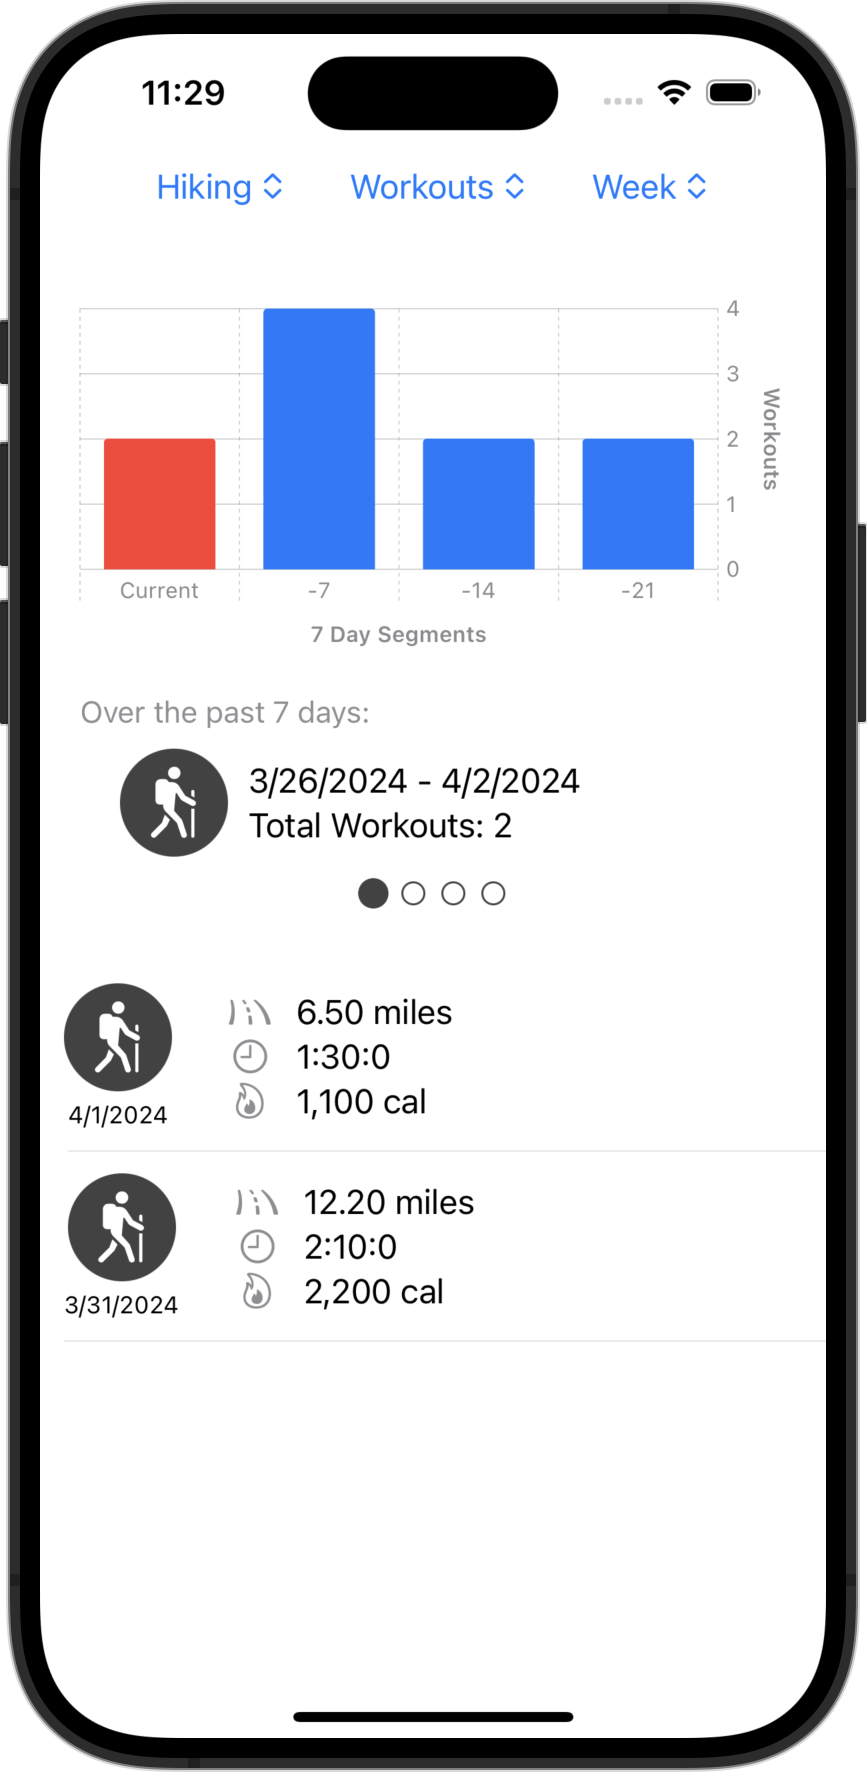
    My app will display your workout data for segments of time so you can compare your last 7 days against the prior 7 days, or months, or years. I display some graphs and text output of this data. I don’t record any data in the app and rely on any data the user has recorded via HealthKit. A rough screenshot looks like this:

    In the past I would just cobble together some code to use HKWorkout.init(…) but with iOS 17 that method is deprecated in favor of HKWorkoutBuilder. I found the documentation on how to actually use HKWorkoutBuilder a bit lacking so after some trial and error I came up with the following solution. Your mileage may vary but for my use case this is enough to allow me to get back to work.

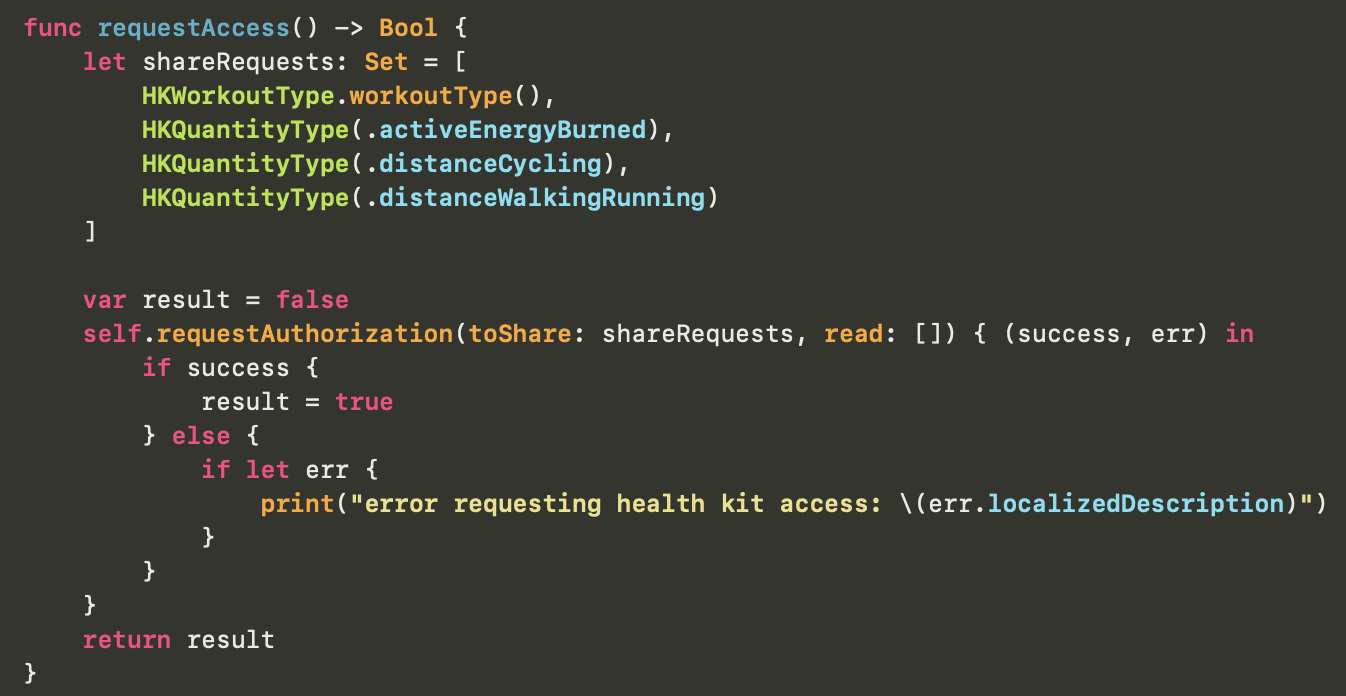
    Before you can access the users Health data you need to request permissions for either read/write or both. The final app I am creating will not write any user data so in order to write sample data I need to request additional permission to share data. I created a helper on HKHealthStore to request this permission:

    For the purposes of writing sample data to the health store we only need share access so here I pass an empty array of read values. This may be different from your actual app usage where you do need to read data. This helper is only for permission to write data. If your app already asked the user for read/write access and that access covers all the sample data you wish to write you may not need to request further permissions at all. The simulator either in the simulator app or Xcode previews will need this permission granted before any data can be written. tl;dr: if you already have permission in the simulator to write data you don’t need to call this method. If you do need permission this can help.

    Keep in mind the values I’m asking to share are for my app needs. You may need to edit the list to request access to other data types.

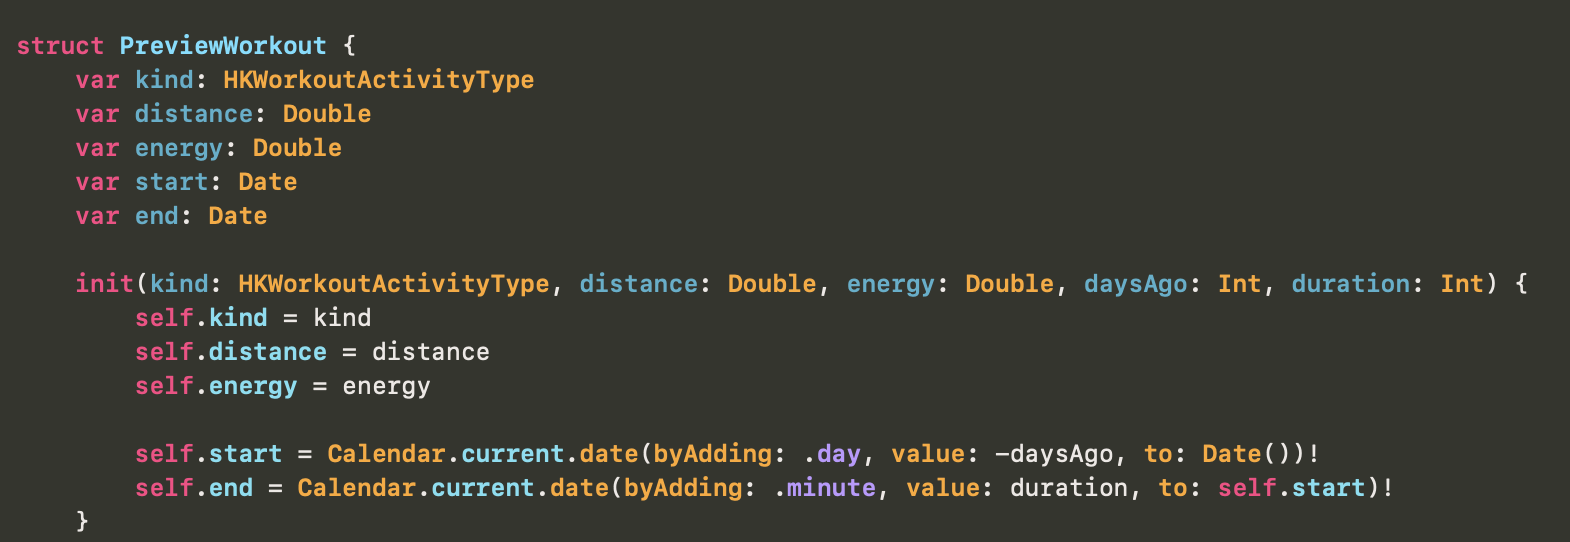
    In my case I want to create workouts that occur at various intervals such as 7 day periods. For my sample data I created a struct to allow me to specify enough information to create workouts with specific start/end dates and pass along a few stats, in this case the workout distance and energy burned. In my app it’s important the data is relative to the current date so I create data offset from Date.now. Your needs will most certainly vary but I explain this here so that the code to add workouts will make sense.

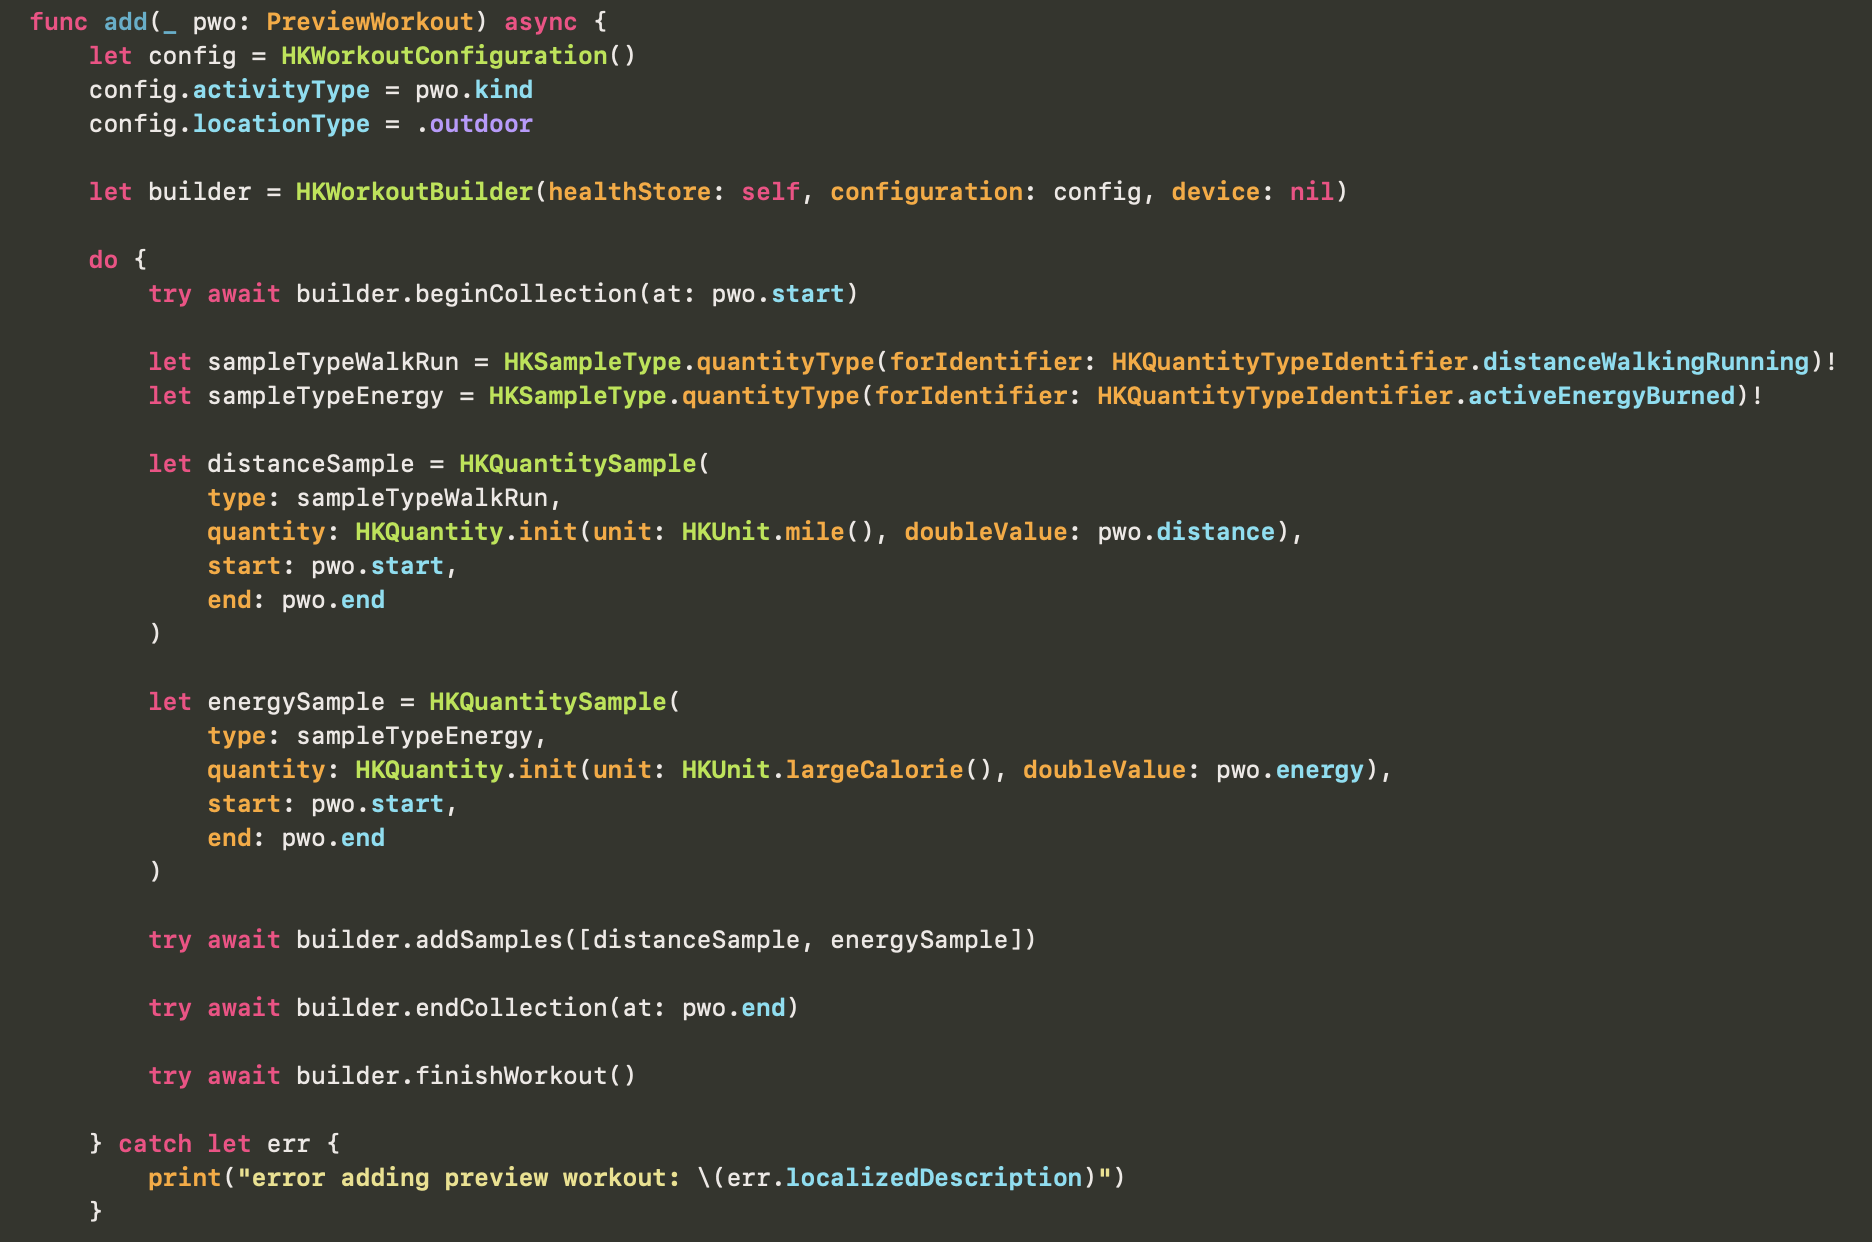
    Next I have the actual code to add workouts to the health store. Notice the method takes a PreviewWorkout which we defined above.

    The add(…) method uses the new HKWorkoutBuilder to create a workout and add samples. Here we create a workout with the type defined in our PreviewWorkout, add two different HKQuantitySamples and then finish the sample collection and workout in that order. Assuming you have the correct permissions, the workout will be written to the devices health store.

    To use this sample data in your Xcode previews you’ll need to call these methods prior to displaying the preview. Since add(…) is async you need to wrap the call in a Task{} but you may quickly notice that your samples are growing each time you refresh the preview. We need a way to clear the samples so we don’t keep adding new versions of the same data.

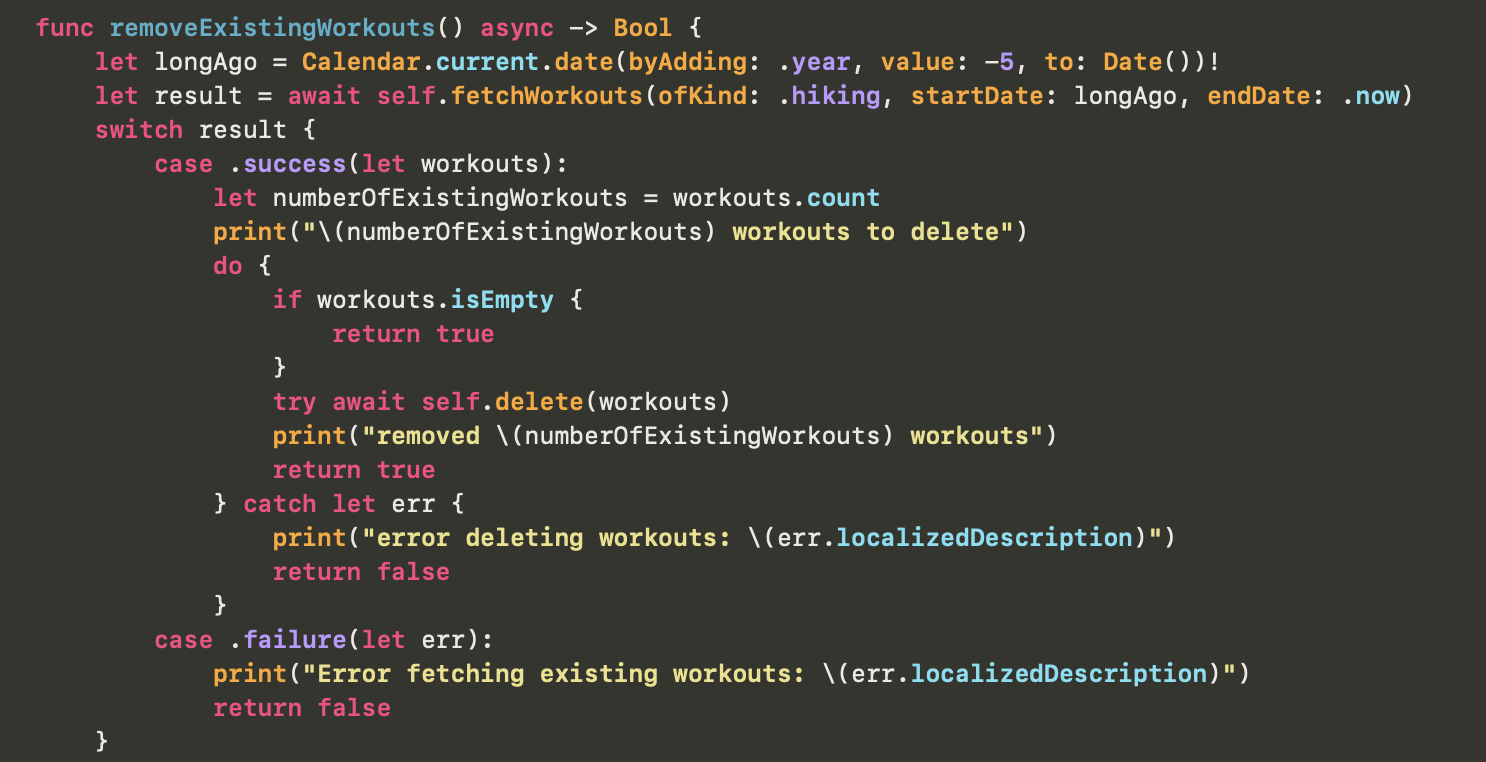
    self.fetchWorkouts() calls another method in a HKHealthStore extension that I created to grab all workouts matching a type and between two dates. There are plenty of examples of fetching workout data available so I’ll not share that code here. Suffice to say, it will return an array of workouts matching the criteria.

    Here we just grab all the workouts for the past 5 years (adjust if needed for your samples) and remove all the existing workouts. Calling this prior to adding new samples ensures we only have one set of our sample data. 

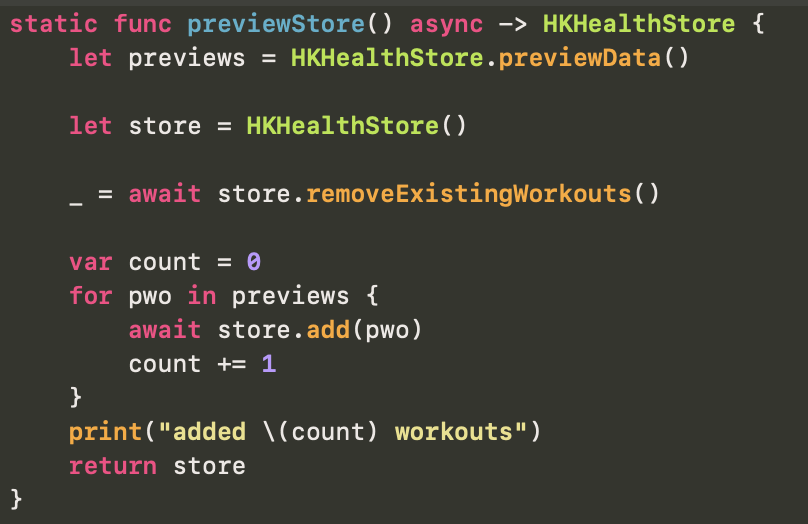
    Putting it all together in one method can look something like this:

    Here we get our preview data from another extension, again your data and methods may vary. We then grab the default store, remove existing data and write our samples. We return the store if it’s helpful, I’m not currently using the returned value. 

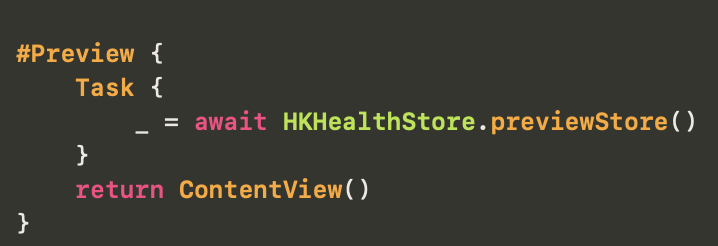
    So to make all this work within previews you can do something along these lines:

    There are two issues with this. First this will needlessly create the samples each time the preview is refreshed. This is unnecessary unless you’ve updated the sample data and need to refresh it. The other problem is there is a race and the data will not always show on first drawing of the preview. Interacting with the preview should show the sample data as that will redraw the UI. I have not figured out how to get this first rendering of the preview to wait for the sample data (without needlessly mucking up my actual code) but as long as the data is present it will be displayed on any subsequent preview renders. 

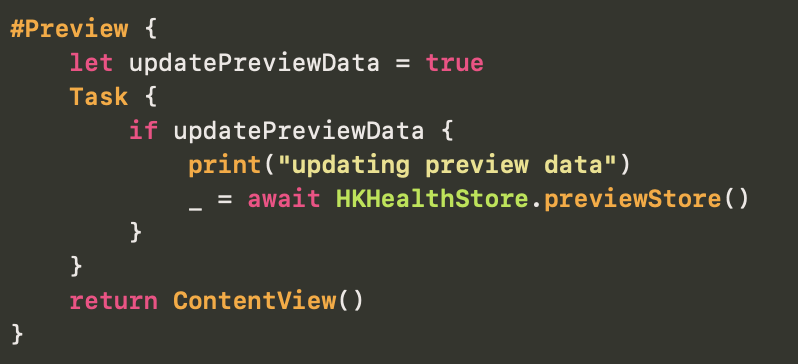
    If you only need it for previews/simulator debugging you can place this extension and any sample data in the Preview Content folder within Xcode and it will only be compiled into the debug builds.

    I’ve settled on this solution for my usage. Here I have a boolean value I can manually set to update the preview data. I generally leave it set to false unless I need to update the sample data. The key is once the sample data is in the simulators health store it remains there unless you wipe the simulator.

    If you need sample data in the full simulator you can adapt these same methods. I’ve created an .onAppear{} block that requests share access and writes the data. I can comment this block out after the data is written and uncomment for updates. It works the same as described here for previews. For my usage, I am mostly using the previews for UI adjustments and when I need real hard data I run on my personal iPhone

    I welcome any input on how this may be improved. I already understand this is a bit hacky and rigid but sometimes that’s all that’s needed to get back to work on the actual project. Obviously you will need to adjust everything I outline here for match your needs. I thought it was helpful to at least document one approach to working with HKWorkoutBuilder.

    I’ve uploaded both the HKHealthStore extension and my sample data structs to Gitlab as a snippet if you wish to make use of the code. The code is provided as is and you are free to use/adapt it for your use.

    → 12:32 PM, Apr 2
  • No one cares about my opinion but...

    This DOJ vs Apple thing is an annoying distraction to my social media timelines and surely soon to expand to fill all my podcast listening time.

    It is my novice opinion that while Apple is frequently poorly behaved, to put it mildly, most of this stuff doesn’t rise to the level of monopoly abuse. The problems are purely Apple’s making and are almost all caused by simple greed. Isn’t it always?

    It is convenient for them that things like privacy provide cover for some behaviors. That doesn’t make things like privacy unimportant and certainly not worth compromising too much in these areas.

    Another interesting thing is seeing all the Apple pundits choosing very clear sides on this. I think any rational thinking Apple observer can point out dozens of places where Apple could do better by consumers or developers but stubbornly sticks to their ways. Blindly defending Apple is a bad look. They are not without many faults here. At the same time, bashing Apple blindly with “I told you so…” is equally poor form.

    I believe this is yet another one of those situations where nuance is needed. Yes, Apple often behaves badly. At the same time It’s possible that these things don’t rise to the level of monopoly abuse.  If we, as a supposed democracy, want to curtail some of these behaviors we need better laws. I don’t think the current laws address this adequately. Nor do I believe the people in power are knowledgable enough to deal with these sorts of technical things in the ways that are required.

    Along with “AI”** I fear this sort of “distraction” will just slow improvements to the development tools we use every day. It already takes Apple years to improve on some frameworks. I would  prefer they improve MapKit for SwiftUI and 100 other things rather than waste time dealing with this nonsense.

    ** I realize some level of this so called “AI” is needed. I don’t want it to absorb all the oxygen in the room. Much like I know they spent years on the Vision Pro but right now I don’t care. I have work to do on the other platforms likely to be shortchanged by focus in these other areas for the foreseeable future.

    → 11:34 AM, Mar 22
  • Peakist is Ready to Test

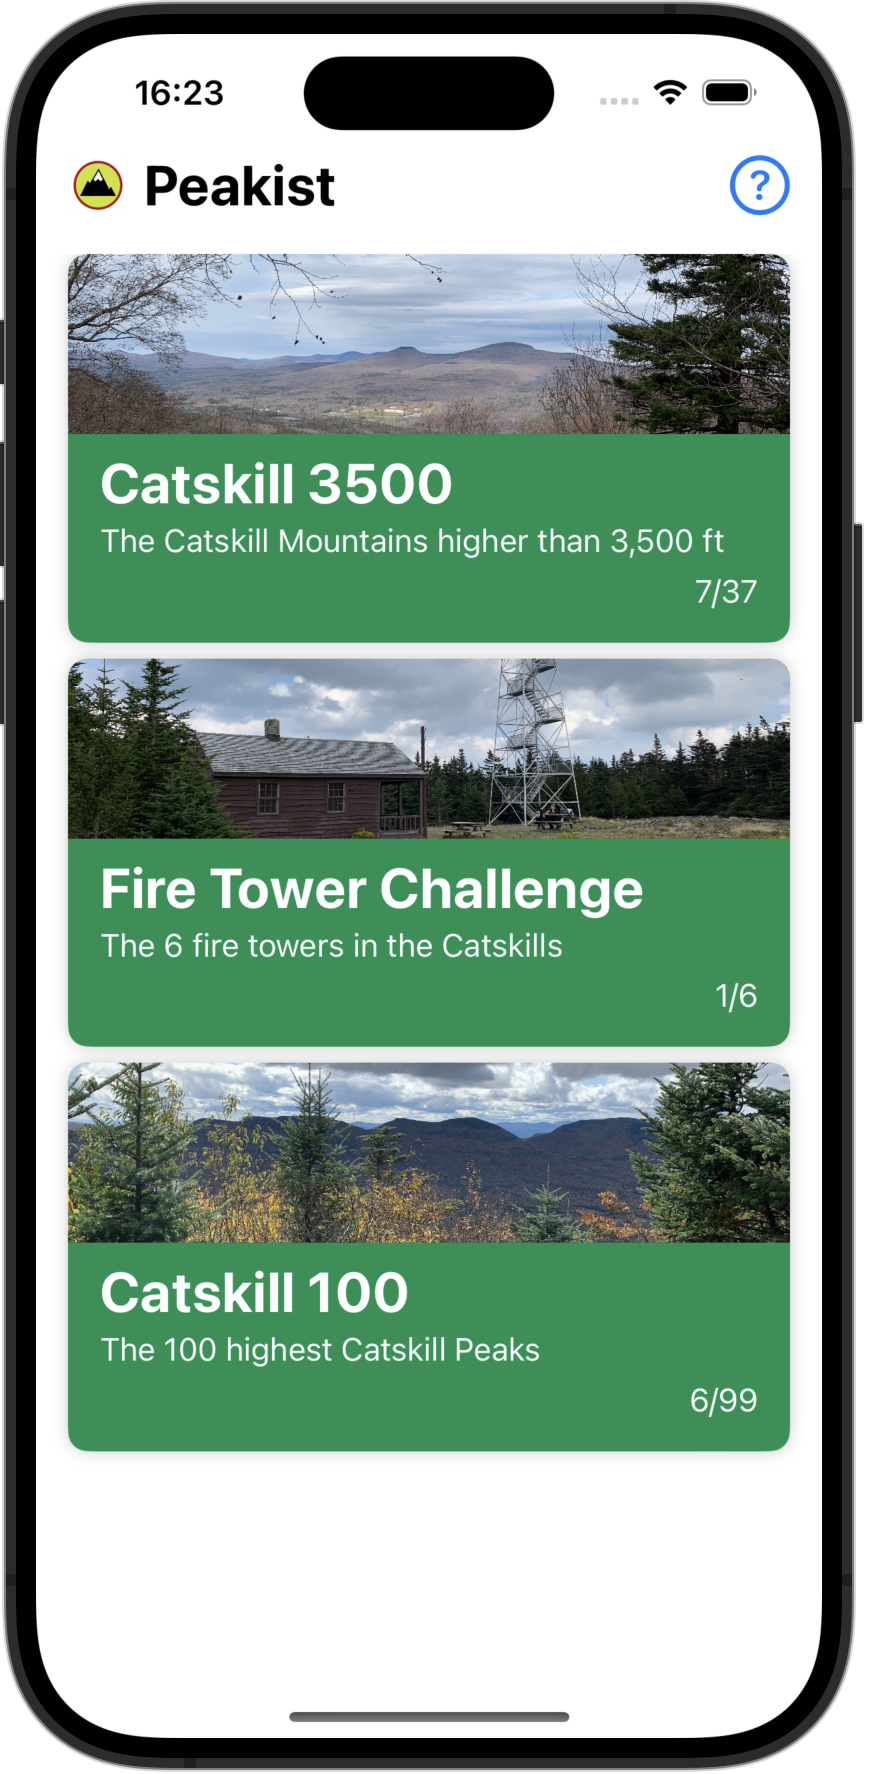
    After far too many rewrites, I’ve finally reached a “good enough” point for some beta testing of my hiking app. The app is called Peakist and it helps keep track of your visits to hiking locations. Some folks call this “Peak Bagging” and other folks find that to be a negative term. Personally, I’m indifferent but I avoid using that language here.  

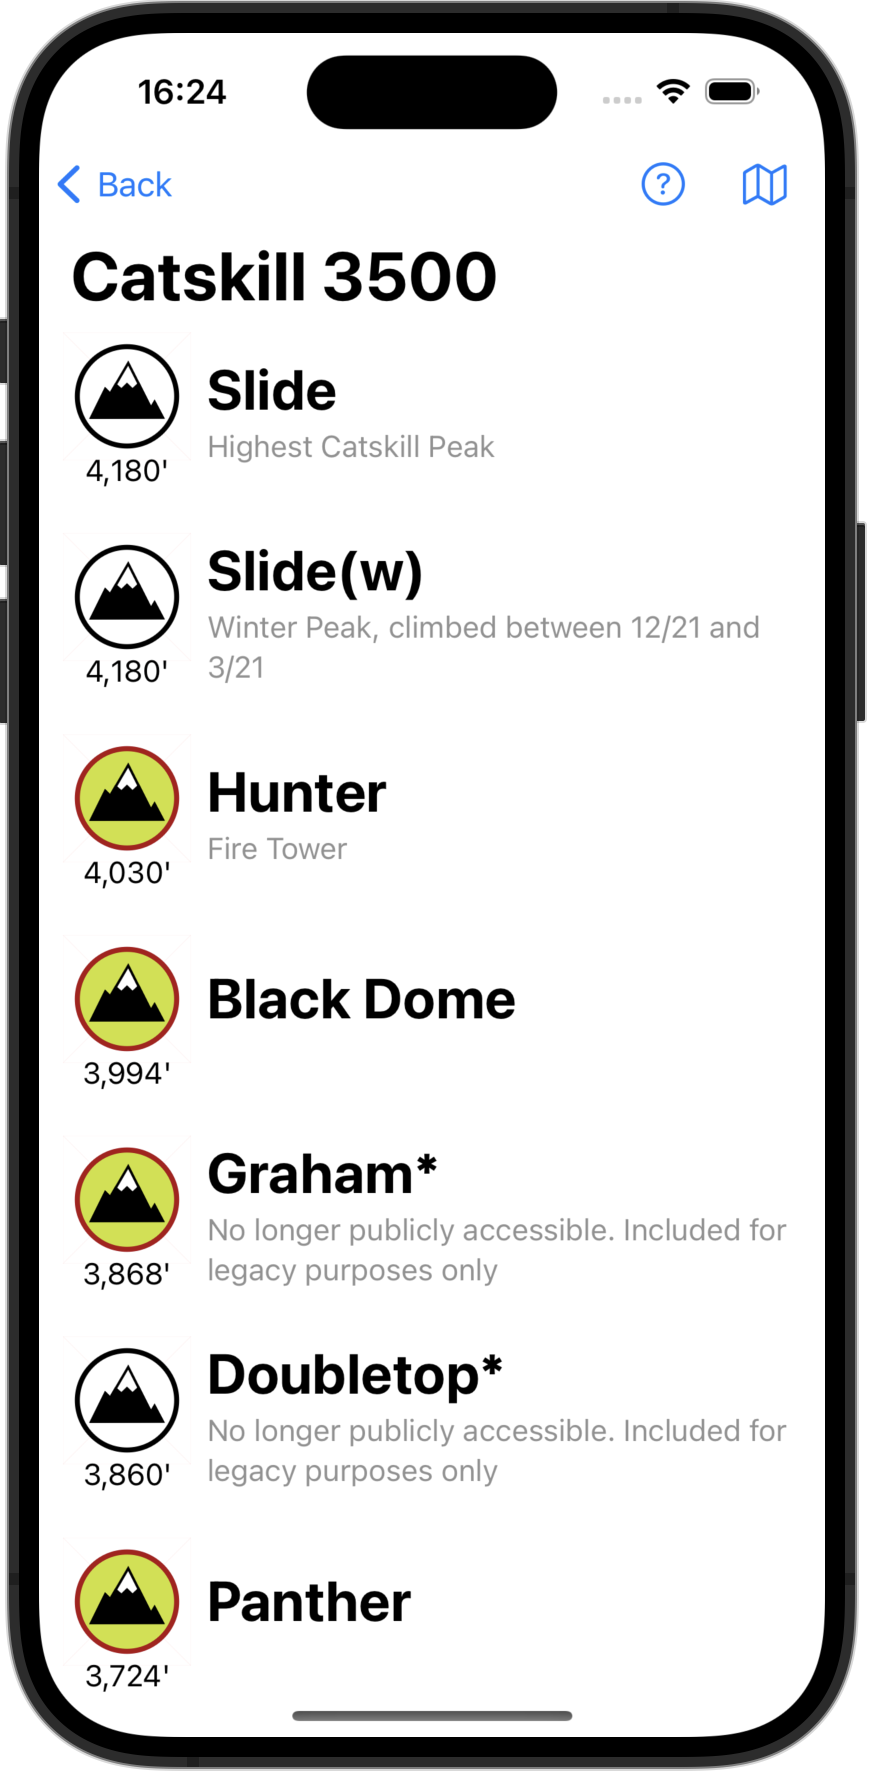
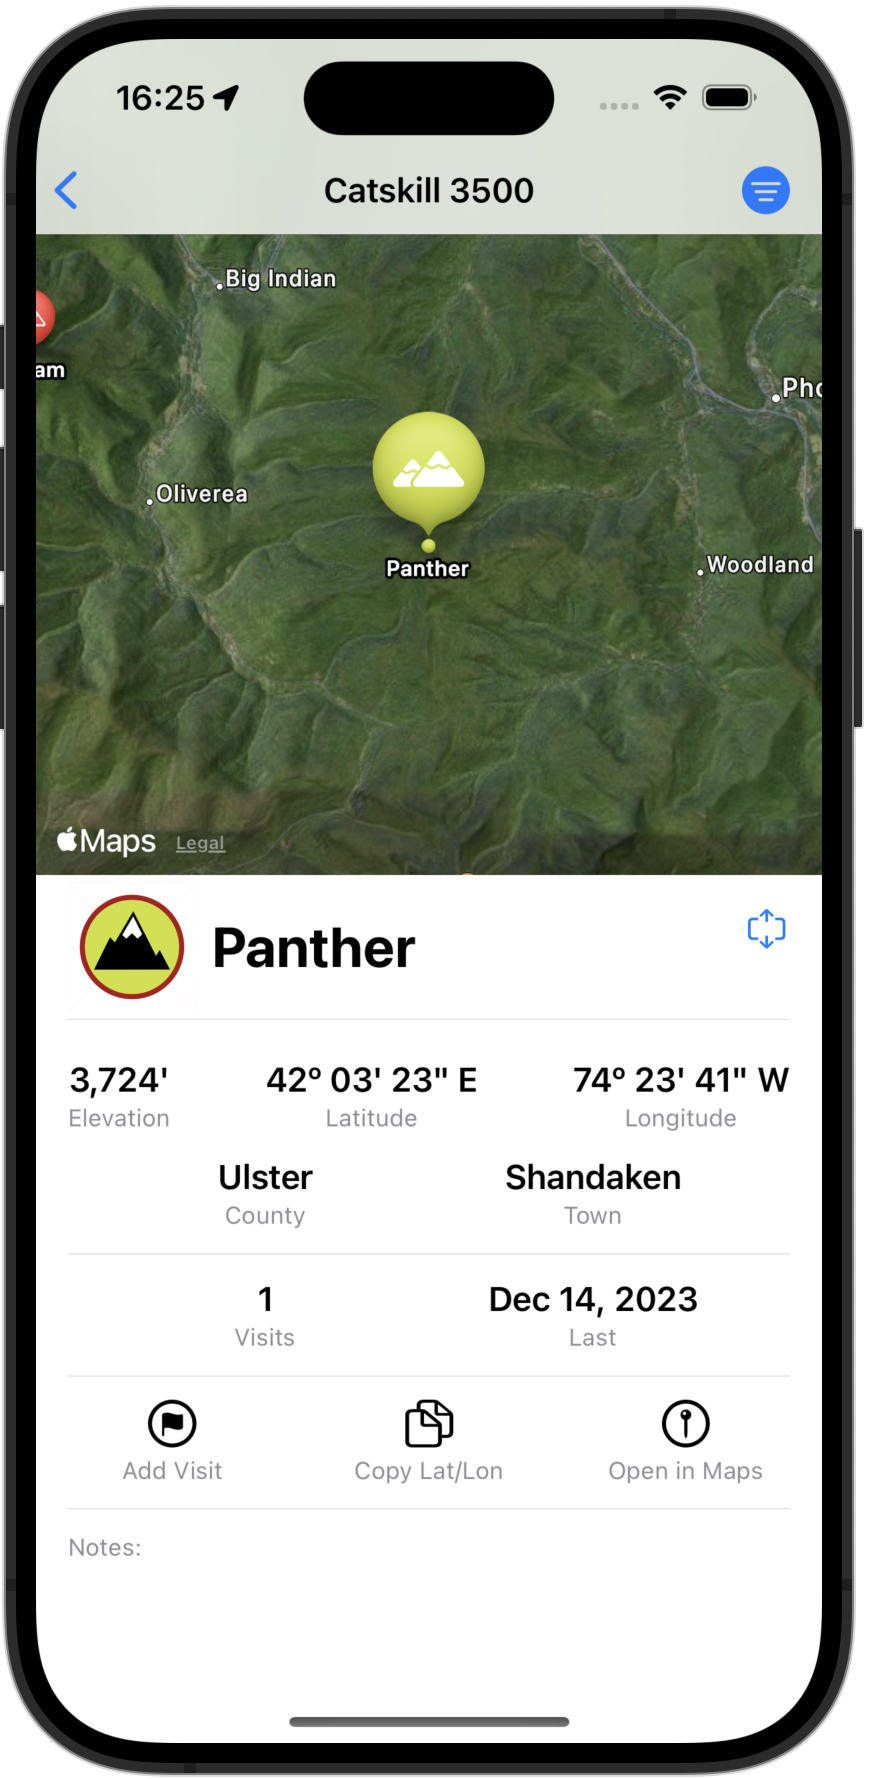
    You can use the app to track which locations you have visited or to give you inspiration for future trips. The current test version is designed primarily for iPhones but should work fine on both iPad and Mac. I hope to optimize the design of the iPad/Mac versions later. The initial test build features three lists of locations: Catskill 3500, Catskill 100 and Catskill Fire Towers. I do most of my hiking in the Catskills so I’m starting with these. 


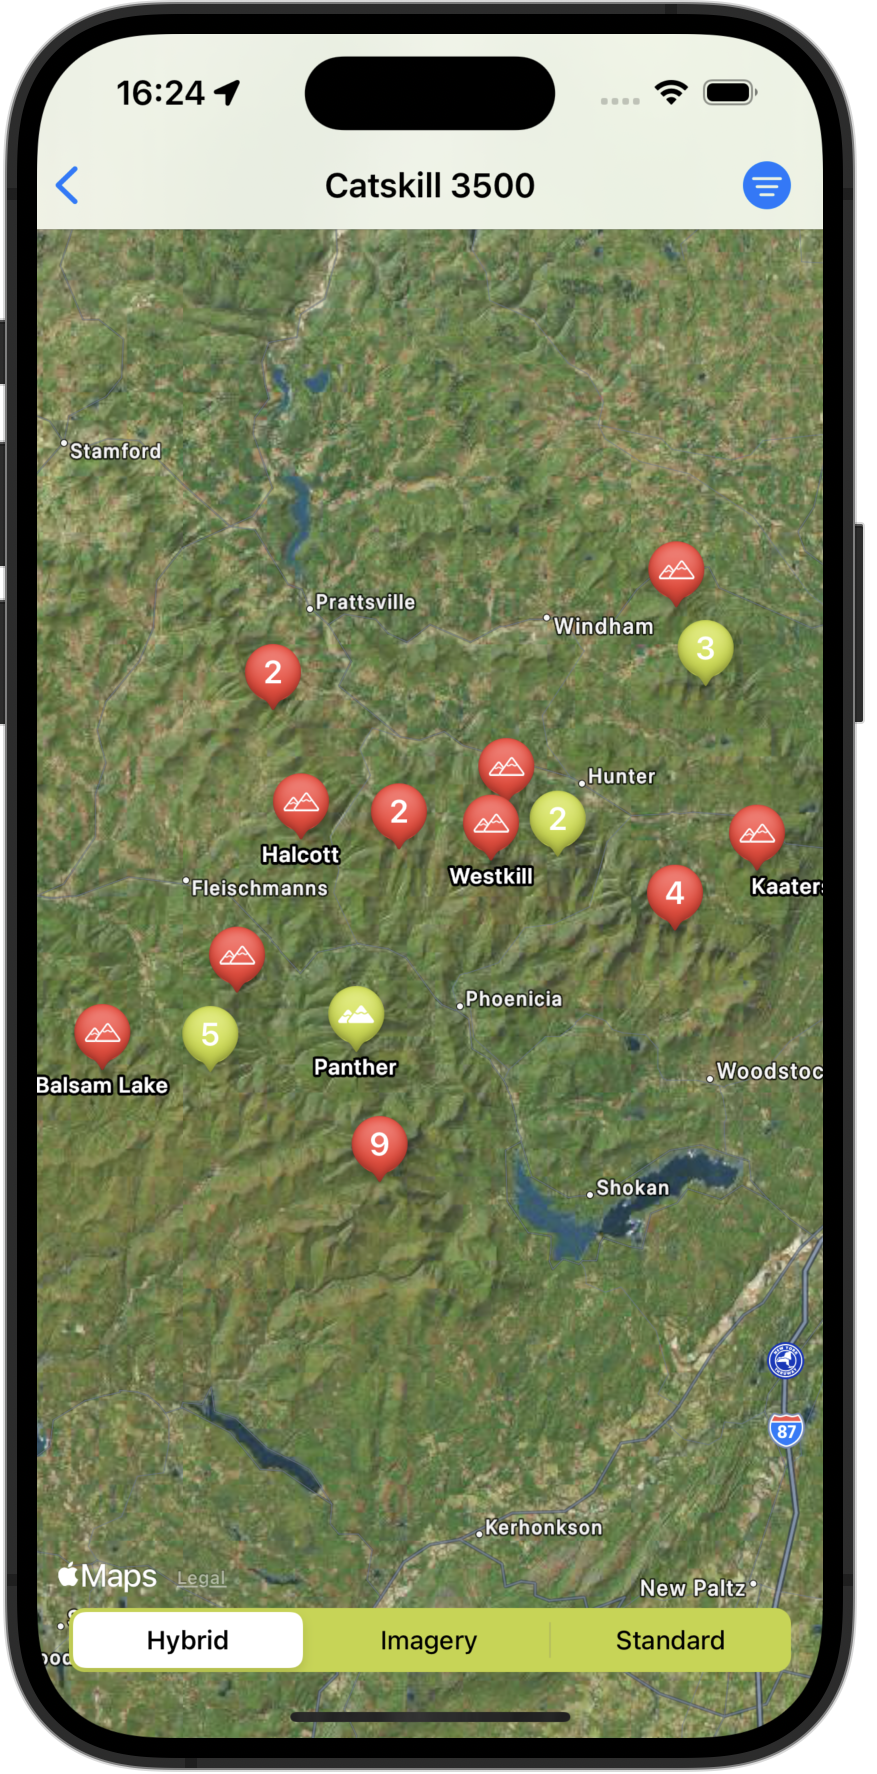
    Peakist is not designed to be a navigation tool for use in the field. It will display locations on a map so you can get a feel for where things are but it does not track your hikes or display hiking paths beyond what are included on the maps used.


    The app will allow you to copy the coordinates for a location for use with other apps/tools and will open any of the locations in Apple’s Map app to help with driving directions. It will also display known, official parking areas.


    I’m not 100% certain yet how the app will be monetized but the current thinking is it will be a free download with a few lists to work with but additional lists will be available to purchase. Ideally you would be able to download the app and get your first list for free and then pay for others but I’ve yet to work out how to do that. Still thinking about this...

    I still want to make some design tweaks here and there but I want to put this out into the world to get some feedback and gauge interest in this sort of app.

    If you are interested in testing the current beta version drop me a note and I’ll add you to TestFlight for the app. Note that the app uses the latest, greatest Swift/SwiftUI features and therefore requires a minimum of iOS 17.

    There is a website for the app. The site is based on an earlier concept and out of date right now however there is useful information there and in the FAQ.

    I believe the world needs more apps that don’t treat users as a data farm so I track nothing and share nothing. Visit data is synced via iCloud and that is the only data that will be passed around and that data will not leave the users iCloud account.

    If the concept for this app is interesting but you hike in another region please let me know what other lists you would like to have included. I do plan to add other local (to me) regions soon such as the Adirondacks.  

    → 2:02 PM, Feb 2
  • Imposter Syndrome, Featuritis and Just Shipping Something

    I think everyone who does indie development harbors the dream of shipping an app or two that can earn them a living. The reality is that’s probably not going to happen and even if it does it’s going to take a lucky break and be a long term project. 

    I tend to be the type to add too many features (featuritis) and be too picky when planning my own apps. This comes from wanting to build a great product as well as making it compelling for users to spend their cash.

    There is also the constant worry that I will embarrass myself with a less than amazing app. Classic imposter syndrome. I’ve shipped dozens of successful apps and I still feel like I have no idea what I’m doing or how I accomplished that. For me, this all leads to paralysis and difficulty shipping. 

    As an example, several of my apps make heavy use of maps and Apple's MapKit has been a moving target since the advent of SwiftUI. The app(s) in question have been in development for a while and I’ve gone back and forth between interfacing with MapKit via UIViewRepresentable, using MapKit for SwiftUI and MapBox for some time. 

    I’ve recently learned that Mapbox now has “experimental” support for native SwiftUI frameworks so I experimented with that as well. It works fine.

    The point is I’ve redone the map support in my apps at least five times and this app is yet to ship.

    I have been working on these apps a long time, rearchitecting/redesigning them over the past 18 months. I’ve been looking to create an awesome map experience when the map in my app is a secondary feature.

    Over the past few days I decided to step back and rethink my assumptions around app features considering the possibility I am overthinking things and maybe, just maybe, I can get by with a simpler approach. I really want to use the latest SwiftUI based stuff as much as possible. Working with the new SwiftUI frameworks is so much simpler than most of the older frameworks. That’s not saying SwiftUI is perfect. Far from it.

    I think the SwiftUI route may lead to shipping something quicker. The key will be in not fighting the frameworks. Yes, SwiftUI is incomplete in areas and may not lend itself to all the customization we enjoyed in the UIKit/AppKit days. It’s best to stop fighting SwiftUI and make use of what’s there.

    A clean, working app that has shipped should be better than a fancy custom app that never sees the light of day.

    Using the most recent SwiftUI frameworks also limits an app to the latest iOS release. Just accept it and get on with the work. It’s just not worth fighting to provide last gen support for an app that doesn’t yet exist. If a market develops and cries for older OS support that’s a good problem to have and something to be dealt with in the future.

    Single device support is good enough for a version 1.0. It’s not necessary to work with CoreData or SwiftData to sync data across devices. When creating a new app just ship on one platform and worry about adding sync support later. It’s likely that in creating a multi-device app you will need to do extra work to make a real iOS/iPad/Mac app anyway. The goal should be to ship first and iterate. Don’t worry about multi-platform and syncing support in the first version.

    When the average app price is probably nothing, is it worth building all these features? I got into software development because it was fun. It’s always worth remembering that and reassessing what brings you joy and focusing on that.

    My current app project using maps is a project that scratches a personal itch. It started out as a fun project to build something I want to use. Over time it’s become a bit of a chore. It’s time to bring the fun back and let the rest sort itself out.

    Thanks for coming to my inner monolog indie app dev pep talk.

    → 12:10 PM, Nov 3
  • Displaying User Location with MapKit for SwiftUI

    If you’re only interested in the code to show a user location on the map a plain text code listing is at the end of this post...

    I’ve been rethinking my approach to maps in some of my apps lately and I’m taking another pass at trying to use SwiftUI and the new MapKit in lieu of wrapping the UIKit MapKit views in UIViewRepresentable. I’ve implemented a MKMapView wrapper a few times now and I find it inelegant amongst all the concise SwiftUI code.

    I understand that if I need the features that aren’t currently available via SwiftUI I need to use the wrapper but that’s a big part of my rethink. Do I really need all the features I’ve been considering? I have a tendency to over scope projects and make shipping harder than needed.

    I sat down to watch the Meet MapKit for SwiftUI video again. I’ve already watched this video a handful of times. It covers a great deal of ground and explains the new features pretty well.

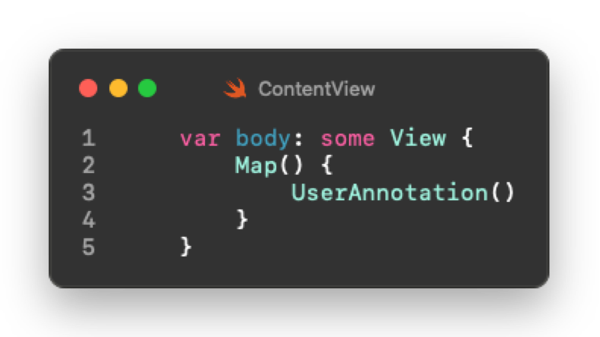
    I want the ability to show the users location on the map. According to the video its a single line of code:

    BodyView

    Not so fast. In the video this displays the users location and enables other features using this location.

    If you’ve used the old MapKit you may recall needing to get the users permission before being given access to their location. In order to do that you had to rely on the CoreLocation framework. The WWDC video makes no mention of any of this but it’s still required.

    Just like in the UIKit based MapKit you need to edit your Info.plist to provide a string explaining why you need to know the users location. You also need to rely on CoreLocation's LocationManager class in order to prompt the user to allow access to their location and keep track if permission has been granted.

    In your apps Info.plist add an entry for one of the privacy requests based on your need. For example, if you only need the users location while they are in the app add “Privacy - Location When in Use Usage Description” with a string that will be shown to the user when asking permission. Anything will work here but keep in mind when shipping your app that Apple might review what you ask for here. I’ve had no problems being blunt. Something like “Displaying Users Location on the Map” is fine.

    Note there are several privacy fields referencing location use. Make sure you select the correct one and your code matches the type of usage you need. Selecting the wrong permission in the Info.plist can cause user location to not work and fail silently with no indication of the error.

    InfoPlist Screenshot

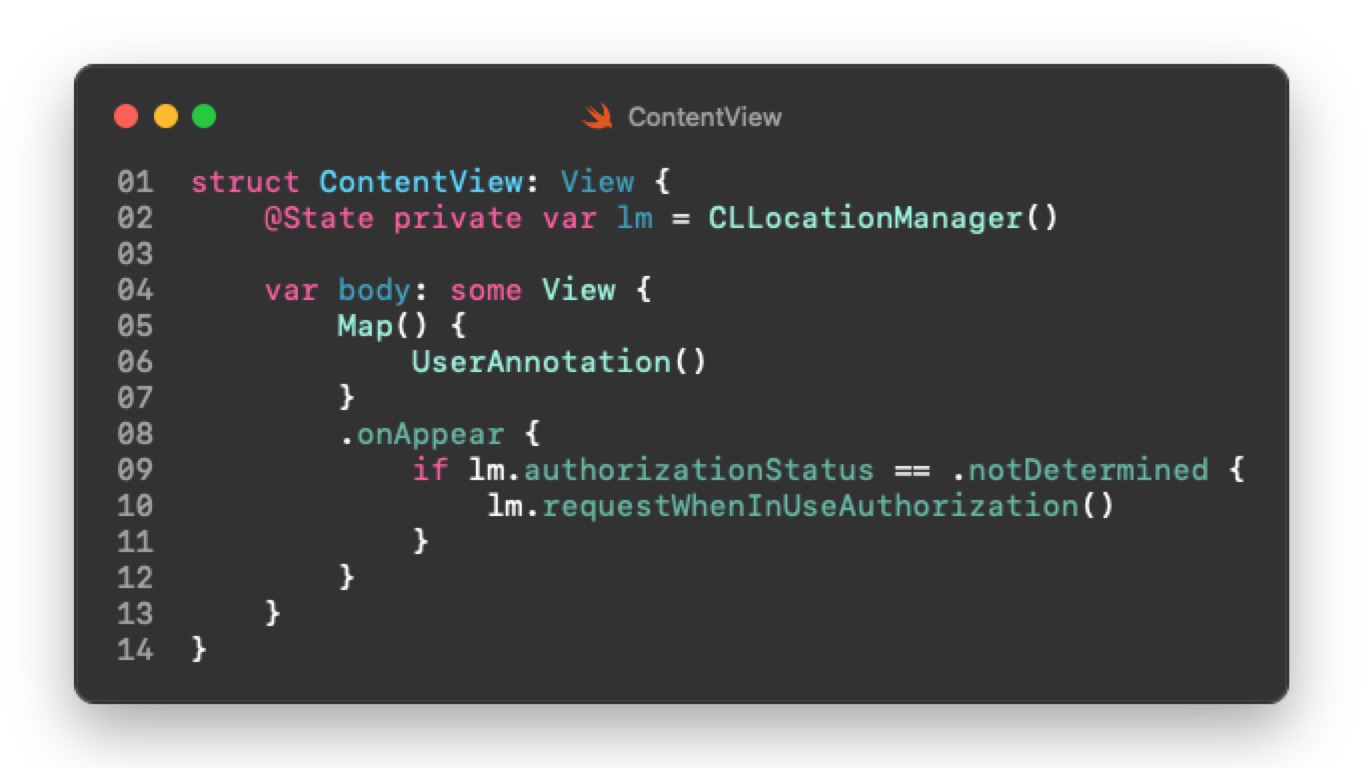
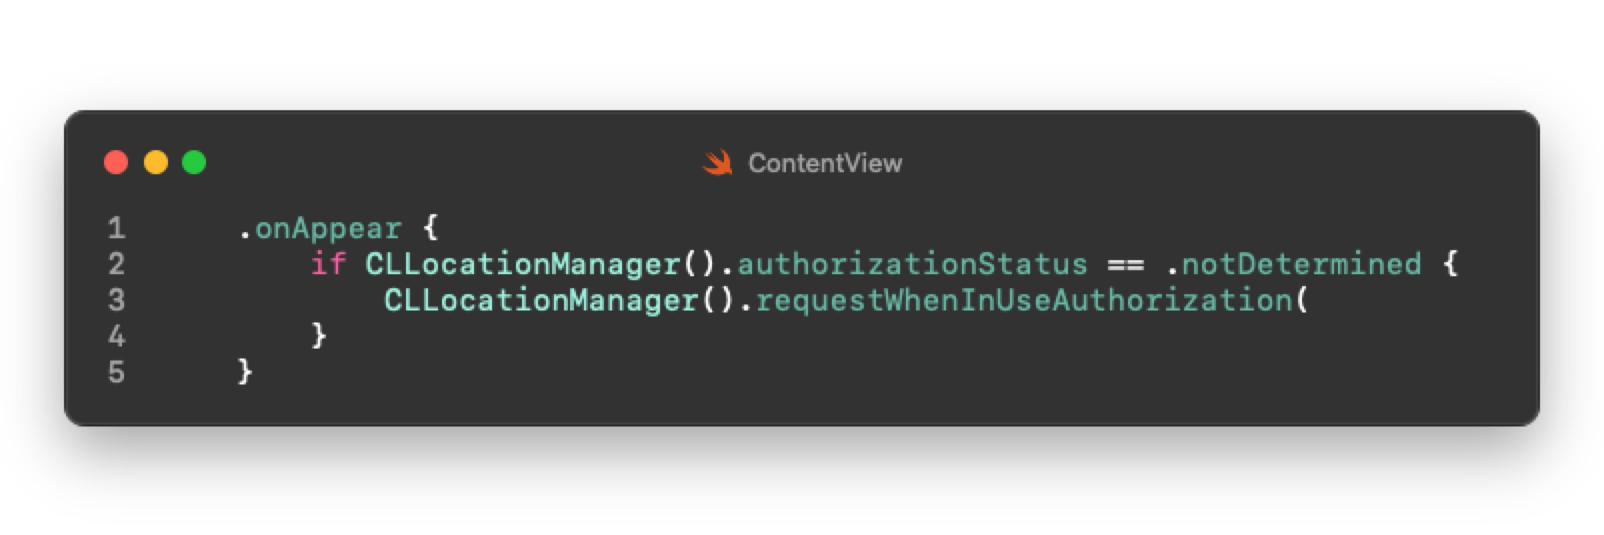
    Once you have edited the plist you need to add an instance of CLLocationManager to your view and be sure you’ve asked for permission.  This is the minimum I’ve found to display the users location:

    MinimumContentBody


    Note that this code is asking only for permission to see the users location while they are using the app. If you require background usage, adjust both Info.plist and this code to request what you need. 

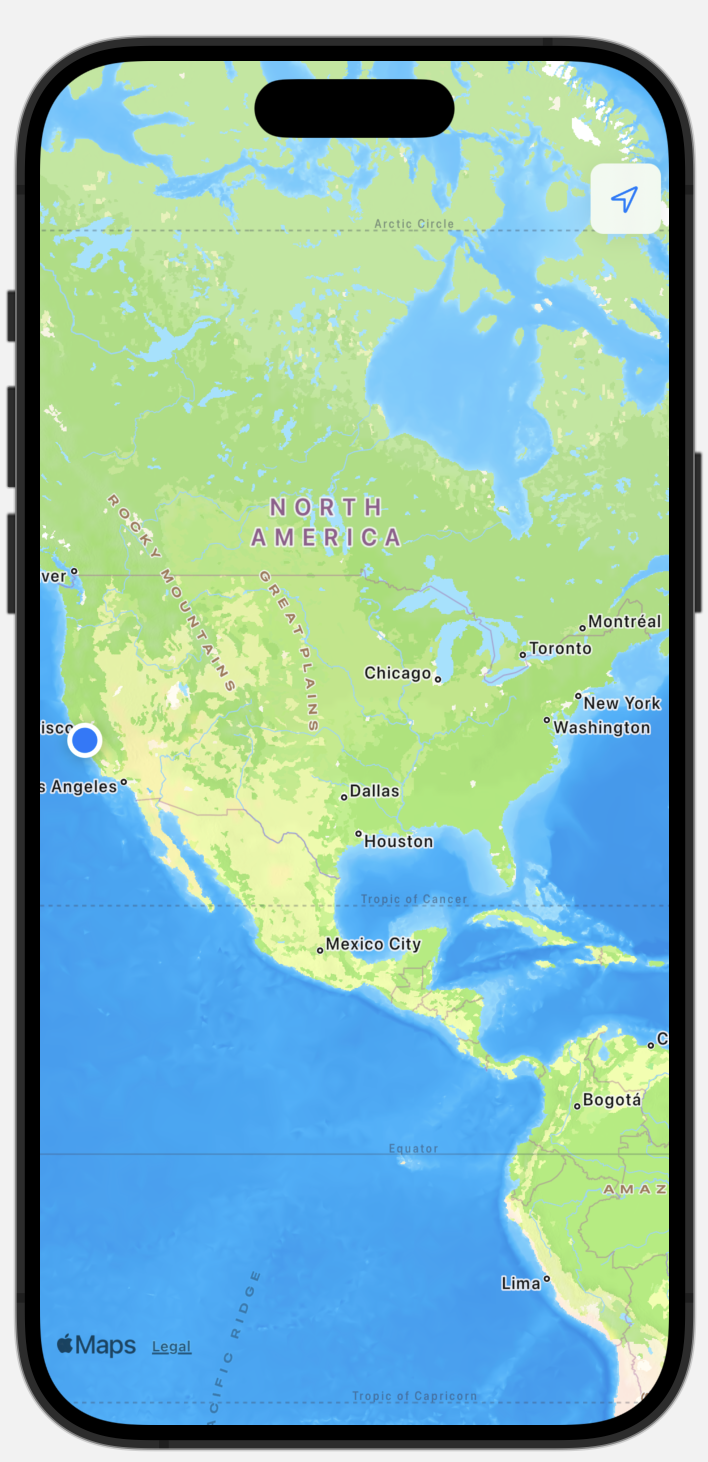
    By default a preview view will show the map zoomed out to show all of North America with the user located at Apple Park in Cupertino, CA.

    Map Preview Screenshot


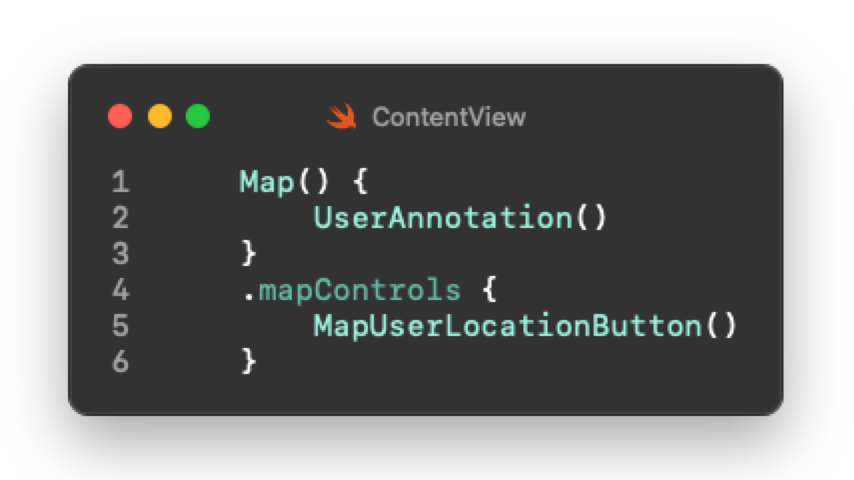
    One other new feature of MapKit for SwiftUI is the ability to add additional map controls to the view such as the map scale, compass or a button to zoom to the user location. The screenshot above shows the MapUserLocationButton in its default location. You may not need this in your apps but I find this button very handy, even if only during debugging, to quickly check that things are working so update the code to add a mapControls modifier so it looks like this:

    MapWithUserButton

    In my initial experiments with getting user location displayed it seemed all that was needed was to ask if the user has given permission and if not ask. I tried various ways of asking for permission and settled on what is shown here. If you play around with this you may wonder why the @State is required to store the CLLocationManager instance at all. It is needed so that the map can update the view when the users location changes. If you omit the @State for the CLLocationManager and try something like this:

    IncorrectLocationManagerRequest

    you will see the users position on the map with the familiar blue dot BUT it will not update if and when the user moves. The new SwiftUI implementation of MapKit gives you easy user location tracking but only if you provide a @State to hold the instance of the CLLocationManager.

    Thus far I have been unable to get the preview views to show any other locations than the default at Apple Park in Cupertino, CA. The simulator will show the various provided user location options or even a custom location you specify by latitude and longitude. 

    Simulating Other User Locations

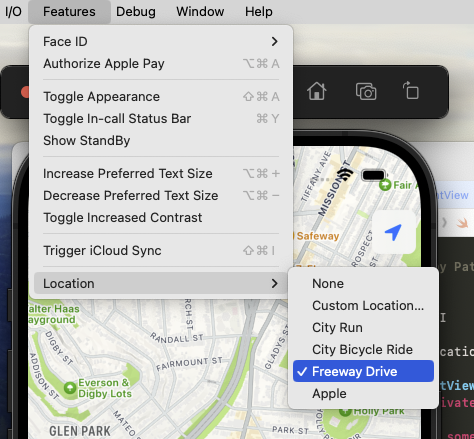
    If you want to see the user location update in the simulator based on Apple provided presets, run the app code provided here on a simulator device. Once the app is running and you have granted permission to show your location, press the MapUserLocationButton in the upper right to zoom in. Next select Features -> Location -> Freeway Drive from the simulator menu:

    Simulator Location Screnshot

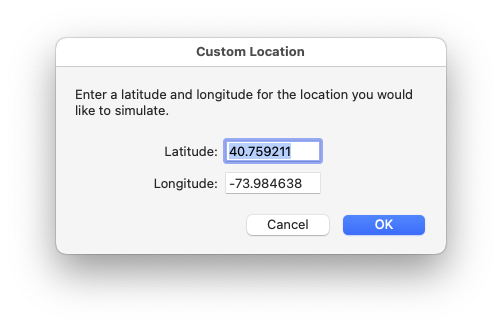
    If you are zoomed in close enough you will see the location update as if you were driving on the California freeway. The other location options simulate various routes and locations. You can also enter a custom location to show the user at a specific location. For example this will simulate the user being located in Times Square New York City.

    Time Square Coordinates

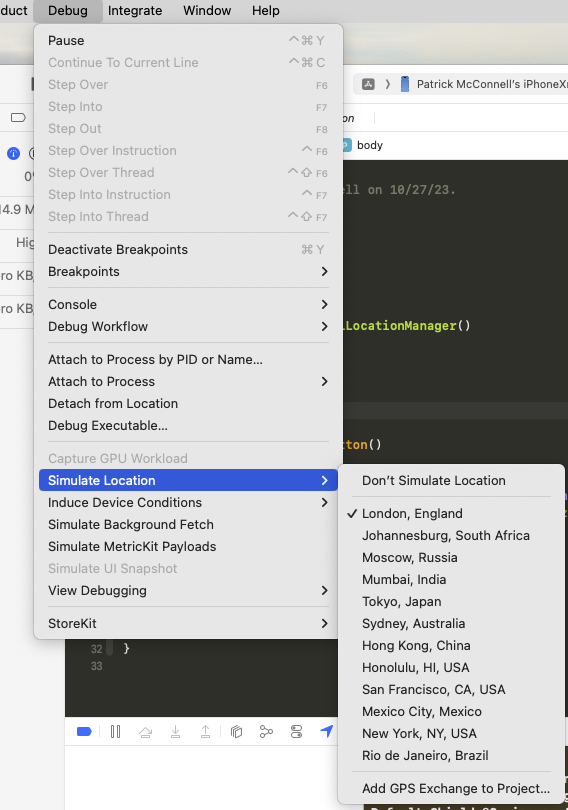
    If you want to simulate locations while debugging on an actual device. Debug the app from Xcode and select Debug -> Simulate Location ->  then select a location

    Xcode Locations Screenshot

    If you are zoomed in enough when selecting a location you will see the map view animate to the new location. Again, I have been unable to get locations other than the default to work in the Preview View. If you have a trick to accomplish that let me know.

    All of the code and screenshots shown here were generated on Xcode 15.0.1, simulators and preview running iOS 17.0.1  and my actual iPhone running iOS 17.1.  

    An earlier version of this post stated that MapKit support was compatible back to iOS 14. That is not correct. While the base Map view is supported that far back the newer MapContentBuilder features that enable Markers, Annotation, etc. require iOS 17.

    Here is a text code listing for a ContentView.swift that shows all the things discussed here.

    //
    // ContentView.swift
    // Location
    //
    // Created by Patrick McConnell on 10/27/23.
    //

    import SwiftUI
    import MapKit
    import CoreLocation

    struct ContentView: View {
        @State private var lm = CLLocationManager()

      var body: some View {
          Map() {
              UserAnnotation()
          }
          .mapControls {
              MapUserLocationButton()
          }
          .onAppear {
              if lm.authorizationStatus == .notDetermined {
                  lm.requestWhenInUseAuthorization()
              }
          }
      }
    }


    #Preview {
      ContentView()
    }


    → 10:41 AM, Oct 31
  • It Should Not Be So Difficult To Be So Thick Headed

    As a long time proponent of avoiding dependencies in my software projects, it's often incredibly frustrating trying to find out how to do something yourself when that market has been taken over by services that really, really just want you to use their paid tools. Even the “open" and “free" paths can lead to dead ends in some SAAS product.

    I’ve been working on some map based products/apps for a long while. While the map frameworks available on the various platforms such as iOS and Android are good, I do need to extend what they are capable of. Things like offline viewing of a map or custom appearances (such as topography) are just not available out of the box in these frameworks.

    I am well aware of the steps required to render custom map tiles as I’ve done it in the past. Nowadays it seems like a wall has been thrown up around the tools and info needed to accomplish these sorts of tasks. I can find all sorts of documentation on how to generate the custom images necessary for offline map viewing or styling of my maps but inevitably at some point in my reading the path will lead to some paid tool/service.

    These services are free to market themselves and charge for what they are offering. I’m not suggesting there is anything wrong with that. I’m sure it helps many people accomplish things quickly and “easily” however I prefer not to rely on others. I’ve seen enough in the past to want to control as much of my code as possible. I just prefer to do things myself whenever possible.

    In the case of mapping tools I believe at some point in the past many these tools were freely available and widely known.  Somewhere along the line, the tools were put behind a pay wall and the ladder pulled up so that thick skulled fools such as myself have to really dig to find out how to do this themselves.

    I think on a more broad level this is similar to many things that used to be freely available but have now converted to a subscription. At some point we’re going to be paying for breathable air, aren’t we? 

    → 10:45 AM, Sep 29
  • Sometimes It Still "Just Works"

    From the department of little things that (still) make for quality apps…

    I'm currently working on a Go API for a new product we’re working on at Squirrel Point Studios. My current editor of choice is Nova by Panic. I have the app configured to allow me to run the app and tests in several ways right in the editor. I’m a fan of turning my editors into an IDE when possible.

    I like accomplishing as many parts of the development process in one app. Nova delivers on this in much the same way as something like Visual Studio Code. Sure there is a smaller audience and thus a smaller extension library but this doesn’t mean you can’t do the same things. There may only be 2-3 Go extensions vs 100 that might exist in the other editor but you can get what you want done.

    I’ve used VS Code for years and it’s probably the best example of an Electron app there is but it’s not a native app and never will be. I’ve built Electron apps when it served the purpose at hand. It has its benefits but native is almost always better unless you’re looking to cut some corner (expense.) More correctly, native apps have more upside than other solutions. Not all native apps live up to what is possible but some do and it’s worth seeking them out.

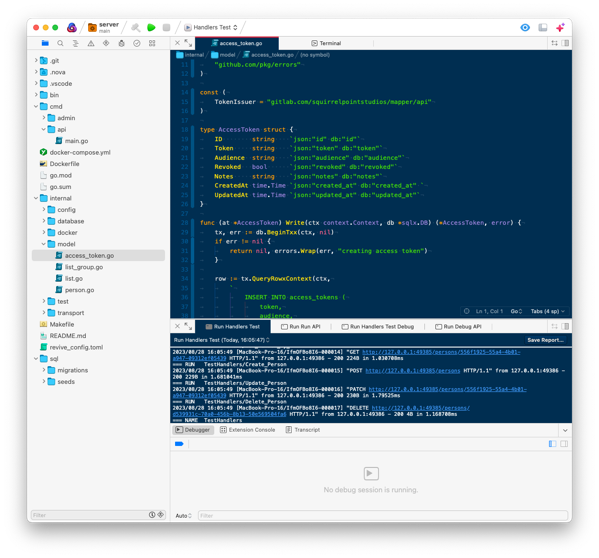
    One of the side effects of using Nova as an IDE (and why I started this whole brain dump…) is you can end up with several tabs of output from various actions. I tend to keep these tabs in a pane at the bottom of the editor view, as shown here. 

    Screenshot 2023 08 29 at 14 58 03

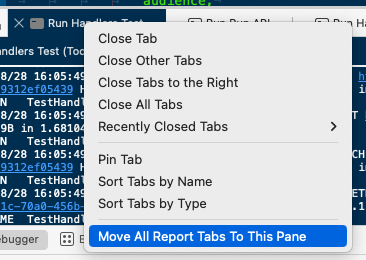
    Today I closed all my source code files to start on a new feature leaving only the report tabs open. My OCD causes me to need these panels to appear in the bottom of the editor. In one of those “it just works" moments that have become more infrequent over time, I right clicked on a report tab that I had moved to the lower pane and in the menu that appeared there is an option for “Move All Report Tabs To This Pane.” This was unexpected and very welcome. Sure I could have just dragged the handful of tabs to the lower pane but someone at Panic thought this might be helpful and took the time to add this feature. I salute that person and all the folks at shops like Panic that still care enough to add these little touches that are probably missed by 90% of users.

    Screenshot 2023 08 29 at 14 59 36

    I remember when I first started using a Mac full time around the time of OS X 10.1. Those early days were full of little moments where you would just try things to see if they worked and very often they did. As MacOS has matured and more so as web apps have displaced native applications we see less and less of these little bits of forethought that reveal themselves as “magic.”

    I think these little touches should be part of the spec for Mac-assed Apps, a term coined by Collin Donnell  that I learned about via this post from Brent Simmons. This sort of thing is why I continue to fight the battle against web apps and universal frameworks. Sure, there are good examples but a conservative estimate might be 1:1,000 good vs adequate applications. Those of us who understand this are still out here using old school apps like BBEdit and new fangled examples like Nova. We resist the temptation of the new shiny thing everyone else is using because these Mac-assed apps do the job and often do it better if you just give them a chance.

    → 3:36 PM, Aug 29
  • Hey I have a WWDC Post Too!!?!

    Everyone else is doing it so here is my post on WWDC.

    As a long time Apple developer I have always followed the events of WWDC. Some years I am working in other areas and I don’t follow as closely as others. This year I am in the middle of a few projects for iPhone/iPad/Mac so I was watching intently for things I could use. 

    I’ve done this long enough that I know that anything announced can’t be used for at least a few month until the new frameworks and platform updates are released. When doing consulting work I am usually required to support a few older OS versions so even after the frameworks are released they are often not available to use. On my own personal projects I will jump in and require the latest OS if it’s compelling enough. Apple device users tend to update quickly and my philosophy is that people who don’t update are probably not a large group of app buyers anyway.

    Right now I am working on several mapping app projects (Peakist being one.) I prefer to work in SwiftUI when possible as it’s just easier when it does what you need. I am comfortable falling back to using UIKit when needed but it is cumbersome so I was hoping for improvements to MapKit with SwiftUI. I dared not actively wish for this as Apple moves very slowly and rarely gives you what you want in a timely fashion. I was very happily surprised when the keynote mentioned MapKit related items like offline maps and topographic map styles. However, when I went to bed that night thinking of how I would refactor my apps to use these new things it dawned on me that perhaps Apple didn’t expose these features to developers. The next morning I dug into the docs and videos and my fears were correct. While Apple has given Map app itself the ability to download maps for offline use there is no public framework for developers to do so. More frustrating, personally, the topo map style is not available outside Apple’s own use for the Map app on the watch.

    Still the improvements to MapKit with SwiftUI for non-topo map projects are compelling. In some quick experiments I was able to replace my UIKit map bridge containing 100s of lines of code with a handful of lines of SwiftUI code. That’s a huge win and I will use this for future projects.

    All the other improvements to the platforms look great as well. I haven’t dug into what is and isn’t accessible for developers but I’ll get there when I need some new features.

    The headset looks like impressive technology but I think Gruber eloquently summed up what I was thinking when he talked about whether it makes a “compelling product” It looks like an amazing toy at a minimum and I would like to try it but I don’t see a reason to buy it. Yet.

    If it was under $1k I might feel differently but the current price is too high for something that I feel currently has limited use. I’m not saying it’s too expensive for what it is. Sure there is an Apple premium I suppose but it’s just more costly than I can justify to play with. This is all likely to change once use cases emerge and more software is available. I suspect this will be similar to the watch where apple tossed out all sorts of ideas at launch and it eventually settled into a fitness/notification device. 

    I’ve yet to use a VR headset that doesn’t quickly make me nauseous so I most defiantly would not purchase one without trying it. I sounds like some of the things they have done here will help with that but time will tell.

    I think it’s clear from many of the improvements and new frameworks that Apple is increasing their dogfood-ing of SwiftUI. Things many of us have asked for are being added and they look like great implementations. I’m sure holes remain, and I’ve found a few myself, but things are improving. 

    The big win for me this week has been Mastodon and finding more interesting people to interact with. I’ve had great conversations with people working in the same areas as me and look forward to continuing discussions in the future.

    Sure there are the usual negative borderline trolls abusing the #wwdc hashtag but for the most part it’s been a very positive experience. I do understand some of the concerns about the walled garden, patent locked software, climate change and how many animals were harmed in the production of this toy for the rich and powerful. I get it but this is still impressive technology and let us just geek out for a bit. For some of the concern trolls I offer the words of the dude:

    Fo FtF X0AAo1SS

    So as the WWDC week winds down, I’m watching the videos and reading the docs longing for the time when I can make use of the new tools. Right now I have to ship a few things so I need to suppress my immediate disappointments with missing features and the lack of ability to use what is provided in beta frameworks. Still it’s inspiring to see the new things coming and I continue on with current projects with a bit more enthusiasm.

    → 10:11 AM, Jun 8
  • Creating a SwiftUI Launch Screen

    Some Background

    iOS and iPadOS apps both support a launch screen that will be shown first when the app launches. The purpose of the launch screen is to indicate the app has launched but it may still be doing some background tasks or unwrapping the UI before it’s ready for the user. It’s traditional to show a splash screen or an image of your actual UI for the launch screen. This makes the app feel responsive and the device feel fast. This has always been a bit of an Apple sponsored hack to make things feel smooth and quick for users. It works.

    The old way of creating a launch screen is by defining a view in a storyboard and pointing Xcode to that view. That view might be just a UIImage or it could be any view you like. This worked fine in the days of UIKit where you may have already created the UI views in a storyboard so you could easily replicate your UI view as a launch screen in order to make it appear the app was loading quickly. 

    In the days of SwiftUI where many things remain in flux, there are new ways to create launch screens. You can still use the older method but it’s more difficult to create a view that matches the view you dynamically generate in your SwiftUI code. 

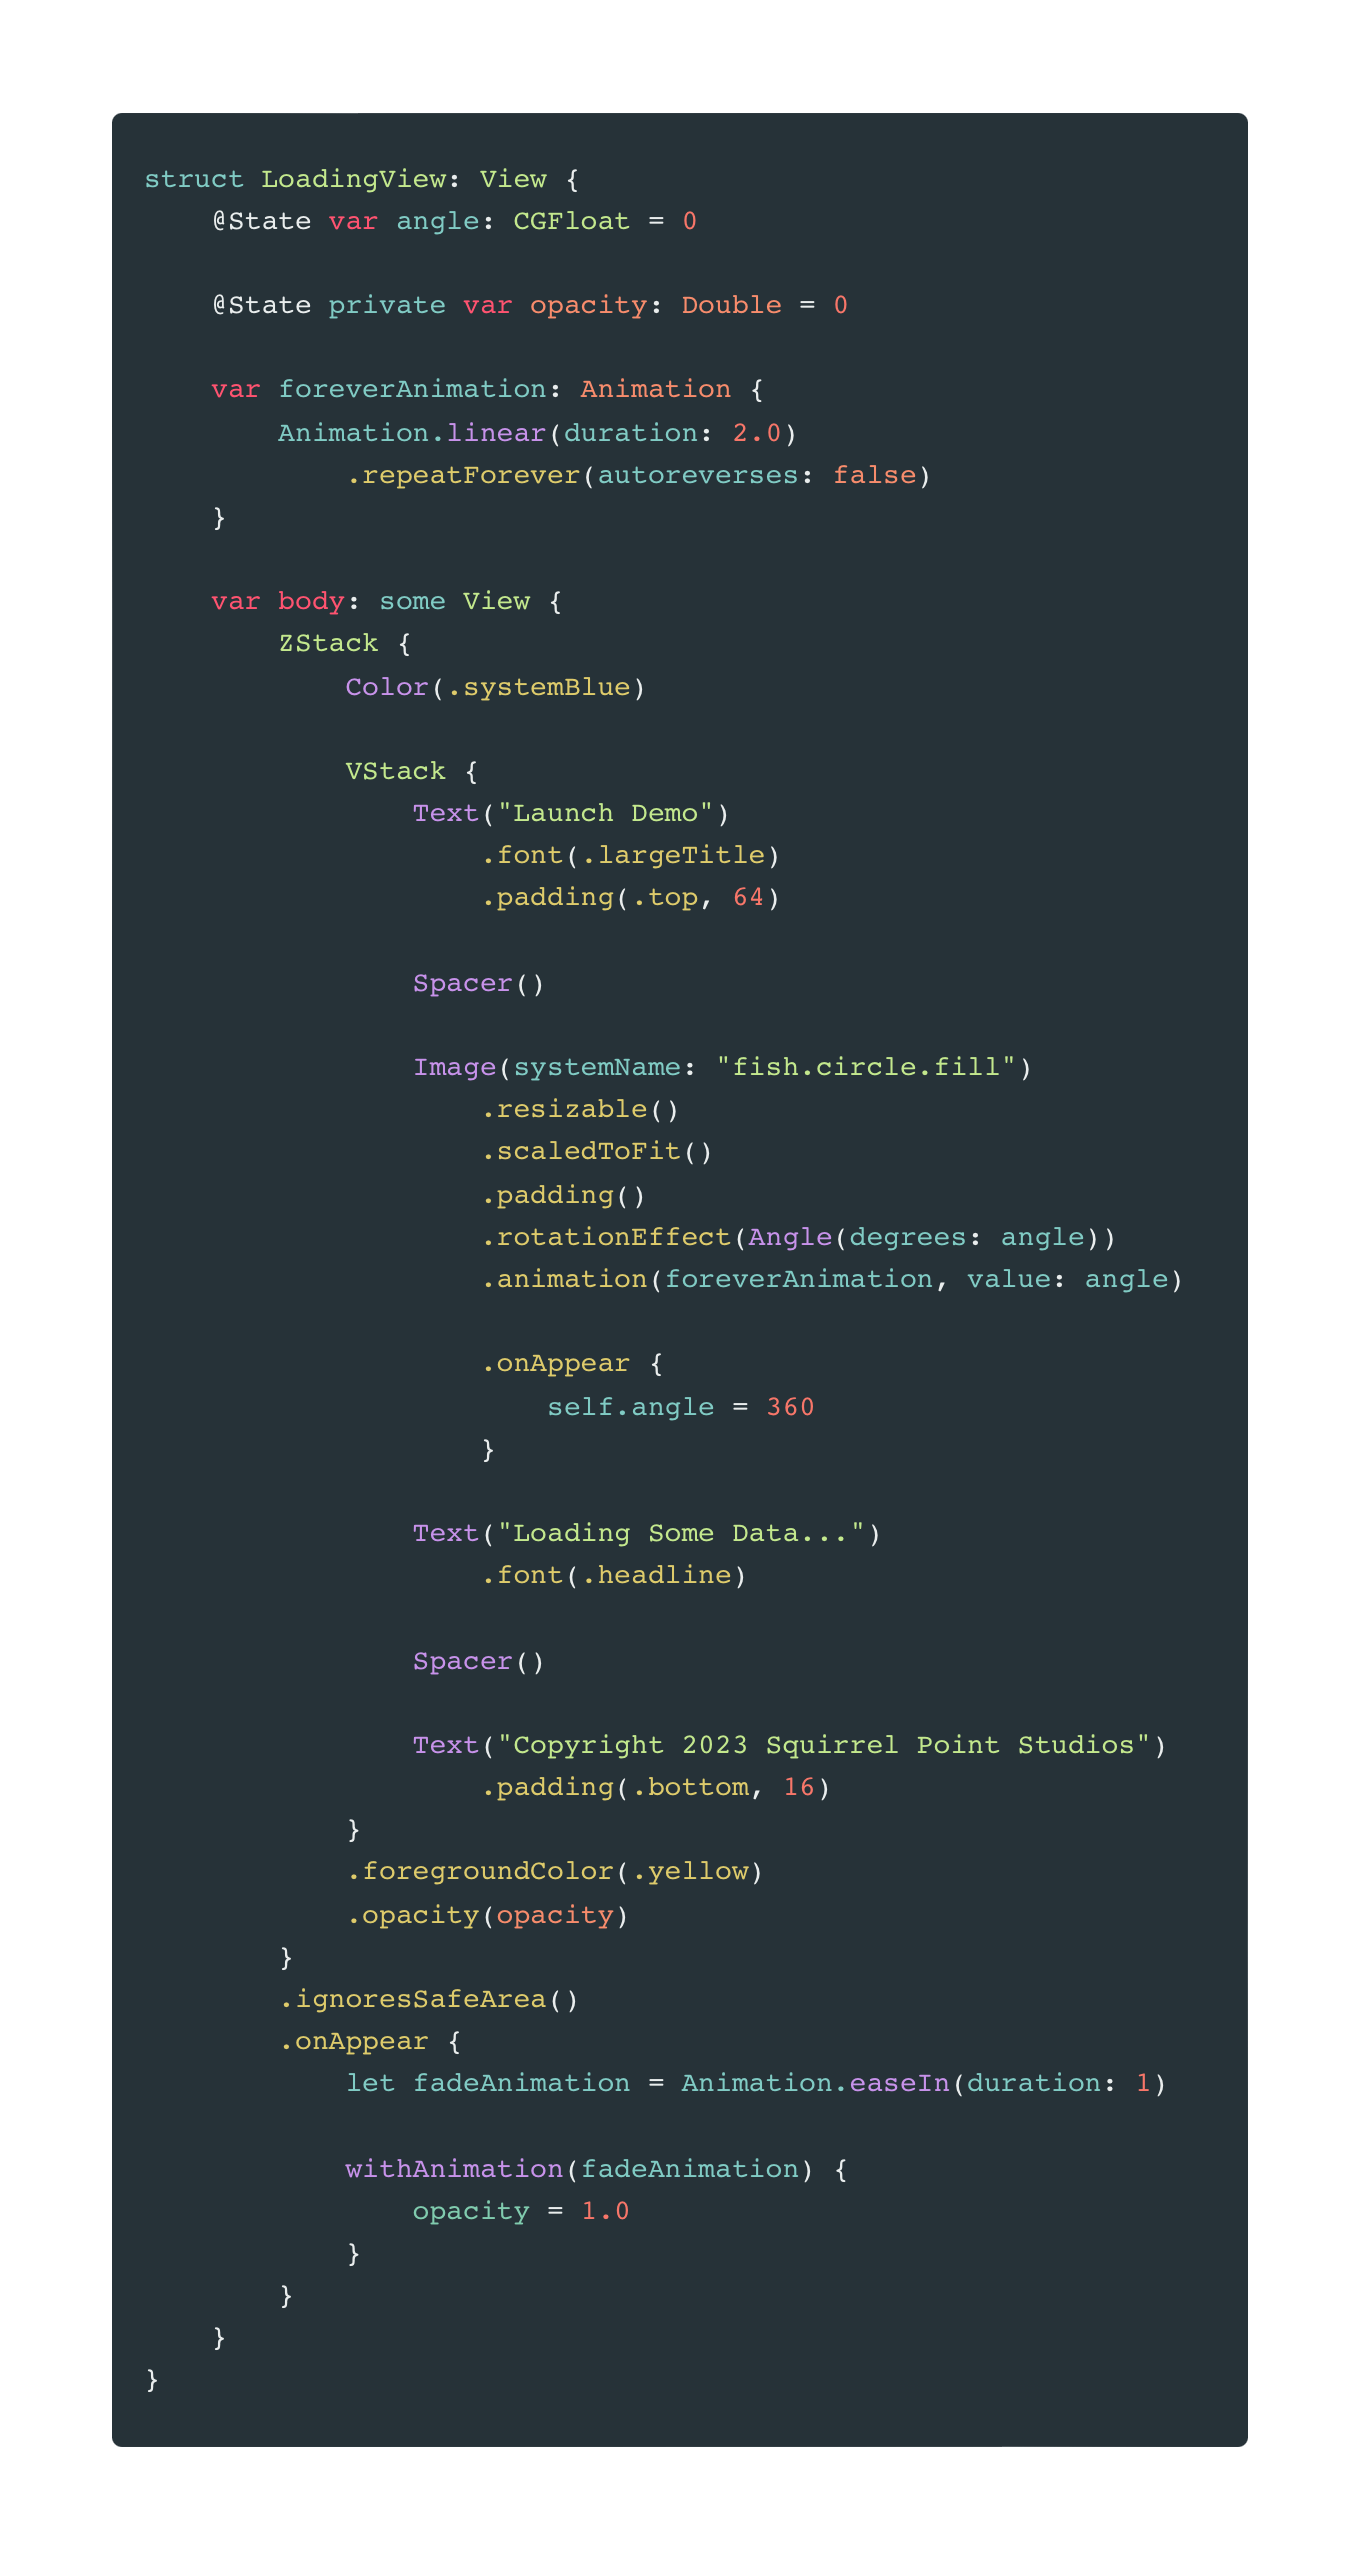
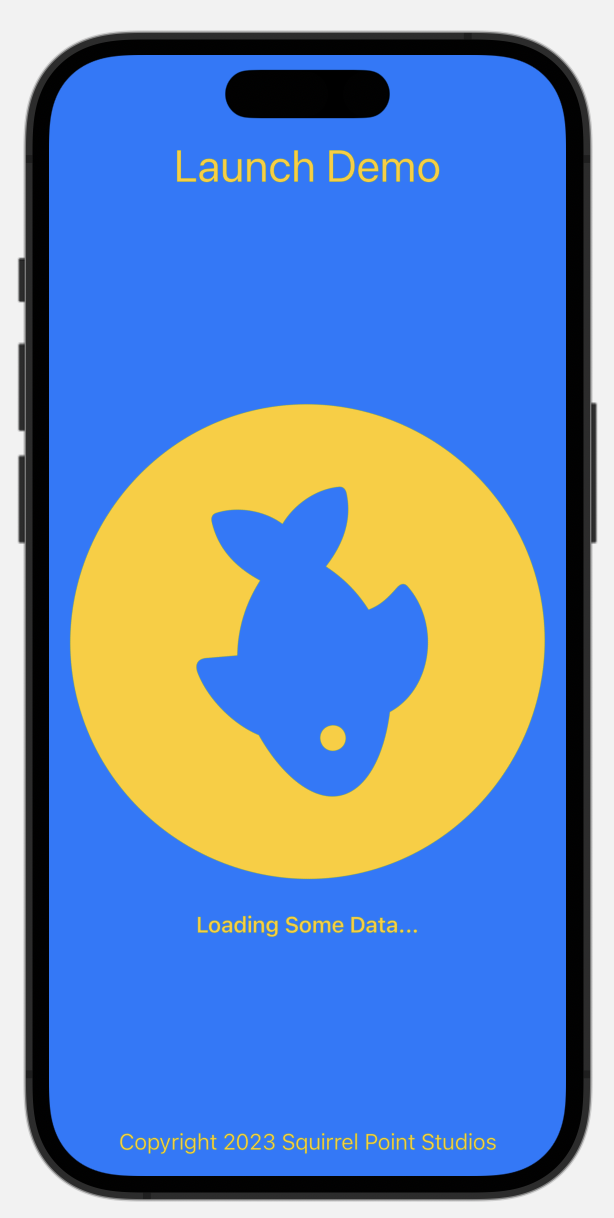
    In my current app my initial view is displaying a circular image close to the center of the screen and that image is magically sized in my SwiftUI code to best fit the screen. There are several other text elements displayed and I don’t do much more to place them then drop them all in a VStack and using some spacers. Replicating that magic in a UIView from a storyboard is difficult and some things may in fact not be possible. In order to come up with something that didn’t create a jarring transition from launch to live UI I needed a solution.

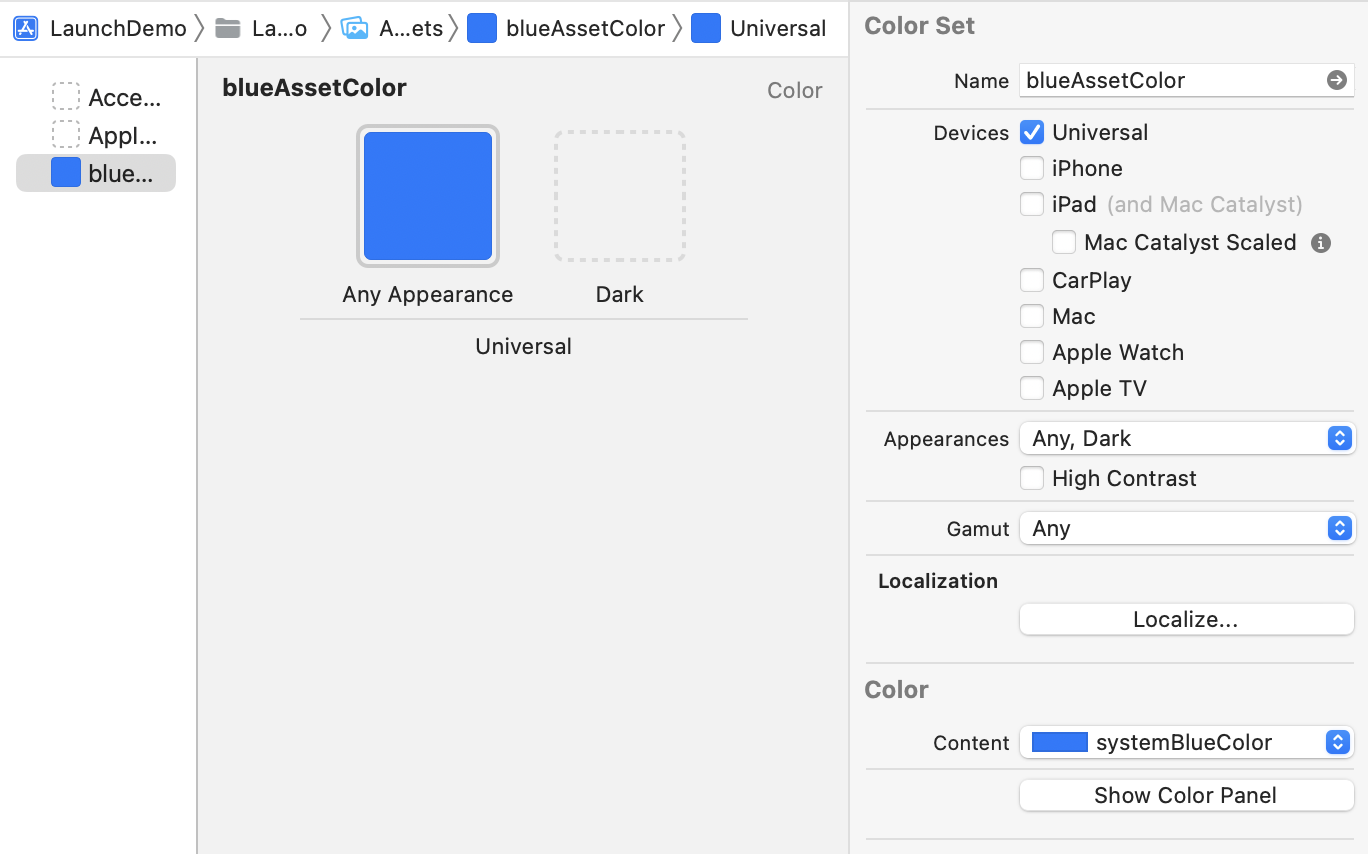
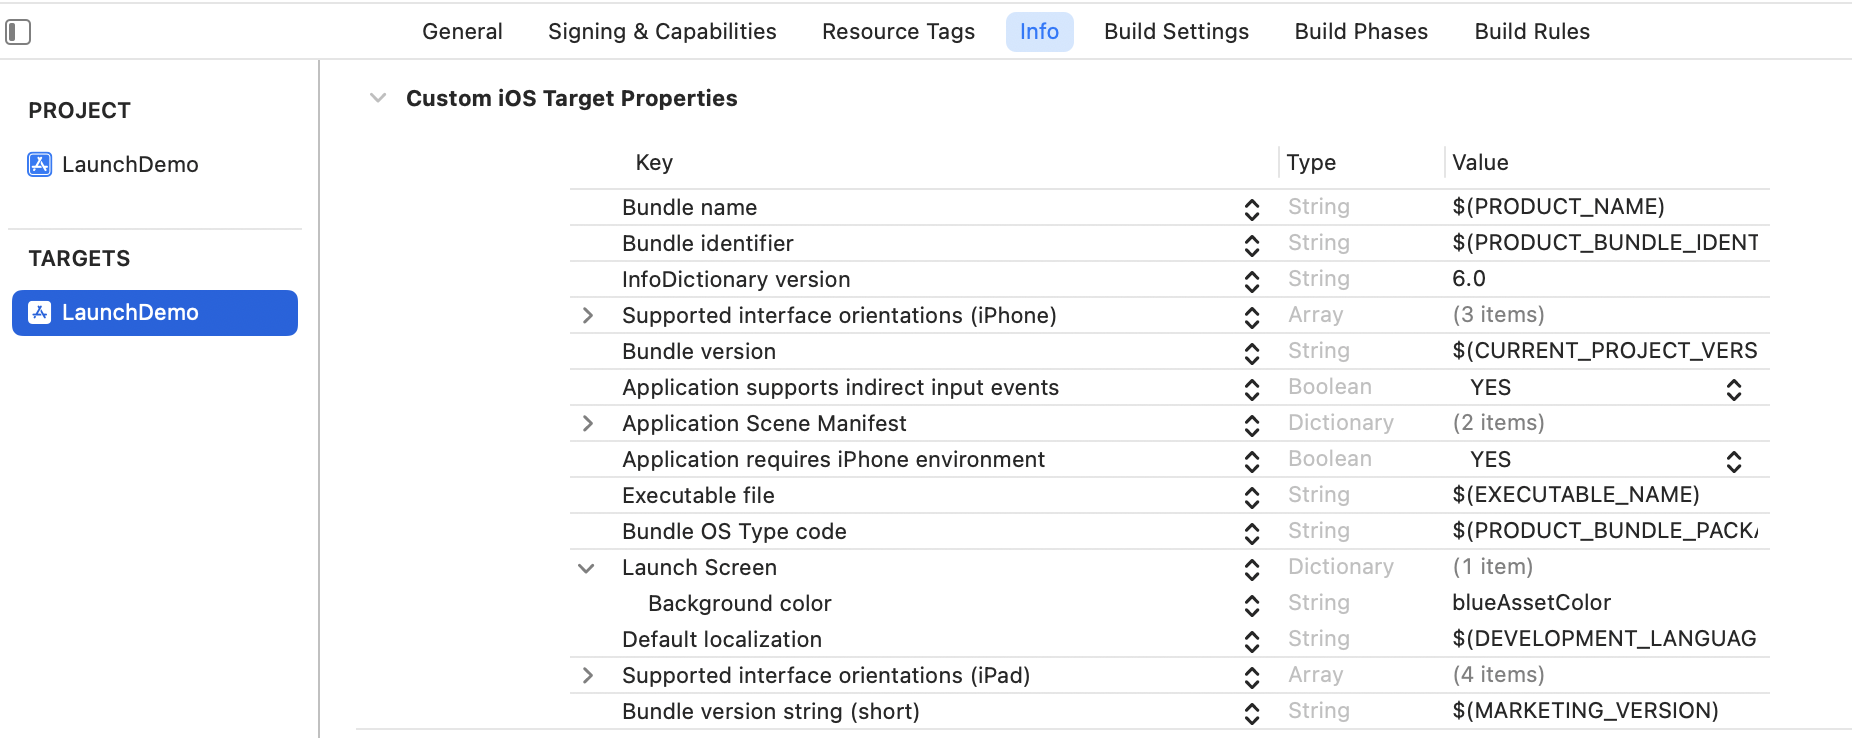
    The newer method of creating launch screens is to specify some values in your info.plist file and let the compiler build a launch screen for you. Unfortunately you can only pick a background color and image to be shown along with options to display navigation items such as a navigation bar or a tab bar. This method may work if you just want a splash screen shown before the real UI but for other usage it’s not great.

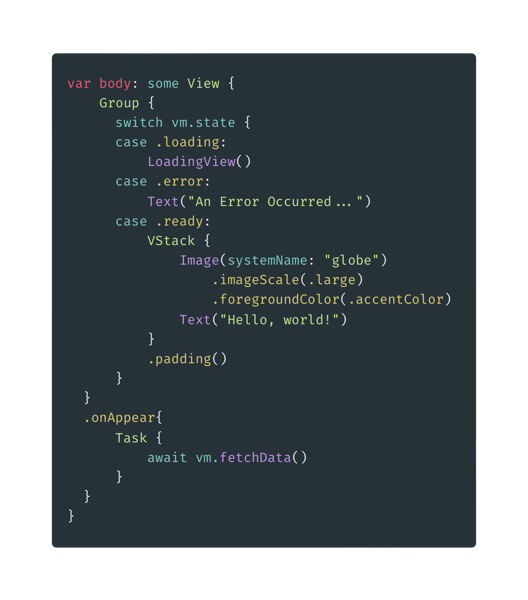
    My app starts by displaying a full view loading screen so using a splash screen that transitions to what amounts to another splash screen before the actual UI seemed like a bad idea.

    I started by trying to mimic the loading view in UIKit to appear that the loading view was displayed immediately upon launch but I quickly tired of setting constraints and trying for pixel perfection between UIKit and SwiftUI. I spent some time thinking it over and thought what if I didn’t use a launch screen at all? Up until this point in the development cycle this was how the app was working and it wasn’t awful but it also lacked a bit of the polish you like to see in a finished product.

    When my app launches the first thing it needs to do is query an API for data updates. I initially display a loading view to indicate to the user that something is happening before we can present any data. In my current app this loading screen is a full screen view and that works well with this solution I’m presenting here.

    I decided to make it appear as if the loading view was the launch screen and that loading view would fade in as the app launched. The launch screen is just a blank view with the background color set to match the color of my apps initial screen. Then my loading view is displayed with a fade in animation that presents a nice transition from the blank launch canvas to the actual UI. It’s fast enough in practice that it’s not noticeable what’s happening. The user just sees the UI fade in and the app is ready.

    Sample App

    I put together a sample app that shows this in more detail and here is some explanation of the steps taken.

    In the sample app, which is similar to my current project, there is a view model that fetches some data and reports its state. The state of the view model can be one of loading, ready or error depending on the result of the data fetch.

    There is a main view that switches its display based on the state of the view model. So on initial launch, while the view model state is loading" a LoadingView is shown, as shown below:

    Content view

    The loading view presented can be any SwiftUI view. The idea with this sample app is that the background color matches between the loading view and the launch screen setting. This requires creating a new color asset in Xcode for the color to be shared. This is necessary because in order to specify the Launch Screen Background Color in the Info.plist it must be a named asset. So in the Assets of the Xcode project select Editor -> Add New Asset -> Color Set (or select a Color Set from the + button in the lower left of the Asset panel. 

    Name the color as desired and configure it to your needs. In the sample project the color is named “blueAssetColor” and it’s just the standard predefined “systemBlue” You can not use the predefined color names in the info.plist.

    Screenshot 2023 05 03 at 18 24 21

    Next you need to tell Xcode to use this color as the background for your launch screen. Navigate to the info.plist by selecting the project in the Project Navigation, selecting the target for the app and the info pane in the editor. Find the item for Launch Screen and add an item within that group for Background Color entering the asset color you created earlier. In our sample project this value is “blueAssetColor”  There may be an item under Launch Screen when you first expand the item in the info editor labeled “UILaunchScreen” you can delete this entry.

    Screenshot 2023 05 03 at 18 26 17

    With these steps completed the your app should launch with a blank launch screen and the background color will be the one you have specified here.

    The loading view can be virtually any SwiftUI view as long as the background color matches the launch screen color. The trick is to have your UI elements fade in over time. The code below shows how to use an animation to fade in the UI over two seconds. The first animation in the code is just to rotate an image on the loading view to indicate the app is working. The fade in animation is setup on the onAppear block later in the code.

    Loading view 4

    The end result is a loading screen that look like the following: 

    Screenshot 2023 05 03 at 18 52 53

    All the elements in yellow will fade in over the blue background. The fish image will also rotate as it is faded into view. The loading view is just standard SwiftUI and could be any view you like. Once the view model reports it’s ready, the app will transition to the main UI view and the user can get to work.

    The full source for a sample project is available via GitLab This approach may or may not apply to your projects but it does show a different way to think about Launch Screens. If you have any comments or suggestions I can be found on Mastodon or via email

    → 12:09 PM, May 4
  • Snow Day Game Dev

    After clearing the heavy wet snow from the driveway this morning, I spent most of the day coding on a MUD. 

    This scratches the itch to make something game-like without getting bogged down with graphics. I can get right into the parts I enjoy creating.

    Its fun to take yet another stab at socket programming and message parsing. It’s also rewarding to get a world up and running relatively quickly where you control all the rules.

    I had some old code but, as is always the case, it was bad. I don’t know what that other me was thinking. I started from scratch this time. It’s written in Go since I’ve been working with that for the day job lately and Go works well with this sort of project. Sometimes you want to learn a new language or framework and sometimes you just want to make something with comfortable tools. Today was the later.

    In the past I’ve created these sorts of things in the traditional way with text files for data storage but for this project I added Postgres for my storage layer. It’s overkill but the whole project is overkill. No one is going to play this but it’s fun to hack on something that’s completely of my design.

    Here is the world in all it’s glory after a few hours:

    look

    Room 1 - (19c4361b-f382-43e7-b708-03b5d73b3454)

    The first room

    Exits: East

    Say Hello mud!

    You said 'Hello mud!'

    I even took the time to create admin tools to work with the database. So I can just run migrations from my admin tool or seed the database quickly.

    I worked on the code in Nova, the Mac editor from Panic and it’s very good. It is very Mac like and extensible. While it seems most people use it for web dev there are some decent plug-ins for Go. I can do most everything I do in VS Code in Nova except debugging. I did have to swap over to VS Code a few times since its so easy to debug there. 

    The best part of this project so far is getting into the flow. I find it less likely that I can get into that mental state when I’m working on a project consulting for others. It takes a lot to get up to speed and if I didn’t create the architecture or requirements I find it slows me down. When I do my own projects I am far, far more likely to just bang away and find 4 hours have passed. That’s the part of this work that is most enjoyable. When the code seemingly writes itself. If you were to stop and look over your own shoulder you would probably have no clue what is going on but the person in that trance like flow does know what’s going on and it works. 

    The only downside to that state of mind is being interrupted. Even a simple question that breaks the spell can be far more irritating than it really should be.

    This project amuses me and it’s in good enough shape to shelve it and come back when that inevitably happens. Of course by that time older me with think today’s me quite a silly person for some choices I made here but for now I’m content.


    → 7:44 PM, Dec 17
  • Roguelike Tutorial | Fat Old Yeti

    Playing around with this Roguelike Tutorial.

    tl;dr: it’s very good but I have some mental problems

    My OCD immediately kicked in when he added a framework to handle the game systems. I’m not opposed to using a framework but I was hoping to go over how to implement it yourself before taking that shortcut. Not a knock on the tutorial, which is very good, but more a statement about how my mind works and how I can never finish these sorts of projects.

    I’ve built these types of games myself from scratch before and I know how to create all the parts. Sometimes all it takes to scratch that “time to make a game” itch is do a few tutorials and fool around.

    Main reasons I never finish any of these projects are I overcomplicate it from the start and I always want to keep dependencies out of it. These two tend to go hand in hand.

    Sometimes the journey is the point and just reading, learning and messing with the code is the important thing anyway. At least I’ll tell myself that, again.


    → 2:32 PM, Dec 4
  • Several crashes of the Window Server on Mac OS Ventura when connected to an external display. Seems related to use of full screen windows. Seeing reports of this being fixed in the betas so let’s get that wrapped up so I don’t need to change my workflow

    → 12:32 PM, Nov 30
  • I’ve often said the best code is the code you delete. I think overly clever code is not ideal. So what are you presenting for the madmans code show & tell?

    → 3:39 PM, Nov 18
  • Micro.blog as front end to Mastodon

    Here is what I’ve figured out regarding Micro.blog and Mastodon. This was confusing to me so maybe this helps others.

    There are two ways to connect your Micro.blog account to Mastodon:

    Option 1 - If you don’t already have a Mastodon account:

    On Micro.blog, go to your account settings and find the option for a new ActivtyPub account. Follow the steps to hook it up and your micro.blog timeline will be sent to that newly created Mastodon account.

    Option 2 - You already have a Mastodon account:

    You want to cross post in this case. Go to your Micro.blog account settings and find the button to edit feeds & cross posting. Connect Mastodon (or twitter, etc) to your existing account. Once this is done your micro.blog posts will go to the account(s) you connected.

    I did both but what I really wanted was Option 2. I already have an account with a few followers and telling people to follow you across several accounts is not ideal.

    Micro.blog, once configured will allow you to follow your Mastodon friends right in your timeline. At least I’ve been able to add a few so far.

    The only hurdle I encountered with Option 2 was Mastodon timing out several times while trying to approve access from micro.blog. It did eventually work and hopefully this all gets better once the great exodus is over.

    Happy to be shown what I’m still doing wrong but this seems to work.

    → 3:35 PM, Nov 18
  • I may have cracked the code to get micro.blog working as the front end to my mastodon feed.

    → 2:46 PM, Nov 18
  • RSS
  • JSON Feed
  • Surprise me!